background image

-  20  -


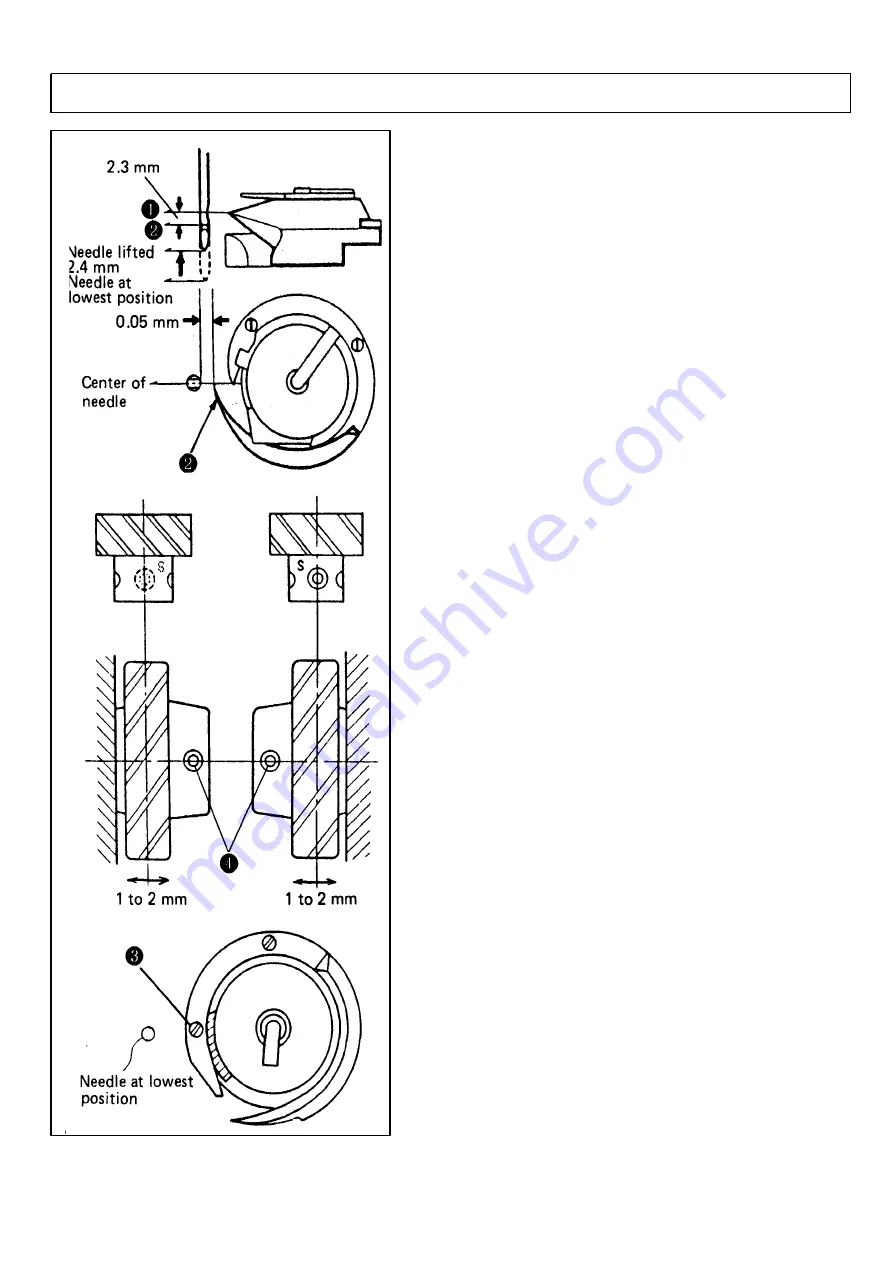
13.가마와  바늘의  타이밍  /  TIMING  ADJUS TM ENT  FOR  ROTATING  HOOK  AND  NEEDLE


☞ 

땀수조절  다이얼을  돌려  6애  맞춥니다.

☞ 

그림과  같이,  풀리를  돌려  바늘을  최하점에서  2.4mm

      상승시켰을  때의  가마와  바늘을  위치는  아래와

      같습니다.

      바늘구멍①의  상단은    가마끝②보다  아래에  위치

      가마끝은    바늘과  가마의  중심선과  일치

      가마끝과  바늘의  측면  틈은  :  0.05mm

☞ 

가마와  바늘의  위치를  수정할  때는  노루발과

      침판과  톱니를  떼어낸  상태에서  하는  것이

      좋습니다.

☞ 

Set  stitch  length  adjustin g  dial  "6".

  When  the  needle  is  lifted  2.4mm  from  its  lower

      most  position,  the  rotating  hook  an d  the  needle 

      should  be  located  at  the  following  location s;

      The  upper  edge  of  needle  eye①  should  be  below

      the  hook  point②.

      The  hook  poin t  should  be  located  at  the  center  of

      needle  axis.

      Gap  between  the  hook  poin t  and  the  side  face  of

      needle  should  be  0.05mm.

☞ 

Easy  adjustment  can  be  made  by  removing  the 

      presser  foot,  throat  plate,  and  feed  before

      adjustment.

  가마 끝② 의  위치   결정

☞ 

바늘이  최하점의  위치일때  오른쪽  기어(小)의

      S나사는  정면에,  외쪽  기어(小)의  S나사는  뒤쪽에

      가도록  큰  기어와  맞춥니다.

☞ 

가마축을  맞추고  S나사를  단단히  죄어줍니다.

☞ 

가마  위치의  기준은  바늘의  최하의  위치일때  가마

      나사③는  바늘의  거의  옆에  위치해  있습니다.

☞ 

바늘과  가마  위치의  미세조정은  큰  기어의 

      나사④를  풀고,  큰  기어를  축방향으로  1~2mm의

      범위에서  움직여서  조정합니다.

  Positionin g  th e  h ook  poin t②

  With  the  needle  at  lowermost  position,  mesh  the

      right  hand  driving  gear(small)  with  the  large

      gear  so  that  "S"  screw  is  located  at  front,  and

      mesh  the  left  hand  driving  gear(small)  so  that

      "S"  screw  is  located  at  rear.

☞ 

Tighten  "S"  screw  on to  the  set  contact  of  hook

      shaft.

☞ 

Guide  of  rotating  hook  position

      When  the  needle  is  at  its  lowermost  position,  th e

      screw③  in  rotating  hook  is  nearly  in  line  with

      the  needle.

  To  make  fine  adjustment  of  hook  an d  needle

      motion,  loosen  screw④  in   driving  gear(large)  and

      move  th e  driving  gear(large)  1~2mm  in  the  axial

      direction.

Summary of Contents for LT2-H650

Page 1: ...LT2 H650 LT2 H6500 UNISON LOCK STITCH SEWING MACHINE WITH THREAD TRIMMER OPERATION MANUAL PART BOOK...

Page 2: ...1...

Page 3: ...UNICORN sewing machine Before using your new machine please read there safety instructions together with the separate instruction manual for the machine With industrial sewing machines it is normal t...

Page 4: ...5 off A S 44 2 40 25 OFF A S A S 3...

Page 5: ...cur install the belt covers to the machine head and motor Be sure to wear protective goggles and gloves when handling the lubricating oil and grease so that they do not get into your eyes or onto your...

Page 6: ...edle when not using the machine and when leaving the machine unattended For machines with automatic presser lifter do not touch the solenoid section because if becomes hot during operation and may cau...

Page 7: ...ician to carry out any maintenance and inspection of the electrical system Turn off the power switch and disconnect the power cord from the wall outlet at the following times otherwise the machine may...

Page 8: ...UNICORN A S 1 2 3 7 3 2 1...

Page 9: ...HEAVY MAX SEWING SPEED 2000 SPM MAX STITCH LENGTH 0 9mm NEEDLE BAR STROKE 36mm FEED DOG HEIGHT 1 2mm PRESSER FOOT HEIGHT USING HAND 8mm USING KNEE 16mm NEEDLE TYPE DP 17 20 23 STITCH ADJUSTMENT DIAL L...

Page 10: ...he installation should be carried out by two or more people Do not connect the power cord until installation is complete otherwise the machine will operate if the treadle is pressed by mistake which c...

Page 11: ...Set the rubber hinges at the table Set the cushions at the four corners of the oil pan Set the oil pan at the table exactly 3 V INSTALLING THE V BELT 15 20 1 THE ROTATIONAL DIRECTION OF THE MACHINE IS...

Page 12: ...INSTALLING THE BOBBIN WINDER ATTACH THE BOBBIN WINDER ON THE TABLE WITH TWO SCREWS 4 INSTALLING SPOOL STAND ASSEMBLY ATTACH THE THREAD SPOOL STAND ASSEMBLY AT THE RIGHT REAR CORNER OF THE TABLE WITH T...

Page 13: ...plenish the oil supply up to the position While operating the machine it is necessary to check the condition of oiling through the oil check window Adjustment of the hook oil lubrication is made by tu...

Page 14: ...downward Wind the thread around the bobbin a few times in the direction of the arrow and then operate the machine If the thread cannot be wound evenly loosen the thread guide screw and move the thread...

Page 15: ...ad as shown in FIG Pull out the end of the thread about 50 through the needle eye 4 HOW TO ROUTE THE LOWER THREAD 1 2 3 Pass the end of the thread through the bobbin case slot IN FIG 1 Pass the thread...

Page 16: ...the counterclockwise by the other hand Holding the lower thread from the underneath of the presser foot and place the lower thread in the back side of needle plate Stop the machine and push the revers...

Page 17: ...on the reverse lever adjust the eccentric pin to the desired direction Clockwise Increase the stitch length in forward decrease the stitch length in back sewing Counterclockwise Decrease the stitch le...

Page 18: ...the upper thread to obtain a good even stitch 9 HOW TO ADJUST THE THREAD TAKE UP SPRING 7 10 20 40 The standard operating range of the thread take up spring is 7 10 The operating range of the thread t...

Page 19: ...by turning the lower thread tension adjusting screw Clockwise The tension is strengthen Counterclockwise The tension is weaken 11 HOW TO ADJUST THE PRESSER FOOT PRESSURE The presser foot pressure can...

Page 20: ...of the thread through a groove of inside the rotary hook 5 Pass the thread under the tension spring 6 Pass the thread through the clearance between the rotary hook and the bobbin case opener 7 Pull o...

Page 21: ...made by removing the presser foot throat plate and feed before adjustment S S S 1 2mm Positioning the hook point With the needle at lowermost position mesh the right hand driving gear small with the...

Page 22: ...eoretically equivalent at the point where the reference line for feed rock shaft crank is aligned with the center of special bolt After adjustment tighten the special bolt 1 6mm 2mm 1 Operating Height...

Page 23: ...esser bar lifter Loosen the screw in the upper feed lifting rock shaft crank Moving the crank to the left in creases the vertical stroke of presser foot and decreases that of working foot Reversely mo...

Page 24: ...orms to the direction line 4 Raise the sewing machine and put in the needle 2 ADJUSTING THE CLEARANCE BETWEEN THE NEEDLE AND ROTARY HOOK 0 05 0 2 Loosen the screws and and move the rotary hook saddle...

Page 25: ...1 1 6mm Rotary hook timing In case of 7 1 Set the stitch length adjusting dial to the position 5 2 Loosen the screws 3EA and turn the rotary hook so that its tip meets the center of the needle when th...

Page 26: ...in case opener have fully retracted in the direction on the arrow by loosening the screw and moving the bobbin case opener to the right or left 6 ADJUSTING THE FEED DOG HEIGHT l 0 Rotate the pulley un...

Page 27: ...e needle to its lowest position 6 Allow 13 5mm gap between the pressure bar and the pressure bar Then finger tighten the feed shaft crank screws and 7 Check to see if the right feed shaft crank is con...

Page 28: ...p is about 0 0 1 between the driving knife and the needle fix the screws A little loosen the bolt screw and the driving knife stopping position 4 If thread is not trim clearly loosen the screw w ith w...

Page 29: ...driving knife lever absolutely sticks to the two stopper pin fixed at the rotary hook fix the connecting board moved along the arrow as the two screw 3 Fix the stud screw at the ball joint bearing 4...

Page 30: ...ry hook knife tip FIG2 Put the roller in the cam after pushing and turn the thread trimmer cam to the counterclockwise Fix the screw when the bearing stop at the cam point the tim the driving knife mo...

Page 31: ...n raise the needle move the screw to the counterclockwise When take down the needle move the screw to the clockwise Adjusting the needle down When raise the needle move the screw to the counterclockwi...

Page 32: ...31 p28 p27 p27 p30 p29 p29 p14 p14 p14 1 p18 p17 p17...

Page 33: ...ding parts p29 p14 After trimming needle thread is too long Pretension is insufficient Needle thread tension releasing timing is too advanced Increase spring pressure p14 After trimming needle thread...

Page 34: ...33...

Reviews: