background image

ROSSO / ROSSO INSTANT

Page 17

Version 3.3 / November  2016

ТМ

  3.4.3 Open door circuit-breaker

  A special circuit-breaker turns OFF all power to the electrical and electronic system, when the door 

is opened, to ensure that all the operations related to the recharging (loading) and cleaning would be 

carried-out under completely safe conditions. All other operations behind the door, which need to be per-

formed with the running power, must be performed EXCLUSIVELY by qualified personnel, who have per

-

mission to perform such works and who know all the risks involved in the performance of such works. 

Figure 20а

Figure 20b

Figure 20c

  To turn ON the power, with the door 

open, it is necessary to insert the spe-

cial key (see figures 20 a, b, c) into the 

breaker and turn it through 90

0

 until it is 

fixed. Please make sure to remove this 

key before closing the door. 

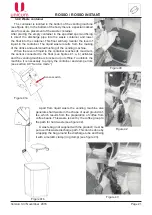
  3.4.4 Containers for ingredients and coffee beans


The drink vending machine has two types of containers: containers for ingredients and sugar (see figure 

22) and container for coffee beans (for the ROSSO model) (see figure 21). 

Figure 21

  Filling the coffee beans container


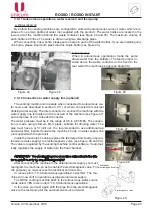
To fill the container, please remove the top lid of the container (see figure 23) and fill it with coffee beans 

(see figure 24). 


The coffee bean container has a fixing latch (see figures 25, 26). To remove the container, for example 

to access the float chamber or water selector, please close the coffee feed holes with the latch and remove 

the container. After reinstalling the container make sure to fully release the latch to free the passage of 

coffee beans. 

Figure 22

Summary of Contents for ROSSO

Page 1: ...DRINKS VENDING MACHINE models ROSSO ROSSO INSTANT USER MANUAL Version 3 3 November 2016 ТМ ...

Page 2: ...nges Version Date Brief description Pages 3 0 05 2015 Document creation Update of maintenance menu to version 0 49 All 3 1 11 2015 Changing items in the service menu Operator 76 3 2 10 2016 Replacing door lock machine model 35 3 3 11 2016 Adding a section 1 4 7 ...

Page 3: ...9155 Saint Petersburg Uralskaya str 13 let A Tel 7 812 449 09 91 Fax 7 812 350 7089 http www unicum ru en Original language Russian Directive Description 2004 108 CE Electromagnetic compatibility directive 2006 95 CE Low voltage directive 2006 42 CE Machinery Directive 1999 5 CE Artical No 3 1 b R TTE Directive 2011 65 CE Directive of the European parliament and of the Council of 8 june 2011 on th...

Page 4: ... 3 4 7 Cup holder 20 3 4 8 Drink dispensing slot 20 3 4 9 Waste container 21 3 4 10 The hydraulic circuit for ROSSO 22 3 4 11 Autonomous operations water reservoir and feed pump 23 3 4 12 Connection to water supply line optional 23 3 4 13 Flot chamber pump and boiler 24 3 4 14 The coffee group 26 3 4 14 1 Coffee grinder and dosing apparatus for ROSSO 26 3 4 14 2 Espresso group for ROSSO 28 3 4 15 ...

Page 5: ...coin slot 45 4 0 SERVICE MODE 46 4 1 Technician s menu Service engineer s menu 47 4 1 1 Menu item 1 1 SYSTEM 47 4 1 2 Menu item 1 2 PAYMENT SYSTEMS 52 4 1 3 Menu item 1 3 TIME INTERVALS 57 4 1 4 Menu item 1 4 CASH REGISTER 58 4 1 5 Menu item 1 5 MODEM 59 4 1 6 Menu item 1 6 PRICES 61 4 1 7 Menu item 1 7 SNACK 1 64 4 1 8 Menu item 1 9 HOT 1 67 4 2 Operator s menu 76 4 2 1 Menu item 2 1 STATUS 76 4 ...

Page 6: ...yer is responsible to make sure that the serving personnel had undergone needed training and was informed properly and that the instructions of the technical documents were fully ob served The Machine manufacturer carries no responsibility for damage or loss incurred under the following circumstances In case of unsanctioned modernization In case of improper installation In case of improper connect...

Page 7: ...user docu mentation which is a part of the Machine s package The developer of the Machine and regulatory software have the right to make necessary changes to the Machine s structure software s flow and in the documentation for its use without notice to the user 1 4 Manufacturer s warranty The manufacturer s warranty during the warranty period covers all vending machine units and assem blies except...

Page 8: ... desired vertical inclination These pegs are included in the machine s base configuration The vending machines should be connected only to protected power supply with earthing The power plug of the machine should be approachable accessible after the machine has been installed If the power cable would be damaged it should immediately be replaced It is strictly PROHIBITED to use the vending machine ...

Page 9: ... with fabric or any other such material Each vending machine is identified by the serial number inscribed on the specification plate which is fitted on the rear wall of the machine The specification plates carries all the technical details of the machine ATTENTION The vending machine dispenses hot drinks The front flap of the dispensing slot should be closed during the preparation of the drinks to...

Page 10: ... 670 mm Weight maximum 130 kg 130 kg Voltage 220 230 V 220 230 V Power frequency 50 Hz 50 Hz Power consumption max 1800 W 1800 W Consumption of electricity per day when surrounding air temperature is 220 C and making 40 drinks each 100ml maximum permissible 4 kWh 4 kWh External water supply Water pressure minimum 0 5 bar 0 05 MPa 0 5 bar 0 05 MPa Water pressure maximum 8 5 bar 0 85 MPa 8 5 bar 0 8...

Page 11: ...d very carefully to avoid damaging the vending machine All the operations related to lifting and displacement of the vending machine should be executed using a fork lift The forks of the lift should be slipped under the vending machine at the spots indicated on the machine s packing The following should be observed during the vending machine s transportation The vending machine should be transport...

Page 12: ...vertical tilt of more than 20 Please remove the packing and take out the master key from the change dispensing slot Using this key program the machine s lock Then using the functional key open the vending machine s door the key is stuck inside the change dispensing slot using scotch tape see section 3 4 19 and figures 1 2 3 Figure 1 Figure 2 Figure 3 The vending machine s inner components are all ...

Page 13: ...amp for waste coffee collector 7 Electric circuit breaker key The vending machine is fixed to the carrier tray using M10 screws Remove the screws and install the adjustable pegs You can adjust the vertical tilt of the machine using these pegs After adjustment Please cover the pegs using decorative casing as shown in figures 9 10 11 Figure 8 Figure 9 Figure 10 Figure 11 The vending machine must be ...

Page 14: ...orative plastic components The door carries the following main components see figure 12 1 Upper and lower light boxes with LED lights The upper light box can optionally be replaced with a video monitor 2 Drinks selection keypad which can also hold labels with product name 3 The protective plastic flap for the drinks dispensing slot 4 The MIZMATIC programmable lock 5 Bank note acceptor BNA 6 4 row ...

Page 15: ...ffee bean container ROSSO 4 Container for loose ingredients 5 Coffee grinder ROSSO 6 Coffee dosing apparatus ROSSO 7 Mixers 8 Espresso group ROSSO 9 Pipes to supply dissolved ingredients into the cup 10 Boiler cover 11 Coffee waste dispensing tube ROSSO 12 Space for the installation of can bottles of water 13 Water supply pump for autonomous functioning 14 Fan for drying mixer nozzles 15 Waste con...

Page 16: ... 19 1 Door to the electronic circuitry section 2 Upper light box cover 3 The keyboard short cut 4 Drinks selection keypad label placement slot back side 5 Electronic circuitry section door latch 6 Drinks dispensing slot back side 7 Lock mechanism 8 Bank note acceptor BNA 9 Main Board controller 10 Modem optional 11 Coin slot with change dispensing function 12 Coin box cash box Figure 18 1 2 3 The ...

Page 17: ...ert the spe cial key see figures 20 a b c into the breaker and turn it through 900 until it is fixed Please make sure to remove this key before closing the door 3 4 4 Containers for ingredients and coffee beans The drink vending machine has two types of containers containers for ingredients and sugar see figure 22 and container for coffee beans for the ROSSO model see figure 21 Figure 21 Filling t...

Page 18: ...e quantity means the time of rotation of motor which is installed behind the contain er in tenths 1 10 of seconds If needed for convenience in refilling the containers the containers can be removed Turn the spout upwards and slightly raise the container with the help of the spout to ensure that the container s bottom is free of the holder Then pull the container out The sugar container is located ...

Page 19: ...e dispensing mechanism It is strictly prohibited to rotate the tubes manually be cause this would damage the tubes rotation mecha nism 3 4 6 Spoon dispenser see figure 29 The spoons are dispensed in accordance with the configurations of the service menu You can turn OFF the dispensing of spoons or only turn it ON for drinks with added sugar Figure 32 Figure 33 Figure 34 The dispenser can be refill...

Page 20: ... 36 The dispensing area is equipped with a removable tray with a grill which is located right under the cup holder The tray serves as a store for spilt over drinks and liquids To clean or change the plastic components it is necessary to remove the tray and the grill to wipe out or collect liquid waste see figures 37 38 39 Figure 37 Figure 38 Figure 39 Figure 35 The cup with ready drink is brought ...

Page 21: ...evel of liquid in the container reaches its maximum the sensor connected to the float see figures 41 a b activates and the vending machine is blocked or put offline To unblock the machine it is necessary to empty the container and dump errors see section 4 0 Service mode Figure 40 Figure 42 Figure 43 Figure 41b Sensor switch Figure 41а Apart from liquid waste the vending machine also generates har...

Page 22: ...he boiler 7 where it is heated to the set temperature level and accord ing to the selected drink option it then runs into one of the two boiler channels either through the selector 9 to the mixer or to the espresso group 8 where the water is mixed with the required ingredient and the drink is dispensed to the customer through the outlet nozzles 11 The excess of water and drink are then discharged ...

Page 23: ...ust access the technical service menu In menu option 1 9 9 Autonomous operations select NO The ma chine will now shift to operations using external water supply To shift the vending machine back to the autonomous water source mode select YES in menu item 1 9 9 Autonomous operations In this case you must again shift the pipe from the electromagnetic valve to the feed pump for the autonomous source ...

Page 24: ...dually falls inside the float chamber until reaching the set level where the sensor reads as if the chamber is empty At this moment the water from external source the valve is opened or in ternal source the autonomous mode pump turns ON starts filling the float chamber until the water level sensor determines that the chamber was full This also forms a permanent water lock In case of shut down of e...

Page 25: ...he ROSSO model the boiler is located under the protective cover behind the espresso group see figure 52 position 1 and figure 54 To access the boiler please remove the espresso group see section 3 4 15 In ROSSO INSTANT model we only use one electro magnetic valve of the boiler the other one is plugged The surface of the boiler can be very hot Before starting any routine service or cleaning it is n...

Page 26: ...grinder From here the coffee is fed into the espresso group The quality of grinding of coffee depends on the rotation of the screw located on the coffee grinder see figures 55 and 56 posi tion1 Turn the screw clockwise grind more smaller particles or counter clockwise to grind less larger particles see figure 55 You can set the rotation of the coffee grinder to achieve the re quired level of grind...

Page 27: ... loosen the upper disk by turning it counter clockwise If the particle size is large the coffee will be less concentrated less saturated The time of working of coffee grinder will be around 3 4 seconds The thickness of output jet will be 3 4mm in this case you can also cause the leaking of the coffee group because very large particles of coffee damage the gasket of the piston In such cases you sho...

Page 28: ...resso group is in open position 2 The ground coffee enters the inlet 2 after which the reducer motor closes the espresso group press ing the coffee powder 3 Hot water from the boiler is passed through the pressed coffee 4 After passing the set amount of water the reducer motor opens up the espresso group emptying the coffee waste through the waste path 4 into the waste container 5 The hot water wh...

Page 29: ...sconnect the hot water supply pipe unclamping the fixator see figure 59 2 Disconnect the ready drink dispensing pipe together with the nozzle from the holder lifting the spring used to fix the pipe see figure 60 3 Turn the espresso group fixation screw counter clockwise 1 see figure 61 4 Lift the right lower end of the espresso group 2 then pull it out 3 see figure 61 5 Remove the espresso group s...

Page 30: ...st increase the space by installing retaining ring into position B see figure below The adjustment is made in the following order 1 Remove group of espresso see above 2 Retighten piston in the direction of arrow 1 as shown in the figure see below 3 Remove the retaining ring 2 from the current position factory setting A 4 Install the snap ring in position A to work with a small dose of coffee or to...

Page 31: ... 16 Mixers for instant ingredients The instant drinks which are made of instant ingredients are prepared in the mixers see figure 65 The ROSSO and ROSSO INSTANT vending machines have 4 mixers each Each mixer is installed and connected in front of the container with the relevant ingredient In the ROS SO INSTANT vending machines one mixer is used for two ingredient containers chocolate and powdered ...

Page 32: ...funnel fixator downwards see figure 67 3 Carefully pull out the funnel see figure 68 and 69 For installation perform the same steps in reverse order To remove the mixer s motor loosen the screw which holds the mixer to the bracket see figure 69 and remove the motor After that disconnect the power connector Figure 68 Figure 69 Figure 66 Figure 67 1 2 3 4 5 6 When needed you should remove the funnel...

Page 33: ...er configuration file loading and software updates This board holds all the configurations except for recipes Figure 70 Main board The vending machine s main board offers two operational modes Selling mode main mode Service mode for specialists Рисунок 7 1 2 3 4 5 6 7 8 9 10 11 1 Operator s menu access button used as reserve button for use when regular service button does not work see 3 4 18 2 2 T...

Page 34: ...s can be installed on the inner side of the door see figure 73 While operating in service mode when you enter the technician s menu or operator s menu this keypad is used to navigate select and change service menu parameters Figure 73 In the main mode which is the selling mode the vending machine serves the customers and monitors all the components which constitute the machine Right after turning ...

Page 35: ... machine door Fig 74 The lock can be located in two positions operating position closed position see figure 74 position for the programming the open position see figure 74 The machine is supplied with pre programmed lock To open close the door machine insert the operat ing SILVER see figure 75 key lock and turn it in the lock 90 degrees to the right to marry see figure 74 WARNING Programming lock ...

Page 36: ... at least one second Then turn 90 degrees in the direction of the control key risk see figure 74 While holding shutting off device of the door in order to avoid a spontaneous turn of the lock remove the master key from the lock and insert them into the new master key which you want to program the lock If you want to program the lock on the same master key don t remove the master key from the lock ...

Page 37: ...ANT s main board setting prices working temperatures and other SLAVE machine settings Connection Connect the SLAVE machine in accordance with the Connecting FOODBOX SLAVE FOODBOX SLAVE LONG vending machines to ROSSO ROSSO INSTANT instructions After connecting the SLAVE machine configure the ROSSO ROSSO INSTANT main board For the purpose perform the following actions 1 Enter Service engineer s Tech...

Page 38: ... 76 and 77 1 Press and move the fixator 2 Move the stacker vertically upwards 3 Open the stacker s lid cover 4 Remove the banknotes 5 You can put back the stacker in the reverse sequence 1 2 Figure 76 3 4 Figure 77 b Banknotes stuck in the stacker 1 Remove the stacker see above clause a 2 Remove the stuck banknote see figure 78 Figure 78 2 c Banknotes stuck in the intake slot 1 Press the handle wh...

Page 39: ...t number of loaded remain ing coins and the amount displayed on the vending machine s screen Figure 80 position 7 Description of coin slot Currenza C2 Blue Switch to menu option Configuration and Servicing Return to normal mode of operations Removing coins from tube A Select Audit menu option from the main menu Navigating through the menu options Increasing parameter value Discharging coins from t...

Page 40: ...nses sugar according to the machine s configu rations and customer s choice The spoon is dispensed simultaneously with the sugar You can set the conditions for dispensing sugar and spoon in the machine s service menu 3 5 3 Preparation of drinks The swinging mechanism shifts the cup deep inside the vending machine right under the drink dispens ing nozzle This movement and placement makes sure that ...

Page 41: ...wards the espresso group the internal pump turns ON and hot water from the boiler reaches the espresso group The water flows through the pressed coffee tab and flows out into the cup After the set amount of water has flown through the espresso group the flow stops and the used coffee is disposed of into the waste container 3 5 4 Dispensing the drink After the drink is ready the swinging mechanism ...

Page 42: ... dispensing instant drinks cleaning and disinfection Pipes and nozzles used for dispensing drinks cleaning and disinfection Discharging chute for sugar cleaning and disinfection Dispensing area plastic parts tray with grill cleaning and disinfection Cup holder cleaning and disinfection Discharge heads of instant ingredient containers cleaning and disinfection Outer parts of espresso group cleaning...

Page 43: ...to the flush bucket Make sure that all the water from the pipe is discharged NOTE when using internal water supply from cans bottles it is also necessary to flush the autono mous function pump For the purpose following the cooling process and removal of supply pipe from the pump it is necessary to manually pull down the float from the float chamber until the pump starts and hold the float for 5 10...

Page 44: ...the OK button 6 Weigh the obtained ingredient 3 6 5 Cleaning the BNA You must clean the BNA at least once a month or as seems suitable Following is the list of instructions that you must follow while executing preventive cleaning of the BNA 1 Turn OFF the vending machine 2 To access the BNA open the door to the section with electronic circuitry see figure 18 position 1 and dismantle the bracket fr...

Page 45: ... INSTANT Page 45 Version 3 3 November 2016 ТМ It is strictly prohibited to use spirit acetone and any other solvents and corrosive liquids for cleaning Figure 83 The inside of the BNA Stacker Optic part Figure 84 ...

Page 46: ... preventive servicing of the coin slot 1 Turn OFF the vending machine 2 Unblock the door of the user interface the blue latch in the right bottom corner of the display and open it as shown in figures 88 a and b 3 Keep the door open 4 Remove all contaminants 5 Remove dust with a brush or compressed air 6 Close the user interface s latch 7 Press the refund handle figure 80 position 3 and open the va...

Page 47: ...ator s menu press button 1 from the left hand side of the Operator on the quick access keypad To find the keypad see section 3 4 18 2 When inside the required menu use the product selection buttons see figure 86 to navigate through the menu and to edit parameter values Navigating through the technician s operator s menu see figure 86 Button 1 One position up in the menu selecting the pre vious set...

Page 48: ...ry 1 1 3 Time Date Setting the internal clock this menu item is hidden if franchising is activated see sub section 1 1 7 1 1 3 1 Set clock Setting time date for the internal clock 1 1 3 2 Daylight saving Summer Winter time shift parameters No daylight Western Europe Central Europe Eastern Europe CIS C Europe Russia 1 1 3 3 Date format Date formats YYYY MM DD Year Month Day DD MM YYYY Day Month Yea...

Page 49: ...ion is dis played Number entry 0 30 seconds 1 1 12 Snack number The number of connected SLAVE machines 0 2 1 1 13 Hot number The number of used machines for drinks coffee pots 1 or 2 1 1 14 Reset Nullification of all statistical data 1 1 14 1 Reset interim Data Reset temporary audit statistics Yes No 1 1 14 2 Re configure Reset to factory defaults Yes No 1 1 14 3 Re lnitialize Password required af...

Page 50: ...n the LCD Line entry 1 1 18 LAN Internet access configuration No Yes to sub menu 1 1 18 1 Local MAC Allow restrict the use of MAC address No Yes to sub menu 1 1 18 1 1 Local MAC Setting MAC address The MAC address is set using the menu It can comprise of any values with only two limitations 1 The first digit must be less than 8 best practice is to set it to 0 If the first character will be 8 F the...

Page 51: ... coming online until it gets a response from the Gateway Therefore even if you don t intend to allow access to the out side world it is recommended that you set this address point ing it to some computer which is always available in the LAN Without this IP address the Machine will keep on dispatching waste packets every 10 seconds 1 1 18 5 Remote IP Here we set the Server s IP address which is use...

Page 52: ...hen Automatic collection starts on Tuesday 00 00 00 hh mm ss 1 1 21 3 Wednesday Execution of Automatic collection on Wednesday No Yes to sub menu 1 1 21 3 1 Start time Time when Automatic collection starts on Wednesday 00 00 00 hh mm ss 1 1 21 4 Thursday Execution of Automatic collection on Thursday No Yes to sub menu 1 1 21 4 1 Start time Time when Automatic collection starts on Thursday 00 00 00...

Page 53: ... Executive PH 1 2 6 Coin acceptor Configuring the coin slot without the option of dispensing change if set For the normal functioning of the MD coin slot this must be set to NO No Yes to sub menu 1 2 6 1 Type Set the type of coin slot Parallel Binary 1 2 6 2 Interface Setting coin slot s interface Italian German 1 2 6 3 Inhibit Restriction Standart Reverse 1 2 6 4 Coin Type Here we set the coin de...

Page 54: ...Machine automatically dispenses change after dis pensing the product YES no automatic change dispensing To finish the trans action you must press the CHANGE button Yes No 1 2 7 10 Immediate change Enables the dispensing of change during the execution of sale This shortens the time of service If you want to disable the dispensing of change in case of mal function this must be set to NO Yes No 1 2 7...

Page 55: ...t 1 2 8 1 Max credit Maximum amount of acceptable deposit Enter amount 1 2 8 2 Max change Maximum amount of change that a customer can get for each transaction Enter amount 1 2 8 3 Coin all enabled YES accept coins of all denominations If restricted you can set criteria for acceptable coins 16 coins according to denominations No Yes to sub menu 1 2 8 3 1 Coin Type Coin selection 0 15 and entering ...

Page 56: ... Yes No 1 2 9 2 Max Card rech Maximum amount of recharge of balance for non cash pay ment cards Limit of total credit for the card which can be reached after recharge For expel if it says 100 euro and the card still has 80 euro in bal ance the card cannot be recharged for more than 20 euro The amount in this section must be no more than the amount in clause 1 2 9 3 Enter amount 1 2 9 3 Max Card Va...

Page 57: ...nal and the Ma chine This is to be entered only if the number was not upgraded in the SBERBANK terminal before its installation in the Machine Enter 8 digits 1 2 10 3 2 Merchant number for SBERBANK Enter merchant number for the SBERBANK terminal No Yes to sub menu 1 2 10 3 2 1 Merchant number for SBERBANK Enter the SBERBANK terminal s merchant number for correct exchange of information between the...

Page 58: ...after the customer inserts his card into the terminal Enter text 1 2 10 3 8 Check summary for SBERBANK Summary collation by the SBERBANK terminal Usually done at least once a day automatically This menu item performs this function manually Manual summary collation must be performed only if needed under the terms dictated by SBERBANK No Yes to sub menu 1 2 10 4 Price list number Selection of price ...

Page 59: ...revious interval or at 00 00 00 Sub menu Description Value 1 3 Time zones Configuration of time intervals see above 1 3 1 Time zone 1 Configuration of time for interval 1 Enter time 1 3 2 Time zone 2 Configuration of time for interval 2 Enter time 1 3 3 Time zone 3 Configuration of time for interval 3 Enter time 1 3 4 Time zone 4 Configuration of time for interval 4 Enter time 1 3 5 Time zone 5 Co...

Page 60: ...r rate for exchange with the cash register АТОL 1200 2400 4800 9600 14400 38400 57600 115200 DATECS 9600 19200 57600 115200 1 4 3 Printer access code for АТОL Enter code for access to the cash register s special functions Enter 4 digits 1 4 4 Cashier password Enter password to access the main operational mode of the cash register Enter 8 digits 1 4 5 Admin password Enter password for additional op...

Page 61: ... connect to server 1 If the server does not have reserve line the second address must be the same as the first one When making first manual connection to the server this param eter is set automatically by the server Enter IP address 1 5 4 SIM cadr PIN code Enter SIM s PIN code This parameter does not change SIM s PIN code If the SIM s PIN code is activated you must enter the PIN code here which co...

Page 62: ... 5 10 Modem IMEI This menu item is read only Shows IMEI Unique identifier of the modem connected to the Ma chine With IMEI you can identify the Machine from the server side Display of the modem s serial number or er ror message 1 5 11 Modem SW version This menu item is read only If the modem is ON it displays the modem s type and it s software version Displays modem s version or error message 1 5 ...

Page 63: ...lection keyboard Enter text 1 6 1 2 Cash Price Setting price for cash sales 1 6 1 2 1 Price Drink price Enter amount 1 6 1 2 2 Discount Discount on drink price in percentage points When this value is set then the value in s c 1 6 1 2 3 is over ridden 0 100 1 6 1 2 3 Surcharge Retail margin in percentage points When this value is set the value in s c 1 6 1 2 2 is overridden 0 100 1 6 1 2 4 Time zon...

Page 64: ...me product article The products from different cells will be sold turn by turn even ly The products out of the cells with different priority levels will be sold in the order of least priority cells first lowest number goes first For example if for one of the cells the priority level is set to 1 and for the other it is 2 then the cell with priority level 1 will be sold out first Enter a number 0 25...

Page 65: ...e of the third product which is sold as part of the combinational sale Snack 1 Snack 2 Hot 1 Hot 2 No 1 6 6 7 Product 3 number Configuration of the button number which holds the third prod uct which is sold as part of combinational sale Configuration of the cell number for SLAVE machine This menu item is not shown if s c 1 6 6 6 NO 1 15 drinks 10 8B snack 1 6 6 8 Product 4 type Configuration of th...

Page 66: ...artment Enter temperature 10 60 1 7 3 Temperature max Set maximum temperature for the lower part of the dispensing compartment Enter temperature 10 60 1 7 4 Evaporator min temp Set minimum temperature for the evaporator in the refrigera tion unit Enter temperature 10 60 1 7 5 Evaporator max temp Set maximum temperature for the evaporator in the refrigera tion unit Enter temperature 10 60 1 7 6 Con...

Page 67: ...time out not used This sub menu item is displayed on the LCD but is not used inactive 1 7 12 Optical sensor Configures optical sensors used to record the dispensing of products No Yes to sub menu 1 7 12 1 Max failure Set the number of failures in attempting to dispense the prod uct from all cells in the Machine upon reaching this number the Machine reacts as per the settings in s c 1 7 12 1 1 Ente...

Page 68: ... electromagnetic lock YES s c 1 7 14 then this parameter determines the duration of time during which the given compartment would be open for product retrieval Enter number 0 255 1 7 16 Wide extension YES for wide Machines of type LONG NO for all other models Yes No 1 7 17 Lift not used This menu item is displayed but not active The configurations must be set to NO No 1 7 18 Retry blocked motor YE...

Page 69: ...r algorithm of s c 1 9 1 3 will not exceed Enter number 0 10 1 9 1 5 Pre heating Flow of water through the coffee group to preheat the coffee making chamber before making coffee 1 9 1 5 1 Delay Time interval If the time since the making of the previous cup of coffee exceeds the set time the hot water is flushed to pre heat the machine before making the next portion Enter number 0 240 1 9 1 5 2 Qua...

Page 70: ...nfigure the dispensing of spoons Single selection dispensing parameters are set sepa rately for each drink Sugar dispensed only when sugar should be added to the drink Allways always dispense Single selection Sugar Always 1 9 3 Sugar Configure quantity of sugar per portion the customer can select from 0 to 6 portions Set in tenths of seconds of motor rotation Enter number 0 6 1 9 4 Remaining cups ...

Page 71: ...he quantity of added sugar In this case unless the customer selects option the ma chine automatically adds the quantity of sugar in accordance with the set option Sugar Quantity 0 sel do not add any sugar Sugar Quantity 1 sel app 1 8 g of sugar Sugar Quantity 2 sel app 3 6 g of sugar Sugar Quantity 3 sel app 5 4 g of sugar Sugar Quantity 4 sel app 7 2 g of sugar Sugar Quantity 5 sel app 9 g of sug...

Page 72: ... without the added ingredient just water 1 9 6 9 Test powder sel When you enter the sub menu the machine makes the test drink without added water only ingredient 1 9 7 Functional test Testing the functionality of main units of the vending machine 1 9 7 1 Powder motor Testing the motor supply instant ingredients 1 9 7 1 1 Soluble 1 When you enter this option the machine dispenses the powder in the ...

Page 73: ...initial state to grind coffee 1 9 7 4 2 Close group When entered it closes the espresso group in coffee making state 1 9 7 4 3 Test grinder When entered it turns ON the coffee grinder for 0 5 seconds provided that the dosing apparatus is not full 1 9 7 4 4 Test doser When entered it opens the dosing apparatus twice if it contains ground coffee it is dropped into the nozzle 1 9 7 4 5 Test coffee po...

Page 74: ...closes coffee valve and switches the espresso group back to initial state open state 1 9 7 10 Test cooling pump Switches selector to position 1 starts the cold water pump for a second turns OFF the pump and switches the selector back to position 0 1 9 7 11 Test water Test water flow 1 9 7 11 1 Coffee Flush the amount of water set in s c 1 9 7 11 7 through the espresso group 1 9 7 11 2 Soluble 1 Fl...

Page 75: ...og and transfer this data to the service center of the supplier No Yes 1 9 7 14 Debug quantity Yes Machine debugging mode with an option to log the latest past few hours of functioning events to a USB flash drive It is normally used in case of system failures and errors to log and transfer this data to the service centre of the supplier No Yes 1 9 7 15 Test loop Let s you perform cyclical preparat...

Page 76: ...ng bottles cans No Yes 1 9 10 Cool boiler Selection cools down the boiler by pumping water through it to bring the temper ature down to 45 degrees 1 9 11 Fill boiler Selection fill the boiler If the boiler is not filled during the 30 second working cycle of the pump the action is repeated until the water overflows into the liquid waste tank 1 9 12 Empty boiler Selection empty the boiler After empt...

Page 77: ...the errors need to be liquidated manually and shift to menu item 2 1 2 Sub menu Description Value 2 1 Status Display of operational errors 2 1 1 Show error Shows a list of errors current and previous upon entry to the menu item indicating the type of equipment number of fail ures date and the time of last error as well as the current state of error active or not List of errors 2 1 2 Reset error Re...

Page 78: ...oin Out This menu item is hidden if the Machine is in Operator s menu but Operator s privileges do not give access to coin discharge privileges are set in technician s menu In the given mode the LCD shows information about the tube selected for dis charge withdrawal of coins coin denomination number of coins For discharge of one coin from the selected tube press 2 2 3 Change motor test At the entr...

Page 79: ...efore each Machine servicing and zero position adjusting 2 3 2 Test all On entry tests all cells 2 3 3 Test motor Enter cell number When you enter a test sale is executed from the given cell 2 3 4 Temperature Shows temperature readings from all three sensors of FOODBOX 2 3 5 Voltage DC Shows the Voltage reading from the power supply circuit normal value when on 220V 29 8V 2 3 6 Lift voltage DC not...

Page 80: ...STANT Start flushing the instant drink 5 dispensing system this menu item is hidden if the machine is other than ROSSO IN STANT No Yes 2 5 1 9 Soluble 1 cold Starts the flushing the system of dispensing drink 1 with cold water No Yes 2 5 1 10 Soluble 2 cold Starts the flushing the system of dispensing drink 2 with cold water No Yes 2 5 1 11 Soluble 3 cold Starts the flushing the system of dispensi...

Page 81: ...gs of the selector position sensor 0 position 0 position error i position working Out of position 2 5 4 9 Cups dispenser Shows the state of the cup dispenser sensor Out of position 0 position 2 5 4 10 Surer sugar Shows the state of the spoon dispenser sensor Out of position 0 position 2 5 4 11 Coffee waste full Shows the state of the coffee waste container s sensor Out of position 0 position 2 5 4...

Page 82: ...7 1 9 Card reacharge Shows information about number of card recharges performed 2 7 1 10 Cash overpay Shows information about over payments 2 7 1 11 Cashless vend number Shows information about the number of card sales 2 7 1 12 Cashless vend value Shows information about the revenue from card sales 2 7 1 13 Cashless incentive Shows information about the quantity of bonuses granted to card holders ...

Page 83: ... sales 2 7 2 3 Snack 2 Display information about the sale of each cell of the second connected snack vending machine This menu item is hidden if s c 1 1 12 0 or 1 Menu items 2 7 2 3 2 7 2 2 7 are similar to corresponding items in menu 2 7 2 2 2 7 2 2 7 2 7 2 4 Hot 1 Displays the information about the sale of each drink This menu item is hidden if s c 1 1 13 0 Menu items 2 7 2 4 2 7 2 4 7 are simil...

Page 84: ...sion Shows the version of card reader s software 2 8 12 CashLess Model Shows the type model of card reader 2 8 13 Snack 1 S N This menu item is displayed if s c 1 1 12 1 only used when connected SLAVE ma chine 2 8 14 Snack 1 Version This menu item is visible if s c 1 1 12 1 only used when connected SLAVE ma chine 2 8 15 Snack 1 ChkSum This menu item is visible if s c 1 1 12 1 only used when connec...

Page 85: ...c 1 1 13 0 or 1 It is used to connect a second drink vending machines 2 8 24 Snack 2 ChkSum Shows checksum for the Machine s software to identify the Machine s equipment This menu item is hidden if s c 1 1 13 0 or 1 It is used to connect a second drink vending machines 4 2 7 Menu item 2 9 PRICES Menu item 2 9 Prices is designed to let you configure information about the drink s and is accessible f...

Page 86: ...m 0 to 9 You can save up to 10 files with different names in 24 hours To read the information you want to insert USB flash drive into the connector of the controller board in the trade regime and approve the request Save audit The current configuration File format EVA DTS File name Cxxxxxxx DTS C then the 7 digit serial number of the machine specified in clause 1 1 2 of he Technician s menu for ex...

Page 87: ...are updates Then on the next page select the link FIRMWARE CONTROLLER after which the starts the automatic download of files to your computer The files are downloaded to the archive folder for write files on USB flash drive unzip the folder and save the contents of a folder in the root directory of USB flash drive The archive folder contains sowtware update files machine with explana tory text fil...

Page 88: ...3 7 Double espresso КК00 60 3 8 Coffee with chocolate К300 75 65 19 0 9 Moссacino 1К30 58 58 29 38 18 0 10 Chocolate 3000 100 40 0 11 Double chocolate 3000 100 45 0 12 Chocolate with milk 1300 55 22 55 19 0 13 Hot milk 1000 100 43 0 14 Tea 2000 120 22 0 15 Vanilla cappuccino 4000 120 36 0 16 Coffee ristretto К000 55 3 К Coffee beans ROSSO Instant coffee ROSSO INSTANT 1 Ingredient 1 milk 2 Ingredie...

Reviews: