background image

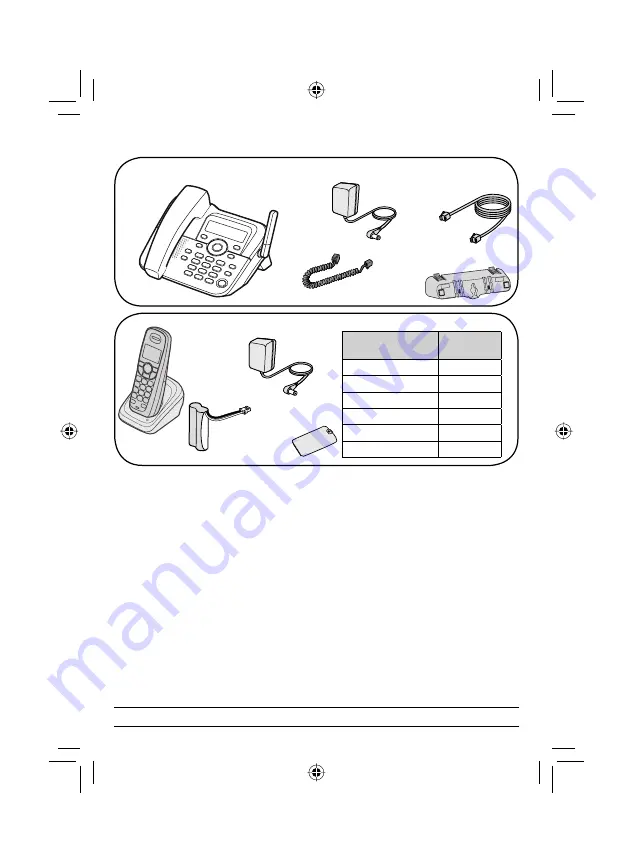
AS1051 base 

with answering 

system

Base AC 

adapter

Telephone 

cord

Coiled 

cord

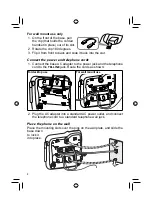
Desk stand/wall 

mount bracket

Corded 

handset

Charger AC 

adapter

Battery 

cover

Accessory 

handset and 

charger

If you purchased 

model number:

You should 

have:

AS1051

1 of each

AS1051-2

2 of each

AS1051-3

3 of each

AS1051-4

4 of each

AS1051-5

5 of each

AS1051-6

6 of each

You will also 

fi

 nd:

Rechargeable 

battery pack 

DESK

WALL

If any items are missing or damaged, never use damaged products!

Important Safety Instructions!

When using your telephone equipment, basic safety precautions should always 

be followed to reduce the risk of fire, electric shock and injury to persons, 

including the following:


-

This unit is NOT waterproof.

 DO NOT expose this unit to rain or moisture.


-

Do not use this product near water, for example, near a bath tub, wash bowl, 

kitchen sink or laundry tub, in a wet basement or near a swimming pool.


-

Avoid using a telephone (other than a cordless type) during an electrical 

storm. There may be a remote risk of electric shock from lightning.


-

Do not use the telephone to report a gas leak in the vicinity of the leak.


-

Use only the power cord and batteries indicated in this manual. Do not 

dispose of batteries in a fire. They may explode. Check with local codes for 

possible special disposal instructions.


-

Do not place the handset in any charging cradle without the battery installed 

and the battery cover securely in place.

SAVE THESE INSTRUCTIONS!

AS1051 Series User's Guide

What's in the box?

Summary of Contents for AS1051 Series

Page 1: ...o persons including the following This unit is NOT waterproof DO NOT expose this unit to rain or moisture Do not use this product near water for example near a bath tub wash bowl kitchen sink or laund...

Page 2: ...and Call Waiting 13 Using Seven Digit Dialing 14 Using the Phonebook 15 Finding a Lost Handset 15 Using Multi Station Features 16 Expanding Your Phone 16 Using Conference Calling 16 Using Privacy Mod...

Page 3: ...ches and slip them into the notches marked as DESK For wall mount use 1 Turn the stand so the word WALL is right side up it will be on the right 2 Insert the tabs into the notches at the bottom of the...

Page 4: ...ower and telephone cords 1 Connect the base AC adapter to the power jack and the telephone cord to the TEL LINE jack Route the cords as shown For desktop use For wall mount use 2 Plug the AC adapter i...

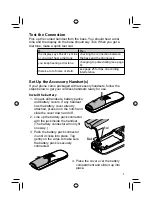
Page 5: ...the Accessory Handset s If your phone came packaged with accessory handsets follow the steps below to get your cordless handsets ready for use Install the battery 1 Unpack all handsets battery packs a...

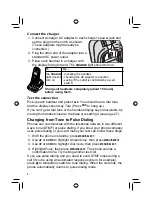
Page 6: ...t get a dial tone or the handset display says Unavailable try moving the handset closer to the base or resetting it see page 27 Changing from Tone to Pulse Dialing Phones can communicate with the tele...

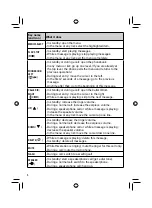
Page 7: ...turn the answering system on or off FIND HANDSET INTERCOM In standby page a handset using the intercom During a call put the call on hold and start a call transfer REDIAL PAUSE In standby open the re...

Page 8: ...the cursor to the right While a message is playing skip to the next message UP In standby increase the ringer volume During a normal call increase the earpiece volume During a speakerphone call or wh...

Page 9: ...creen During text entry move the cursor to the left DOWN In standby decrease the ringer volume During a call decrease the call volume In the menu or any list move the cursor down one line CLEAR INTERC...

Page 10: ...ng system status 12 00A Handset 1 New CID 5 Handset banner Status icons Caller ID count Time The table below shows the possible icons and what they mean Since the icons appear based on what you re doi...

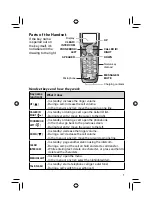
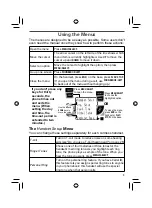
Page 11: ...and time the time out period is extended to two minutes The Handset Setup Menu You can change these settings separately for each cordless handset T coil Turn on T coil mode to reduce noise on some he...

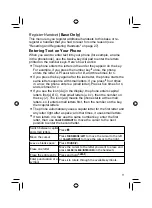
Page 12: ...e 20 Day Time Setting You need to set the day and time so messages get the correct time stamp 1 Use UP DOWN to choose the day of the week press MENU SELECT 2 Use the number keypad to enter the hour an...

Page 13: ...c If you see the icon Aa in the display the phone enters capital letters first A B C then small letters a b c then the number on the key 2 The icon aA means the phone starts at the small letters so i...

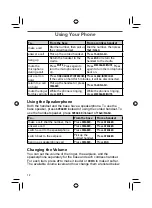
Page 14: ...only While the phone is ringing press MUTE While the phone is ringing press MESSAGES MUTE Using the Speakerphone Both the handset and the base have a speakerphone To use the base speaker press SPEAKE...

Page 15: ...MENU SELECT and select Delete Entry to save it to the phonebook Press MENU SELECT and select Store Into Pb Using Caller ID and Call Waiting You have to subscribe to Caller ID Call Waiting and Caller I...

Page 16: ...unds a tone and displays any CID information received for the waiting call Press FLASH TALK FLASH on a handset to switch between your current call and the waiting call remember each time you switch th...

Page 17: ...to another station You must have at least one accessory handset to use this multi station feature Delete All Erase all the entries in this station s phonebook This does not affect the entries saved o...

Page 18: ...y registered to a base you have to reset it so you can register it to a new base see page 27 or the manual for the accessory handset Using Conference Calling When an outside call comes in the base and...

Page 19: ...rcom Whenever the phone is in standby you can make an intercom call between stations without using the phone line You can make an intercom call from any station but only two stations can be in an inte...

Page 20: ...ebook entry Be sure to enter the code number into the phonebook exactly as you would enter it during a call When you hear the prompt that tells you to enter the number open the phonebook and find the...

Page 21: ...d it go back to step 2 1 Press MESSAGES MUTE to access the answering system Wait until the system finishes its announcements or press 5 STOP to skip them 2 Press 8 3 Wait for the system to say Record...

Page 22: ...e Set the number of rings 2 4 or 6 before the answering system answers the phone Choose Toll Saver to have the system pick up after 2 rings if you have new messages or after 4 rings if you don t Recor...

Page 23: ...ing system To From the base From a handset remote operation play new messages Press PLAY STOP Press MESSAGES MUTE The system announces the number of new and old messages then plays the first new messa...

Page 24: ...LAY STOP again press 2 or select 2 Play end the operation Press PLAY STOP Press END Screening Your Calls Another feature your answering system gives you is call screening While the system is taking a...

Page 25: ...n t You can hang up during the third or fourth ring If your answering system is off it will answer after about ten rings and sound a series of beeps instead of your greeting 2 During the greeting or b...

Page 26: ...ase Seeing if another station has Privacy Mode on Making sure the base is plugged in No stations will display any Caller ID information Letting calls ring at least twice before answering Checking with...

Page 27: ...oving around while you re on a call or moving closer to the base to see if the sound gets louder Make sure the handset s battery is fully charged Try adjusting the earpiece volume or the audio tone se...

Page 28: ...a hearing aid equipped with a telecoil T coil feature the interaction between the hearing aid and digital cordless phones can cause noise in the handset If you have a T coil hearing aid and you have...

Page 29: ...2 Select Base Unavailable 3 When the phone asks you to confirm select Yes The handset deletes its own link without contacting the base When you reset a handset or if you buy a new one that handset di...

Page 30: ...unplug the telephone line while recharging the battery pack to avoid charge interruption CAUTION DO NOT use a microwave oven to speed up the drying process This will cause permanent damage to the hand...

Page 31: ...dset to the cradle If the handset is in standby none of the keys will operate With normal use the battery should last about one year Replace the battery when the talk time becomes short even when the...

Page 32: ...ing your Phone 1 Talk Flash 2 Talk Flash 3 End 4 Mute Message Mute 5 Find Handset Intercom Clear Intercom 6 Speaker Talk Flash 7 Mute Message Mute Using the Speakerphone Speaker Speaker Talk Flash 1 S...

Page 33: ...menu 2 Copy All menu 3 menu 1 Phonebook menu 2 menu 3 menu Using Multi Station Features 1 6 AS116 2 Uniden 3 4 5 De registering a handset END System Reset 1 Deregister HS menu 2 menu 3 Yes No 1 Base U...

Page 34: ...tercom End 8 Speaker Talk Flash Using Your Phone During A Power Failure 1 2 3 4 Use of Auto Talk 1 menu Handset Setup menu 2 Auto Talk menu 3 Yes No Using Voice Message Notification 1 FSK V 2 VMWI YES...

Page 35: ...ute 2 Phonebook Left 1 3 Phonebook Left 1 4 Caller ID Right 3 5 Delete 4 6 Delete Delete 7 Play Stop 2 8 Play Stop End 1 2 0 3 3 Beep 4 Beep 0 1 0 2 0 3 0 4 0 5 0 6 0 9 1 0 15 Screening Your Calls 1 M...

Page 36: ...n modified altered and or repaired by persons other than technician of our company or mishandled by customer 5 This warranty is applicable to Singapore only 6 This warranty does not cover damages caus...

Reviews: