background image

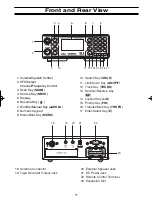
Front and Rear View

11

1. Volume/Squelch Control
2. VFO/Select

Channel/Frequency Control

3. Scan Key (

SCAN

)

4. Service Key (

SRVC

)

5. Display
6. Resume Key (

)

7. Hold/Up/Manual Key (

/HOLD

)

8. Numeric Keypad
9. Menu/Bank Key (

MENU

)

RSM

CHAN/FREQ

VFO/SELECT 

PUSH

SQUELCH

SCAN

SRVC

SRCH

MENU

VOLUME

HOLD

LIMIT

TRUNK

L/O

PRI

TRNFR

MUTE

MANUAL

BACK

MODE

BC796D

1000

CHANNEL

RSM

1

2

3

4

5

6

7

8

0

9

E

1-100

301-400

601-700

RVRS

101-200

401-500

701-800

901-1000

201-300

501-600

801-900

SELECT

1

3

4

5

6

7

8

9

10

11 12 13 14 15 16 17

2

18. Antenna Connector
19. Tape Recorder Output Jack

20. External Speaker Jack
21. DC Power Jack
22. Remote Control Terminal
23. Expansion Slot

18

19

20

21

22

10. Search Key (

SRCH

)

11. Limit/Down Key (

LIMIT/

)

12. Trunk Key (

TRUNK

)

13. Decimal/Reverse Key 

(

)

14. Lockout Key (

L/O

)

15. Priority Key (

PRI

)

16. Transfer/Mute Key (

TRNFR

)

17. Enter/Select Key (

E

)

23

EXPANSION SLOT

BC796D(NEW)  10/20/03 11:30 AM  Page 11

Summary of Contents for BC796D APC0 25

Page 1: ......

Page 2: ......

Page 3: ...sing Standard AC Power 17 Connecting an External Speaker 17 Connecting an Earphone 17 Listening Safely 18 Connecting the Clone Cable 18 Connecting the Tape Recorder 18 Basic Operation 19 Turning On the Scanner 19 Setting the Squelch 19 Using the Menu 20 Manually Selecting a Channel 20 Scanning Programmed Channels 20 Locking Unlocking Banks 20 Locking Unlocking Channels 21 Restoring All Locked Out ...

Page 4: ...ssigning Bank Names 34 General Programming 35 Deleting Frequencies from Channels 35 Transferring Channel Information 35 Entering Alpha Information 35 General Programming Tips 35 Programming Conventional Channels 37 1 Select a Channel to Program 37 2 Enter the Frequency 37 3 Assigning a Text Tag 37 Setting the Delay 38 Setting the Subaudible Tone Option 38 Setting Beep Alert 39 Setting the Attenuat...

Page 5: ...LTR Systems 52 Programming Talkgroups 53 Storing Known Talkgroups 53 Storing Found Talkgroups 53 Deleting Stored Talkgroup ID s 54 Adding a Text Tag to an ID List 54 Seeing Talkgroup Activity 54 Using the Remote Interface 55 PC Control Mode 55 Cloning Scanner Settings 55 Care and Maintenance 57 General Use 57 Location 57 Cleaning 57 Repairs 57 Birdies 57 Troubleshooting 58 Specifications 60 Glossa...

Page 6: ......

Page 7: ...no guarantee that interference will not occur in a particular installation If this scanner does cause harmful interference to radio or television reception which can be determined by turning the scanner on and off you are encouraged to try to correct the interference by one or more of the following measures Reorient or relocate the receiving antenna Increase the separation between the scanner and ...

Page 8: ...s scanner has been designed to prevent the reception of cellular telephone transmissions and the decoding of scrambled transmissions This is done to comply with the legal requirement that scanners be manufactured so they are not easy to modify to pick up these transmissions Do not open your scanner s case to make any modifications that could allow it to pick up transmissions that are illegal to mo...

Page 9: ...s used by families truckers and commu nity groups Business Band frequencies used nationwide Amateur Radio frequencies used by licensed radio operators to report emergency weather conditions experiment with new communications methods or just to chat Local and national government agencies Civil and military aircraft FM and TV Broadcast channels NOAA Weather Radio And much much more The table below l...

Page 10: ...nels you have selected as priority channels CTCSS and DCS Squelch Modes prevents interference from stations not using the mode you select search mode displays the CTCSS or DCS tone being used by the received station Preprogrammed Service Search makes it easy to find interesting frequencies used by public safety news media TV broadcast weather amateur radio FRS GMRS special low power railroad aircr...

Page 11: ...eed to do is plug the AC charger into the scanner See Setting Up Your Scanner if you need any help doing this Next you ll want to listen to see what you can hear with your scanner Install the antenna then press SRVC and use the scroll bar to select TV Broadcast Assuming you are in an area with a strong enough TV broadcast your scanner should soon stop on a station s audio program Listen to this or...

Page 12: ...he scanner quickly moves to the next channel If there is then the scanner pauses on the transmission until it is over Simplex Operation Simplex systems use a single frequency for both transmit and receive Most radios using this type of operation are limited to line of sight operation This type of radio is frequently used at construction job sites and with inexpensive consumer radios such as GMRS F...

Page 13: ...r talkgroup information to the control channel The computer then assigns that talkgroup to a specific voice channel and transmits that data over the control channel All radios in that talkgroup switch over to the assigned voice channel and the user can begin speaking This all typically takes place in about a second the person transmitting hears a beep from their radio when the channel is assigned ...

Page 14: ...her radios in that talkgroup will switch to the correct channel To program a EDACS system in your scanner you will need to know both the frequencies used by the system and the LCN for each frequency so that you can program the frequencies in LCN order Agency Fleet Subfleet talkgroup ID s for EDACS systems are assigned in a way that makes it easy to see at a glance the affiliation of the user Each ...

Page 15: ...stops on the transmission and displays the talkgroup ID on the display In the ID Scan mode the scanner only stops on the transmission if the LTR data matches a talkgroup ID that you have stored in the bank s talkgroup ID list and have not locked out LTR systems are frequently programmed so that each radio has a unique User ID LTR systems also need to be programmed into your scanner in channel orde...

Page 16: ...an also find a wealth of information on the Internet check out scanners uniden com for the latest frequency information in your area In addition you can contact the following source of frequency information Scanner Master 800 722 6701 Hours are from 10 00 a m to 5 00 p m Eastern Time Monday through Friday To purchase another copy of the conventional or trunking frequency guide contact one of the f...

Page 17: ...ODE BC796D 1000 CHANNEL RSM 1 2 3 4 5 6 7 8 0 9 E 1 100 301 400 601 700 RVRS 101 200 401 500 701 800 901 1000 201 300 501 600 801 900 SELECT 1 3 4 5 6 7 8 9 10 11 1213 14 15 16 17 2 18 Antenna Connector 19 Tape Recorder Output Jack 20 External Speaker Jack 21 DC Power Jack 22 Remote Control Terminal 23 Expansion Slot 18 19 20 21 22 10 Search Key SRCH 11 Limit Down Key LIMIT 12 Trunk Key TRUNK 13 D...

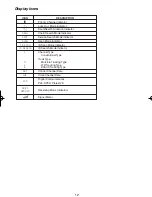
Page 18: ... Scan Mode Indicator ID Scan Mode Indicator ID Search Mode Indicator Channel Type Conventional Type Trunk Type Motorola Tracking Type LTR Tracking Type EDACS Tracking Type Control Channel Data Voice Channel Data Digital Communications P25 APCO Project 25 Receiving Mode Indicators Signal Meter ICON P L O SRCH SRVC SCAN ID SCAN ID SEARCH C M L E DAT LNK P25 AM FM WFM NFM ...

Page 19: ...place of purchase or Uniden Customer Service at 800 297 1023 8 00 a m to 5 00 p m Central Time Monday through Friday BC796D Scanner AC Adapter AD 580D Cigarette Cord DC Cord Mounting Bracket Telescopic Antenna Operating Guide Trunk Tracker Frequency Guide Other Printed Material BC796D SS CD ROM 13 ...

Page 20: ...le to the scanner The antenna connector on your scanner makes it easy to use the scanner with a variety of antennas such as an external mobile antenna or an outdoor base station antenna Always use 50 ohm coaxial cable such as RG 58 or RG 8 to connect an outdoor antenna For lengths over 50 feet use RG 8 low loss dielectric coaxial cable If your antenna s cable does not have a BNC connector you will...

Page 21: ... x 176 5 x 167 mm Caution Be sure to avoid obstructions behind the mounting surface Follow these steps to mount the scanner in your vehicle 1 Choose a mounting location then use the supplied mounting bracket as a template to mark the positions for the mounting screw holes 2 In the marked positions drill holes slightly smaller than the supplied screws 3 Attach the mounting bracket to the mounting l...

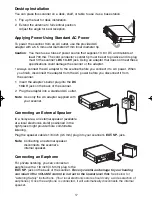
Page 22: ...rminal before you begin Follow these steps to connect the supplied DC power cord 1 Connect the power cord s black wire to a chassis ground such as a metal screw attached to a metal part of the vehicle s frame Be sure that the screw is not insulated from the frame by a plastic part 2 Connect the power cord s red wire with in line fuse to a source of voltage that turns on and off with the ignition s...

Page 23: ...re you disconnect it from the scanner 1 Insert the adapter s barrel plug into the DC 13 8 V jack on the back of the scanner 2 Plug the adapter into a standard AC outlet Note Use only the AC adapter supplied with your scanner Connecting an External Speaker In a noisy area an external speaker available at a local electronics store positioned in the right place might provide more comfortable listenin...

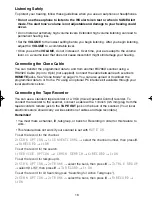
Page 24: ...ad or download the programmed data to or from a PC using an optional PC interface kit available through your local electronics store Connecting the Tape Recorder You can use a standard tape recorder or a VOX Voice Operated Control recorder To connect the recorder to the scanner connect a cable with a 1 8 inch 3 5 mm plug from the tape recorder s remote jack to the TAPE OUT jack on the back of the ...

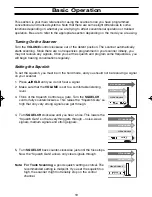
Page 25: ...e and you should not be receiving a signal on your scanner 1 Press HOLD until you do not hear a signal 2 Make sure that the VOLUME is set to a comfortable listening level 3 Think of the Squelch Control as a gate Turn the SQUELCH control fully counterclockwise This raises the Squelch Gate so high that only very strong signals can get through 4 Turn SQUELCH clockwise until you hear a hiss This lower...

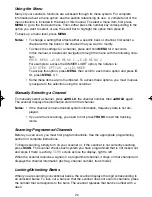
Page 26: ...ions you must manual ly navigate to the selection using the scroll bar Manually Selecting a Channel To manually select a channel press HOLD the channel number then HOLD again The scanner displays the information stored in that channel Notes If the channel contains trunked system information frequency data is not dis played If you are trunk scanning you need to first press TRUNK to exit the trunkin...

Page 27: ...ad been stopped on another channel One channel or talkgroup ID in each bank is designated as the priority To turn on Priority Scan repeatedly press PRI until the scanner displays PRIORITY ON To turn Priority Scan off repeatedly press PRI until the scanner displays PRIORITY OFF Note If all priority channels in unlocked banks are locked out the scanner displays ERROR when you try to turn on the prio...

Page 28: ... much information your scanner displays 3 SYSTEM OPTION 2 SCREEN MASK 1 ON Display all information 2 OFF Display reduced information Turning the Key Beep On Off When Key Tone is turned on the scanner beeps each time you press a key 3 SYSTEM OPTION 3 KEY BEEP 1 ON Turn on the key beep 2 OFF Turn off the key beep Locking the ENTER key To prevent accidentally changing channel settings you can lock th...

Page 29: ...ons that include a matching subaudible tone or have no tone at all When you select this option you also need to set the appropriate tone in either the channel memory or for the search range 3 TONE SEARCH When the scanner stops on a transmission it will then scan the subaudible tones to determine the correct setting When the scanner has found the correct tone it flashes the tone on the display If y...

Page 30: ...stopped on a talkgroup or on the left side of line 4 if it has stopped on a talkgroup Then press the number corresponding to the ID list you want to turn on or off Holding on a Single Talkgroup To hold on an active talkgroup when scanning or searching press HOLD The BC796D stops scanning and holds on the current trunking system It only receives transmissions on the talkgroup that was active when y...

Page 31: ...press HOLD then press L O for 2 seconds to clear all the lockouts from the system EDACS Patch Tracking EDACS systems sometimes bring several talkgroups together in a Patch A patch might be used by a police agency at night to provide a single channel with a single dispatcher for a wide area A patch is created when a single temporary talkgroup substitutes for the original talkgroups While the patch ...

Page 32: ...ast one range turned on at all times Holding on an Active Frequency To hold on the current frequency press HOLD To resume searching press RSM Setting Chain Search 1 SERVICE OPTION CHAIN SEARCH 1 CHAIN SEARCH 1 ON The scanner allows you to search multiple ranges simultaneously 2 OFF The scanner searches only one range at a time Setting Data Skip The scanner normally stops on any frequency with acti...

Page 33: ...ady stored this frequency the scanner displays WARNING DUPLICATE and the channel where the frequency is stored To store the frequen cy anyway press E again After you store the frequency the scanner resumes searching If all channels are used the scanner defaults to the last used channel prior to enter ing the search mode Automatically Storing Frequencies During searching you can have the scanner au...

Page 34: ...ou set the system tone option to 3 TONE SEARCH see Setting Squelch Mode the scanner will determine the correct tone for the received signal Attenuating All Search Ranges If you are near a strong RF source you might need to attenuate the input signal in order to search properly To turn on this option for all search ranges 1 SERVICE OPTION CHAIN SEARCH 4 ATTENUATOR 1 ON The attenuator is turned on 2...

Page 35: ...CH for 2 seconds 2 Use the scroll bar to select the range you want to program then press E 3 Set the following options 1 RANGE Select then follow the prompts to enter the lower and upper frequency limits for the search range 2 STEPS Select then set the step size to use while searching the custom range If you select 9 AUTO the scanner will use the step sizes most often assigned for each band 3 MODE...

Page 36: ... most cases Note This feature only works for 800 MHz and 900 MHz Motorola trunking systems If the scanner detects a trunking control channel it will begin to track that system The scanner displays the talk group numbers as they become active ...

Page 37: ...e to search by selecting from the Service Search menu Note Except for Weather when you press E to select a service searching begins immediately For weather search options see Using Weather Search and Weather Alert Service Search Skip You can set the scanner to skip up to 100 unwanted frequencies during Service Search To skip over a frequency press L O when the scanner has stopped at a frequency yo...

Page 38: ...ctronics retailer carries several weather radios specifically designed for this function SAME Specific Area Message Encoding was adopted late in the last century to replace the wide area alerts previously used Weather alerts today are preceded by a digital packet that identifies not only the type of alert but also the geographic location for the alert Thus it is possible for a weather broadcast th...

Page 39: ...e scanner the scanner keeps the weather alert mode Warning Never listen to the scanner using a headphone or earphone when you have put the scanner in the weather alert mode The volume control is disabled in this mode and the loud alert sound could damage your hearing If an event is issued the scanner displays the text for the event and sounds an alert The alert sound used depends on the type of ev...

Page 40: ...rough Bank 0 which holds Channels 901 1000 Additionally each bank that includes a trunking system can also hold up to 100 Talkgroup ID s for that system Assigning Bank Names To give a bank a name that the scanner displays when it stops on a channel in that bank 3 SYSTEM OPTION 9 BANK TAG 1 Use the scroll bar to select the bank you want to tag then press E 2 Use the scroll bar to select the letter ...

Page 41: ... a text tag 1 Use the scroll bar to select the letter 2 Press HOLD to advance to the next letter or LIMIT to back up to a previous letter 3 When you have completed the text tag press E to accept the entry General Programming Tips Do not program weather frequencies into channels Since they have continuous broad casts your scanner will always stop on them Use weather service search to access NOAA we...

Page 42: ... Entered frequencies are rounded off according to the step size for the channel When you store a new frequency in a channel the text tag previously assigned to that channel is deleted 36 ...

Page 43: ...requency you want to program then press E Notes If the channel already had a frequency programmed it appears above the prompt If you select a frequency that is not valid the scanner displays ERROR OUT OF BAND Enter a correct frequency to continue If you enter a frequency that has already been stored in the scanner the scanner displays WARNING DUPLICATE and the channel number that contains the dupl...

Page 44: ...ly stops on transmissions for 10 seconds then automatically resumes To hold on the transmission press HOLD during the 10 second pause Setting the Subaudible Tone Option 2 SCAN OPTION 1 CONVENTIONAL Channel No 3 TONE DATA Some radio systems use special tones to prevent interference from other nearby systems operating on the same frequencies When tones are being used the radios only open squelch whe...

Page 45: ...ransmission on this channel 2 OFF Beep Alert is off Setting the Attenuator 2 SCAN OPTION 1 CONVENTIONAL Channel No 5 ATTENUATOR If you are near a very strong signal source the signal can overload the scanner s RF front end causing poor audio quality or missed reception 1 ON RF attenuation is on for the channel 2 OFF RF attenuation is off for the channel Changing the Frequency Step 2 SCAN OPTION 1 ...

Page 46: ... 4 NFM Narrowband FM Setting Priority Channels You can set one conventional channel in each bank as a priority channel When you turn on the Priority Scan option see Priority Scanning the scanner automatically checks these channels every 2 seconds to see if there is activity If there is the scanner immediately switches to the priority channel Notes The scanner does not check priority channels in lo...

Page 47: ... users Most are on the 800 MHz band and recent systems are appearing on other bands See Programming Motorola Systems EDACS Including Wideband 9600 baud and Narrowband 4800 baud systems Wideband systems are mostly on the 800 MHz band and are used by public safety utili ties and business users Some systems are used on the VHF and UHF bands Narrowband systems are used in the 935 940 MHz band many by ...

Page 48: ...hen automatically resumes To hold on the transmission press HOLD during the 10 second pause Using I Call Motorola and EDACS only I Calls are direct unit to unit transmissions that are not heard by other users Your BC796D can monitor these transmissions in either the search mode or if you have stored the unit number as a talkgroup in the scan mode When the scanner stops on an I Call the scanner dis...

Page 49: ...nd hold PRI for 2 seconds Multi Track The BC796D allows you to track more than one system at a time Here are some highlights of this feature You can actually track up to 10 trunking systems at one time You can trunk scan or search and scan conventional frequencies at the same time You can program conventional frequencies in the same bank as trunking systems After the scanner finishes checking a tr...

Page 50: ...canner will not look for any other IDs within the same trunked system as this would slow the scan process If you press RSM while you are listening to one ID the scanner will check to see if another ID in your Scan List is active It will disregard the ID to which you were just monitoring TRUNK SEARCH This mode works similarly to Trunk Scan If the scanner finds any non locked out ID when it checks t...

Page 51: ...750 or 875 3 PLAN3 Use if the last three digits of all the frequencies in the system end in 000 250 500 or 750 4 PLAN4 Use if the highest frequency in the system is below 866 MHz and if the last three digits end in 000 125 250 375 500 625 750 or 875 5 OFF Select to turn off control channel programming for this bank Note Many systems alternate control channels To properly track the system you need ...

Page 52: ...se Space and Offset settings These settings are normally provided along with the system frequencies 1 Select the trunk programming mode 2 SCAN OPTION 2 TRUNK 2 Use the scroll bar to select the bank you want to program then press E 1 TRUNK TYPE 1 ON 3 Select one of the following trunk types for Motorola Type 2 or digital Systems 4 TYPE2 P25 UHF Motorola Type 2 or Digital systems in the UHF 450 512 ...

Page 53: ...ll bar to select the bank you want to program then press E 1 TRUNK TYPE 1 ON 3 Select the following trunk type for Motorola Type I Systems 2 TYPE1 Motorola Type I and IIi Hybrid Systems 4 Enter the fleet map information Your scanner has the most common fleet maps preprogrammed Refer to Appendix for a complete list of these fleet maps Use the scroll bar to select the preprogrammed fleetmap 1 16 or ...

Page 54: ... of every talkgroup effectively rounding them down to the nearest multiple of 16 regardless of the status bits 2 SCAN OPTION 2 TRUNK Select the bank 0 STATUS BIT 1 ON Talkgroups are rounded down to the next multiple of 16 2 OFF Talkgroups are not rounded down so you can determine the value of the status bits Toggling End Code Detect At the end of each transmission a digital burst is sent so that r...

Page 55: ...t for EDACS SCAT systems 2 Program each trunk channel in LCN order not frequency order If you program this in the wrong order the scanner will not go to the correct channel when scanning 2 TRUNK CHANNEL ENTER CHANNEL No a Enter the channel to program 1 FREQUENCY b Enter the frequency then the alpha tag for the channel Repeat a and b for each channel in the system Note EDACS SCAT systems use only o...

Page 56: ...rmat see Understanding Scanning However you can use this option to display and enter talkgroups in digital format 2 SCAN OPTION 2 TRUNK Select the bank EDCS ID FORM 1 AFS Display the talkgroup ID in Agency Fleet Subfleet AFS format 2 DECIMAL Display the talkgroup ID in decimal format 50 ...

Page 57: ...justs in increments of 100 at the bottom of the screen watch the Sound Quality level increase or decrease and continue to rotate the VFO until you have achieved the best Sound Quality level Notes When APCO P 25 signal is not received SOUND QULTY appears on the display You must be receiving an APCO P 25 signal to make this adjustment A chart showing the Threshold Adjustment Range is listed below 4 ...

Page 58: ... 9 LT 2 TRUNK CHANNEL 1 Enter the channel number 1 FREQUENCY 2 Enter the frequency and alpha tag for the channel Repeat these steps for all channels in the system Then refer to Programming Talkgroups Note LTR systems must be programmed in channel order skipping unused channels For example if the LTR system you are programming uses only Channels 1 3 5 and 7 program frequencies in the first third fi...

Page 59: ...s enter the two digit agency for the dash then the fleet and subfleet number For LTR systems enter the area code home repeater number ID number then E Note If you replace an existing ID the alpha tag is also deleted 4 Select 2 ALPHA TAG and press E 5 Enter the alpha tag for the talkgroup Note The alpha tag defaults to the numeric talkgroup ID 6 If you want the scanner to beep three times to alert ...

Page 60: ...of the 10 ID lists in each bank 2 SCAN OPTION 2 TRUNK Select the bank 6 ID LIST TAG Select the list Enter the alpha tag Seeing Talkgroup Activity In the ID Scan mode the scanner normally only displays the ID for talkgroups that you have stored into a scan list This setting lets you see the ID s for all talkgroups as they become active when the scanner is monitoring the control channel The scanner ...

Page 61: ...ing If you seem to be having communications problems between the scanner and PC set this setting to a lower value Cloning Scanner Settings You will need to purchase an RS232C null modem adapter gender changer to connect your scanners together These items are available at your local electronics stores To connect the Scanners together plug the scanner ends of the cables into the scanners then connec...

Page 62: ...the scanners display COMPLETE Turn both scanners off and then back on to initialize them If data transfer is not successful the following message appears To clear the error press To exit the clone mode repeatedly press MENU CLONE MASTER UNIT CLONE SLAVE UNIT CLONE ERROR MASTER UNIT ...

Page 63: ...ical noise move it or its antenna away from the source of the noise If possible a higher elevation may provide better reception Cleaning Disconnect the power to the unit before cleaning Clean the outside of the scanner with a mild detergent To prevent scratches do not use abrasive cleaners or solvents Be careful not to rub the LCD window Do not use excessive amounts of water Repairs Do not attempt...

Page 64: ...Out Weather Scan won t work 1 Adjust squelch threshold refer to page 19 Setting the Squelch 2 Check the antenna Adjust squelch threshold refer to page 19 Setting the Squelch Problem Suggestion Scanner won t track 1 Missing the Data Frequency 2 Change to a Type 1 Scanner setup Review User Defined Fleet Maps on page 66 Scanner won t stop 1 No IDs have been programmed during Scan List mode 2 The IDs ...

Page 65: ... be low 1 Verify the accuracy of the frequencies of the P 25 system you are trying to monitor 2 You might be in a dead spot for the P 25 system you are trying to monitor Check other locations in the area 1 APCO project 25 systems can send data before voice communication 2 Data sound can be heard when signal strength is weak 1 Check to see if the ENC message appears on the display The scanner doesn...

Page 66: ... Federal Government 420 450 MHz 70 cm Amateur Band 450 470 MHz UHF Standard Band 470 512 MHz UHF TV Band 806 956 MHz 800 Band 1240 1300 MHz 25cm Amateur Band Operating Temperature 20 C to 60 C 4 F to 140 Scan Rate 100 channels per second conventional mode Search Rate 100 steps per second Normal Search 300 steps per second Turbo Search Audio Output Maximum 3 0W 2 3W normal 10 THD Internal Speaker 8...

Page 67: ...lated with a specific tone is received This method may be used to restrict access to the repeater or receiver or reduce interference where several stations with output frequencies in close proximity of each other make it difficult to hear the conversation you are interested in With CTCSS squelching you can eliminate the possibility of hearing unwanted conversations by selecting one of the 38 stand...

Page 68: ...ad You will not hear a tone each time you press a key NWR S A M E Weather Alert In 1994 the National Oceanic and Atmospheric Administration NOAA began broadcasting coded signals called FIPS Federal Information Processing System codes along with the standard weather broadcasts for stations in your area These codes identify an emergency and the specific geographic area such as your county affected b...

Page 69: ...ccur on a specific talk group number then you will not miss the transmission even if you have not programmed all the talk group numbers With the Status Bit on and you have programmed the unique number then you don t have to worry what the rest of the groups numbers are The topic of interest will be picked up Talkgroup A group of users within a trunked system that communicates with one another 63 ...

Page 70: ...E CODE 4 SIZE CODE 4 SIZE CODE 12 SIZE CODE 12 SIZE CODE 4 SIZE CODE 4 SIZE CODE 4 SIZE CODE 4 Block 1 0 2 3 4 5 6 7 Preset Map 7 Size Code SIZE CODE 10 SIZE CODE 10 SIZE CODE 11 SIZE CODE 4 SIZE CODE 4 SIZE CODE 4 SIZE CODE 4 SIZE CODE 4 Block 1 0 2 3 4 5 6 7 Preset Map 8 Size Code SIZE CODE 1 SIZE CODE 1 SIZE CODE 2 SIZE CODE 2 SIZE CODE 3 SIZE CODE 3 SIZE CODE 4 SIZE CODE 4 Block 1 0 2 3 4 5 6 ...

Page 71: ...0 Block 1 0 2 3 4 5 6 7 Size Code SIZE CODE 3 SIZE CODE 3 SIZE CODE 11 SIZE CODE 4 SIZE CODE 4 SIZE CODE 0 SIZE CODE 0 SIZE CODE 0 Block 1 0 2 3 4 5 6 7 Size Code SIZE CODE 4 SIZE CODE 4 SIZE CODE 4 SIZE CODE 11 SIZE CODE 11 SIZE CODE 0 SIZE CODE 12 SIZE CODE 12 Block 1 0 2 3 4 5 6 7 Size Code SIZE CODE 3 SIZE CODE 10 SIZE CODE 10 SIZE CODE 11 SIZE CODE 0 SIZE CODE 0 SIZE CODE 12 SIZE CODE 12 Bloc...

Page 72: ...pe I system designer are highly dependent on the specific needs of the systems users Some organizations may want many subfleets with only a few radios each while another organization may want only a few subfleets with many radios each Your task is to program your fleet map with the same size code assignments as the trunked system If you do this accurately you ll track all the Fleet Subfleet combin...

Page 73: ... prompted for the next available block when programming a Fleet Map For example if you assign Block 0 as an SIZE CODE 12 you will be prompted for Block 2 the next block available instead of Block 1 And if you assign Block 0 as SIZE CODE 14 you would not see another prompt because all available blocks have been used Size Fleets Subfleets IDs Blocks Used 0 Reserves block for Type II IDs 1 128 4 16 1...

Page 74: ...ch AVA 0 AVALANCHE Volcano Watch VOA 0 VOLCANO Event Code Standard Event Level Siren Type LCD Display Warning Watch Statement Test Emergency Action Notification EAN 0 EMG NOTIFY Emergency Action Termination EAT 0 EMG TERMINATE National Information Center NIC 0 NATIONAL INFO Tornado Warning TOW or TOR 0 TORNADO Service Thunderstorm Warning SVW or SVR 0 THUNDERSTORM Flash Flood Warning FFW 0 FLASH F...

Page 75: ...ne TV S 0 UNKNOWN TV Administrative Message ADR 0 ADMIN MESSAGE Child Abduction Emergency CAE CHILD EMERGENCY Dusd Storm Warning DSW DUST STORM Earthquake Warning EQW EARTHQUAKE Network Message Notification NMN 0 0 NETWORK MESSAGE 911 telephone Outage Emergency TOE 0 911 PHONE OUTAGE Nuclear Power Plant Warning NUW 0 NUCLEAR PLANT Tropical Storm Warning TRW TROPICAL STORM Tropical Storm Watch TRA ...

Page 76: ... 145 110 145 490 0 6 MHz 146 010 146 385 0 6 MHz 146 415 146 505 1 MHz 146 595 1 MHz 146 610 146 985 0 6 MHz 147 000 147 390 0 6 MHz 147 415 147 505 1 MHz 147 595 1 MHz 147 600 147 990 0 6 MHz 148 125 4 375 MHz 148 150 4 25 MHz 222 120 223 380 1 6 MHz 223 720 224 980 1 6 MHz 420 000 424 9875 5 MHz 425 000 429 9875 5 MHz 440 000 444 9875 5 MHz REVERSE LIST Range Offset 445 000 449 9875 5 MHz 450 00...

Page 77: ...T DELAY ATTENUATOR TONE DATA RECORD AUTO STORE 1 ON 2 OFF 1 NONE 2 1 SECOND 3 2 SECONDS 4 4 SECONDS 5 INFINITE 6 2 SECONDS 7 5 SECONDS 8 10 SECONDS 1 ON 2 OFF 1 CTCSS 2 DCS 3 OFF 1 ON 2 OFF 1 ON 2 OFF 1 2 3 4 5 RANGE RANGE SELECT STEPS MODE ALPHA TAG TRUNK 1 SERVICE OPTION 2 OFF 1 5KHz 2 6 25KH 3 7 5KH 4 10KHz 5 12 5KHz 6 25KHz 7 50KHz 8 100KHz 9 AUTO 1 AM 2 FM 3 WFM 4 NFM 5 AUTO 1 PLAN 1 2 PLAN 2...

Page 78: ...OTOROLA CNTRL CH ONLY TYPE1 TYPE2 800 900 Always On at P 25 1 2 1 NONE 2 1 SECOND 3 2 SECONDS 4 4 SECONDS 5 INFINITE 6 2 SECONDS 7 5 SECONDS 8 10 SECONDS 1 ON 2 OFF 1 ON 2 OFF 1 ON 2 OFF 3 ONLY FREQUENCY STEPS ALPHA TAG 1 5KHz 2 6 25KH 3 7 5KH 4 10KHz 5 12 5KHz 6 25KHz 7 50KHz 8 100KHz 9 AUTO 1 2 3 4 5 6 7 8 9 1 2 ON OFF TYPE2 P25 800 TYPE1 TYPE2 P25 900 TYPE2 P25 UHF TYPE2 P25 VHF EDCS WIDE EDCS ...

Page 79: ... CLONE DATA SKIP SQ MODE BANK TAG SELECT BANK P 25 CARD 1 ON 2 OFF 1 ON 2 OFF 1 ON 2 OFF 1 2400 bps 2 4800 bps 3 9600 bps 4 19200 bps 5 38400 bps 6 57600 bps 7 OFF MASTER SLAVE 1 ON 2 OFF 1 CSQ 2 TONE SQ 3 TONE SEARCH 1 ENABLE 2 DISABLE 1 HIGH 2 MEDIUM 3 OFF 3 SYSTEM OPTION ...

Page 80: ...tor or its representatives in connection with the performance of this warranty Warrantor at its option may replace the unit with a new or refurbished unit THE LIMITED WARRANTY SET FORTH ABOVE IS THE SOLE AND ENTIRE WARRANTY PERTAINING TO THE PRODUCT AND IS IN LIEU OF AND EXCLUDES ALL OTHER WARRANTIES OF ANY NATURE WHATSOEVER WHETHER EXPRESS IMPLIED OR ARISING BY OPERATION OF LAW INCLUDING BUT NOT ...

Page 81: ...75 Memo ...

Page 82: ...Memo 76 ...

Page 83: ...Memo 77 ...

Page 84: ......

Reviews: