10
will not interfere with any internal wiring. Be sure there is enough
room for the bracket AND the transceiver.
1. Hold the bracket in place and use the self-tapping screws
(included) to screw the bracket into place. Check the other
side of the dashboard and adjust any wiring if needed.
2. Hold the transceiver in place in the bracket. Screw in the side
knobs, inserting rubber washers onto the screw between the
bracket and the transceiver.
These rubber washers serve as “shock absorbers” and help
keep the unit steady.
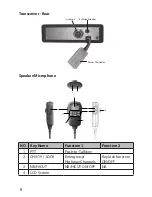
3. Connect the speaker/microphone’s RJ45 jack to the front of
the transceiver.
INSTALL SPEAKER/MICROPHONE HANGER
1. Find a location to install the microphone hanger. Install it,
using the same precautions as installing the transceiver.
Adjust wiring if necessary.
2. Hang the speaker/microphone onto the hanger.
CONNECT POWER
Uniden recommends connecting the power lead to the Ignition
Switch Accessory Terminal. This way, the transceiver is
automatically turned off when the ignition switch is turned off.
As an alternative, the power cord may be connected to an
available terminal on the fuse block or to a point in the wiring
harness. However, caution must be taken to prevent a short
circuit. If in doubt, contact your vehicle dealer for information.
Ground Information
This transceiver may be installed and used in any 12-volt DC
negative ground system vehicle.
With a negative ground system, the negative (-) battery terminal is
usually connected to the vehicle motor block.
Connect Power
1. Connect the power cord to the power connector from the
transceiver.


