background image

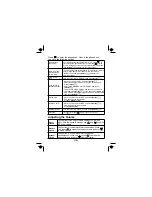
Press [ ] to enter the phonebook. Once in the phonebook,

you have the following options:

Scroll through

the entries

Jump to entries

that start with a

certain letter
Store a new

entry

Copy entries to

another handset

Dial an entry

Delete an entry

Close the

phonebook

Delete all entries

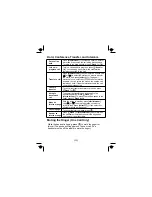
Ringer

Volume

Earpiece

Volume

Speaker

Volume

To scroll through the phonebook from A to Z, press

. To

scroll through the phonebook from Z to A press

. (If the

phone is in standby, move the cursor to DIAL/EDIT, and then

press

to display the summary screen.)

Press the number key corresponding to the letter you want to

jump to. (If the phone is in standby, move the cursor to

DIAL/EDIT, and then press

to display the

summary screen.)
Move the cursor to STORE NEW, then press

.

1. Move the cursor to COPY and press

.

2. Select the handset you want to copy the entries to and

press

.

3. Select ONE MEMORY or ALL MEMORY and press

.

4. If you choose ONE MEMORY, find the entry you want to

copy and press

. If you choose ALL MEMORY,

ARE YOU SURE? appears. Move the cursor to select YES,

then press

.

1. Move the cursor to DIAL/EDIT and press

.

2. Find the entry you want to dial.

3. Press

or

.

1. Move the cursor to DIAL/EDIT and press

.

2. Find the entry you want to delete.

3. Press

.

Move the cursor to DELETE ALL and press

.

Press

or press

again if you are on a call).

[ ]

[ ]

[select/

]

[select/

]

[select/

]

[select/ ]

[select/

]

[select/

]

[select/

]

[select/

]

[select/

]

[ /flash ]

[ ]

[select/

]

[menu/clear]

[select/

]

[ ] (

[

]

Adjusting the Volume

Choose from three ringer volume settings (off, low, and

high). With the phone in standby, use

and

to adjust

the ringer volume.
Choose from six volume levels for the earpiece. While on a

call, press

to make the earpiece volume louder or

to make it softer.
Choose from six volume levels for the handset

speakerphone. While on a call, press

to make the

speaker volume louder or

to make it softer.

[ ]

[ ]

[ ]

[ ]

[ ]

[ ]

(10)

Summary of Contents for DSS3405

Page 1: ...DSS3405 ADDITIONAL HANDSET OWNER S MANUAL OWNER S MANUAL...

Page 2: ...you make and receive calls A cradle that charges an accessory handset It connects to power but not to a phone line base Accessory handsets must be registered to a base The handset is not in use If it...

Page 3: ...the finger indentation press in on the battery case cover and slide it down to remove it 2 Plug the battery connector into the battery compartment jack Be sure to match the red and black wires to the...

Page 4: ...echargeable battery pack that automatically recharges when the handset is placed in the charger 1 Connect the AC adapter to the jack and to a 240V AC outlet that is not controlled by a wall switch 2 S...

Page 5: ...e handset before you can register it to a new base To register to a DSS34 series base place the accessory handset in the base While the handset is registering HANDSET REGISTERING appears in the LCD Wh...

Page 6: ...TER HS appears 4 Press to move the cursor to YES and then press You will hear a confirmation tone If the original base the handset was registered to is not available for some reason for example it is...

Page 7: ...peaker and ringer 5 Battery compartment 6 New message LED 7 Earpiece 8 LCD display 9 10 11 talk flash 12 phonebook 13 14 transfer intercom 15 select messages 16 up 17 end call 18 Caller ID 19 down 20...

Page 8: ...book Press the right side to open the Caller ID list ICON STATUS DESCRIPTION The Standby Screen Using the Four way Function Key 7 Standby Talk Standby Talk Talk Talk Talk Talk The icon indicates the h...

Page 9: ...your phonebook and Caller ID entries If you have 100 phonebook entries Caller ID records won t be saved but will display when the call comes in Press to open the Caller ID record list The first thing...

Page 10: ...phone If you subscribe to Caller ID on call waiting the Caller ID information of the waiting call appears on the display Press and then on the handset to switch between callers Press on the handset to...

Page 11: ...u want to copy the entries to and press 3 Select ONE MEMORY or ALL MEMORY and press 4 If you choose ONE MEMORY find the entry you want to copy and press If you choose ALL MEMORY ARE YOU SURE appears M...

Page 12: ...ation the outside call remains on hold If the other station accepts the call you will be disconnected To cancel the transfer and return to the call press or To answer the transfer page and speak to th...

Page 13: ...and high The default setting Natural Tone is recommended for hearing aid users When the desired option appears on the display stop After two seconds the displayed audio tone is set and the display ret...

Page 14: ...ck Press to start recording Press or to stop Press to turn the answering machine on Press to turn it off Press to start recording Press or to stop Press to hear the Help prompts Press to exit the syst...

Page 15: ...D appears With average use your battery talk time will be approximately 8 hours and standby time will be approximately 7 days For optimum performance be sure to return the handset to the cradle after...

Page 16: ...g contacts until all visible dirt is removed Dry the contacts thoroughly before returning the handset to the charging cradle Warning To avoid the risk of personal injury or property damage from fire o...

Page 17: ...16 MEMO...

Page 18: ...17 MEMO...

Page 19: ...en Repair Agent for a defect or malfunction covered by this warranty E Used in conjunction with any equipment or parts or as part of a system not manufactured by Uniden F Installed programmed or servi...

Page 20: ...2006 Uniden Australia Pty Limited Uniden New Zealand Limited Printed in China UUZZ01474BZ 0...

Reviews: