background image

Important Safety Instructions

When using your telephone equipment, these basic safety precautions should always be followed to
reduce the risk of fire, electrical shock, and injury to persons:

1. Read and understand all instructions.
2. Follow all warnings and instructions marked on the product.
3. Unplug this product from the wall outlet before cleaning, and use a dry cloth, without liquid or aerosol

cleaners.

4. Do not use this product near water; for example, near a bath tub, wash bowl, kitchen sink or laundry

tub, in a wet basement, or near a swimming pool.

5. Do not place this product on an unstable cart, stand, or table. The telephone may fall, causing

serious damage to the unit.

6. Slots and openings in the cabinet and the back or bottom are provided for ventilation. To protect the

product from overheating, these openings must not be blocked or covered. This product should
never be placed near or over a radiator or heat register. This product should not be placed in a
built-in installation unless proper ventilation is provided.

7. This product should be operated only from the type of power source indicated on the marking label.

If you are not sure of the type of power supply to your home, consult your dealer or local power
company.

8. Do not allow anything to rest on the power cord. Do not locate this product where the cord will be

damaged by persons walking on it.

9. Do not overload wall outlets and extension cords, as this can result in the risk of fire or electrical

shock.

10. Never push objects of any kind into this product through cabinet slots, as they may touch dangerous

voltage points or short out parts that could result in a risk of fire or electric shock. Never spill liquid of
any kind on the product.

11. To reduce the risk of electric shock, do not disassemble this product. Take it to qualified service

personnel when service or repair work is required. Opening or removing covers may expose you to
dangerous voltages or other risks. Incorrect reassembly can cause electric shock when the
appliance is subsequently used.

12. Unplug this product from the wall outlet and refer servicing to qualified service personnel under the

following conditions:
A. When the power supply cord is damaged or frayed.
B. If liquid has been spilled into the product.
C. If the product has been exposed to rain or water.
D. If the product does not operate normally when following the operating instructions. (Adjust only

those controls that are covered by the operating instructions. Improper adjustment of other
controls may result in damage and will often require extensive repair work by a qualified
technician.)

E. If the product has been dropped or the cabinet has been damaged.
F. If the product exhibits a distinct change in performance.

13. Do not use the telephone to report a gas leak in the vicinity of the leak.

2

XCI860

860CH1.CHP

Fri Aug 08 17:00:26 1997

Color profile: Disabled

Composite  Default screen

Summary of Contents for DXI860

Page 1: ...he Base Unit Antenna 12 Installing the Handset Battery Pack 12 Cleaning the Battery Contacts 13 Charging the Battery Pack 13 Low Battery Indicator 13 Setting the Pulse Tone Switch 14 Automatic Digital...

Page 2: ...duct where the cord will be damaged by persons walking on it 9 Do not overload wall outlets and extension cords as this can result in the risk of fire or electrical shock 10 Never push objects of any...

Page 3: ...Pack Released electrolyte is corrosive and may cause damage to the eyes or skin It may be toxic if swallowed 4 Exercise care in handling the battery in order not to short the battery with conducting m...

Page 4: ...r a call by just removing the Handset from the Base so you don t have to waste time pushing buttons or flipping switches AutoStandby allows you hang up by simply returning the Handset to the Base The...

Page 5: ...e qualification that the range depends upon the environment in which the telephone is used Many factors limit range and it would be impossible to include all the variables in our rating The Maximum Ra...

Page 6: ...cordless telephone or other source of interference If you cannot eliminate this type of interference you need to change to a different channel Finally it should be noted that some cordless telephones...

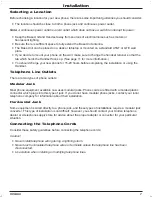
Page 7: ...tallation or using the Handset Telephone Line Outlets There are two types of phone outlets Modular Jack Most phone equipment available now uses modular jacks Phone cords are fitted with a molded plast...

Page 8: ...s not create a trip hazard or where it could become chafed and create a fire or other electrical hazards Adapter Safety Feature The AC adapter furnished with this phone may be equipped with a polarize...

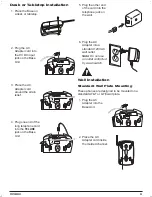
Page 9: ...e TEL LINE jack on the Base Unit 5 Plug the other end of the cord into the telephone jack on the wall 6 Plug the AC Adapter into a standard 120V AC wall outlet Note Do not use an outlet controlled by...

Page 10: ...rd wall plate you can mount your phone directly on a wall Before mounting your phone consider the following Select a location away from electrical cables pipes or other items behind the mounting locat...

Page 11: ...tandard 120V AC wall outlet Note Do not use an outlet controlled by a wall switch Setting the Handset Retainer The handset retainer holds the Handset in place if your phone is mounted on a wall The st...

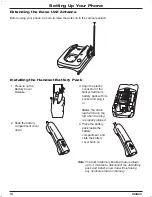
Page 12: ...er down 3 Align the plastic connector of the Nickel Cadmium battery pack with its socket and plug it in Note The black lead will be on the left when the plug is properly aligned 4 Place the battery pa...

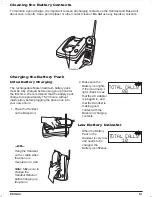
Page 13: ...nto your new phone 1 Place the Handset on the Base Unit OR Hang the Handset on the cradle when the phone is mounted on a wall Note Make sure to change the Handset Retainer before hanging up the phone...

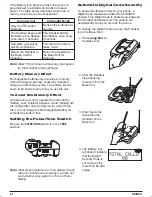
Page 14: ...cator appears Avoid topping off the charge after using the phone for a short time Also do not charge the Rechargeable Battery for extended periods of time Setting the Pulse Tone Switch Be sure the PUL...

Page 15: ...ndicate that the Digital Security Code is set Handset Volume Controls Please refer to the foldout in front of your operating guide for key positions To adjust the ringer volume of your Handset press v...

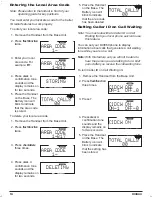
Page 16: ...e Base The Battery icon will blink to indicate that the area code has been deleted Setting Caller ID on Call Waiting Note You must subscribe to Caller ID on Call Waiting from your local phone service...

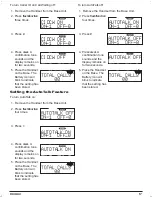
Page 17: ...firmation tone sounds and the display remains on for two seconds 5 Place the Handset on the Base The Battery icon will blink to indicate that the setting has been stored To turn AutoTalk off 1 Remove...

Page 18: ...o Caller ID services from your local phone company for the caller s name and number to be displayed When the phone rings the LCD displays information about the person calling you OR If the Caller ID s...

Page 19: ...ft until the last number is shown in the display 4 During your conversation the LCD displays the call timer 5 When you are finished with the conversation press talk to hang up OR Place the Handset bac...

Page 20: ...oldest call in memory will be deleted Viewing Calls in Memory 1 Remove the Handset from the Base Unit 2 Press caller id 3 To view calls stored in memory Press the or keys To dial the number currently...

Page 21: ...talk key Deleting Caller ID messages Only individual messages can be deleted on the DXI860 To delete messages follow the steps below 1 Press caller id 2 Press or to scroll to the call you want to dele...

Page 22: ...al Memory There are 20 dial memory locations in the DXI860 cordless phone You can manually enter any number into dial memory so that it can be dialed later 1 Remove the Handset from the Base Unit 2 Pr...

Page 23: ...oll through the numbers stored in memory 4 Press talk to dial the number Editing and Deleting Numbers in Dial Memory Use this feature to edit or delete numbers stored in dial memory 1 Remove the Hands...

Page 24: ...nes to Tom Jones Press mem again Press until T is displayed in the LCD Press 2 twice to move two characters to the right Press until m is displayed in the LCD Press mem Bob Jones 8361234 Tob Jones 836...

Page 25: ...ther channel Can t make or receive calls Check both ends of the Base Unit telephone line cord Make sure the AC Adapter is plugged into the Base Unit and wall outlet Disconnect the AC Adapter for a few...

Page 26: ...z 3V AC Size w o antenna 8 H X 3 W X 2 D Weight Approximately 11 1 oz Handset Receive Frequency 43 72 to 46 97 MHz 25 Channels Transmit Frequency 48 76 to 49 99 MHz 25 Channels Power Requirements Rech...

Page 27: ...DXI860 Cordless Telephone with Caller ID NICAD CHP Fri Aug 08 16 59 54 1997 Color profile Disabled Composite Default screen...

Page 28: ...not short circuit the battery m Do not charge the Rechargeable Nickel Cadmium Battery used in this equipment in any charger other than the one designed to charge this battery as specified in this Gui...

Page 29: ...R Pause Keys P 7 Caller ID Key i 8 Memory Key M 9 Up Arrow Pound Key 10 Channel C Delete Key D 11 Volume V Cancel Key c 1 2 3 4 5 6 7 8 9 10 11 talk tone flash redial volume chan function pause cance...

Page 30: ...nd Functions Base 12 Pulse Tone Switch 13 Telephone Line Jack 14 DC Power Jack 15 Status Indicator 16 Page Find Key Extend A Phone status page find 13 14 12 15 16 Color profile Disabled Composite Defa...

Page 31: ...urred by warrantor or its representatives in connection with the performance of this warranty THE LIMITED WARRANTY SET FORTH ABOVE IS THE SOLE AND ENTIRE WARRANTY PERTAINING TO THE PRODUCT AND IS IN L...

Page 32: ...ion All rights reserved Printed in the Philippines Covered under one or more of the following U S patents 4 511 761 4 523 058 4 595 795 4 797 916 860CH4 CHP Fri Aug 08 17 12 57 1997 Color profile Disa...

Reviews: