4
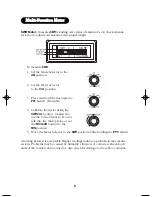
MOUNTING THE RADIO BRACKET
1. Select a location that is convenient for operating the radio, but does not
interfere with the driver or passenger.
2. Remove the mounting bracket from radio and use it as a template for
marking the location of the mounting screws.
3. Drill the necessary holes and secure the mounting bracket in place using
mounting screws.
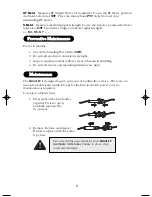
MOUNTING THE MICROPHONE HANGER
Mount the microphone hanger to the side of the radio. Mounting holes are provided
near the microphone connector and on the other side of the unit. Use the screws
supplied. You can also mount the hanger on the dashboard, if preferred.
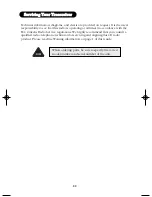
CONNECTING THE POWER CORDS
1. Check the vehicle battery connections to determine which battery terminal
(positive or negative) is grounded to the engine block or chassis. Most of
today’s vehicles use a negative ground. If your vehicle has a negative
ground, follow steps 2 and 3.
2. Connect the RED wire of the DC power cord to the accessory contact in
your vehicle’s +13.8 VDC fuse box.
3. Connect the BLACK wire of the DC power cord to the negative side of the
automobile (usually the chassis).
4. Plug the DC power cord into the Power Connector on the rear panel.
Plan the location of the transceiver and
microphone bracket before beginning installation.
IIn
nsstta
alllla
attiio
on
n
In vehicles with a positive ground, the RED wire connects to
the chassis and the BLACK wire connects to the accessory
contact in the fuse box.
Grant LT.qxd 3/31/99 10:03 AM Page 4
Summary of Contents for Grant LT
Page 1: ...COVER ...
Page 17: ...back cover ...

