background image

112

[MENU]


Program Location


F

 Select a location such as 

Dangerous Xing


F

 Select Location to be deleted 

F


Delete Location


F


Confirm Delete? Yes=”E” / No=”.”


.

F  

Make your choice to either delete the location or to cancel your action.

For POI Only


Set Alert Beep 

F


Choose 

Off so

 no tone sounds or one of the alert 

melodies

 Alert 1

 to 

Alert 4

.

Once you make a Tone selection you are then asked to assign a volume level to 
that selection.

Set Alert Volume 

F


Select from 15 sound levels, plus Auto. As you rotate 

the 

Scroll Control

 the Alert tone you set is played louder and louder. Press 

F

 to 

select a volume level. You can also select 

Auto

, a level that is the same setting as 

your master volume control.


Set Range 

F


Input how far away the alert sounds for the site (only 

available for POI’s)

For Dangerous Xing, and Dangerous Road Only

The Alert Tone is fixed.


Set Alert Volume 

F


Select from 15 sound levels, plus Auto and Off. As 

you rotate the 

Scroll Control 

the Alert tone is played louder and louder. Press 

F


to select a volume level. You can also select no sound (Off) or Auto, a level that is 
the same setting as your master volume control setting.

For Dangerous Xing and Dangerous Road sites there are two additional settings:


Set Heading 

F


You can input the compass direction to the site from your 

present location or, you can select 

All Range

.

For example: If the 

Dangerous Road

 location is toward the Northeast and you are 

driving in that direction, then choose 

NE


(45°)

If you know you will be driving a course which is not a fairly straight line to that site, 
choose 

All Range

 which will trigger the alert regardless of direction as long as 

the other requirements (range, speed) are met.
If you travel in a Northeast direction and do not travel either side of a northeast line 
by up to 22 degrees, the alert system will function.


Set Speed Limit 

F


Choose from 0 ~ 160km/h in 10km/h steps or 0 ~ 

80mile/h in 5mile/h steps.

UB356ZH.fm  Page 112  Wednesday, December 19, 2007  11:28 AM

Summary of Contents for UBC800XLT

Page 1: ...OWNER S MANUAL UBC800XLT C230 E OWNER S MANUAL UB356ZH fm Page 1 Wednesday December 19 2007 11 28 AM...

Page 2: ...volume control or squelch control setting This might be particularly true of the type of earphone that is placed in the ear canal DPL Digital Private Line Motorola PL PRIVACY PLUS Private Line SMARTNE...

Page 3: ...loses power as when you turn off your car s ignition with the scanner s power switch on it can lose some system settings such as display color and backlight To ensure that such settings persist eithe...

Page 4: ...Within A Menu Option 18 Understanding Scanning and the UBC800XLT 19 Understanding the Scanner s Memory 19 Understanding Quick Keys 19 What is Scanning 20 What is Searching 20 What is CTCSS DCS 20 Conv...

Page 5: ...d 43 Search Range 43 Scanning Systems 44 Selecting Systems to Scan 45 Selecting System Channel Groups 45 Locking Unlocking Systems 45 Locking Unlocking Channels 46 ID Scan ID Search Mode 46 Holding On...

Page 6: ...etting Up a Channel Group 77 Editing a Channel Group Name 77 Setting the Group Quick Key 78 Editing Channels 78 Locking Out Channel Groups 78 Deleting Channel Groups 79 Programming Channels 79 Creatin...

Page 7: ...Attenuation 101 Setting Data Skip 101 Setting the Delay Time 102 Setting the Search Frequency Step 102 Setting Air Band Step 103 Setting Record 103 Priority Scan 103 Fire Tone Out 105 Setting Tone Ou...

Page 8: ...ps 122 Type I Programming Information 122 Size Code Restrictions 123 CTCSS Frequencies 124 DCS Codes 124 Appendix 125 SERVICE SEARCH RANGES 125 Air 125 Marine 125 CB AM Radio 126 CB FM Radio 132 PMR 1...

Page 9: ...equencies and you can automatically program channels in a system using the Auto Store feature Use your scanner to monitor Analog trunked systems unencrypted only Police and fire departments including...

Page 10: ...916 AM 12 5 8 33 AIR BAND 137 0000 137 9950 FM 5 138 0000 157 9875 FM 12 5 158 0000 160 5900 FM 10 160 6000 162 5875 FM 12 5 162 6000 173 9900 FM 10 174 0000 215 9500 WFM 50 216 0000 224 9950 FM 5 225...

Page 11: ...9950 FM 5 144 0000 145 9875 FM 12 5 146 0000 155 9900 FM 10 156 0000 157 4250 FM 12 5 157 4375 160 5875 FM 12 5 160 6000 162 0250 FM 12 5 162 0300 173 9900 FM 10 174 0000 215 9500 WFM 50 216 0000 224...

Page 12: ...xxx x083 xxx x166 xxx x250 xxx x333 xxx x416 xxx x500 xxx x583 xxx x666 xxx x750 xxx x833 and xxx x916 For example the next frequency of 100 0916 MHz is 100 1000 MHz Frequency MHz Modulation Step kHz...

Page 13: ...how much memory you have used and how much you have left 100 Quick Keys You can set the scanner so you can quickly select systems and groups by using the keypad This makes it easy to listen to or quic...

Page 14: ...stom Alerts For each alert in the scanner such as channel alert Close Call alert emergency alert you can select from 9 different tone patterns and also set the alert volume level independently from th...

Page 15: ...both conventional and trunked systems at the same time Multi Site Trunking Lets you share system channels across multiple sites to more efficiently use the scanner s memory and more easily select site...

Page 16: ...ority Priority Scan Priority channels let you keep track of activity on your most important conventional channel s while monitoring transmissions on other channels Priority Plus You can set the scanne...

Page 17: ...courtesy of Popular Communications magazine Using the Scroll Control FUNC The Scroll Control is a dual purpose control It also lets you switch to secondary function operations When used in this manner...

Page 18: ...trol you operate to get a desired result We use a form of shorthand symbols to save space The following example shows you how to use the scanner s menu to edit an existing system name It shows you the...

Page 19: ...ns With a traditional scanner when you program it to track a trunked system you must first program the frequencies Since you can only program one trunking system per bank in a traditional scanner if t...

Page 20: ...cy is interesting you can program it into the scanner s memory If not you can continue to search What is CTCSS DCS Your scanner can monitor systems using a Continuous Tone Coded Squelch System CTCSS a...

Page 21: ...transmission always goes out on the same frequency Up until the late 1980s this was the primary way that radio systems operated Even today there are many 2 way radio users who operate using a convent...

Page 22: ...nd PRIVACYPLUS analog trunking systems which are extensively used in 800 MHz communication systems LTR trunking systems EDACS SCAT trunking systems EDACS trunking systems When tracking these types of...

Page 23: ...tely different frequencies on a trunked system This semi random frequency assignment made monitoring such a system impossible prior to Uniden s invention of the TrunkTracker scanner Not only does your...

Page 24: ...r each radio so with this system the user s radio sends only about 1 3 the data as a Type I system with each transmission Type II systems do not use Fleet subfleet talk groups instead they use a 5 dig...

Page 25: ...ngle channel and alternate control data with analog voice traffic While your UBC800XLT cannot track ID s in this system it can eliminate the control data so that all you hear is the voice transmission...

Page 26: ...ner Now the Fort Worth systems are locked out and System Quick Keys 1 2 and 3 allow selection between the Phoenix area systems Multi Site Trunking Some systems covering a very large geographic area us...

Page 27: ...the scanner Other sources provide additional information Information On The Internet The Internet is a great source for current frequencies and information about scanning Many web sites have lists of...

Page 28: ...re DC with Orange Wire See Step6 on Page 33 Power Cord Mounting Bracket and Hardware Push on type Telescopic Antenna Remote PC to Scanner Cable scanner plug to Front PC Connecter Owner s Manual and Ot...

Page 29: ...ner s reception use an optional external antenna designed for multi band coverage You can purchase this type of antenna at a local electronics store If the optional antenna has no cable use 50 75 ohms...

Page 30: ...slightly smaller than the screws 4 Align the bracket with the threaded holes on the sides of the radio case so the bracket is beneath the radio Secure the bracket using the two threaded knobs Never ov...

Page 31: ...connect the cable to the appropriate input jack on your PC so that with controlling software you can record to your hard disc In order for the function to operate you must set the channel to record Yo...

Page 32: ...enna to the antenna jack on the back of the scanner Mounting Using the DIN E Sleeve Optional hardware If you are unsure about how to install your scanner in your vehicle using the DIN E sleeve consult...

Page 33: ...e BLACK connects to the vehicle s chassis ground 6 Connect the ORANGE lead to one side of the headlamp switch so that when you activate the headlights the scanners LCD backlight dimmer level changes i...

Page 34: ...technique However this technique requires a very detailed and thorough knowledge of the technique Therefore we strongly suggest that if you have any doubt about your experience and abilities please c...

Page 35: ...the display Connecting an Optional Antenna The scanner s BNC connector makes it easy to connect a variety of optional antennas including an external mobile antenna or outdoor base station antenna Note...

Page 36: ...s back panel Ext Sp Jack WARNING Never connect anything other than the recommended amplified extension speaker to the scanner s headphone jack Damage to the scanner might occur WARNING Never connect a...

Page 37: ...the following table to separate those actions Note Press means press and release briefly Press and hold means press and hold down for at least 2 seconds F means Tap or Press the Scroll Control to put...

Page 38: ...ect channel or frequency Menu Rotate Turn to scroll to menu item Tap to select current option Press Use as the Enter key for menu choices Name Edit Rotate Turn to select alpha numeric entry for names...

Page 39: ...old Close Call Only Close Call Hold Press Hold Unlocks all frequencies of Global Lockout List 0 to 9 8 Scan Press Enable Disable selected System Site Quick Keys Custom Search Press Turn on and off eac...

Page 40: ...annel data for active channel Search Search Hold Close Call Close Call Hold Press Saves the active frequency Tone Out Standby Press Switches to Tone Out edit Menu to change Tone Out Settings SCAN SEAR...

Page 41: ...lone PC connector Connect Supplied Cable Connect supplied serial cable to use wired clone mode or create edit settings with the optional software Close Call Indicator 15 Lights Lights to indicate a Cl...

Page 42: ...different modes The ones we show here are more common and will assist you to get started 1 Group Quick Key 2 System Site Quick key 3 Channel Name 4 System Name Channel Group Name 5 Hold indicator 6 Si...

Page 43: ...at the scanner can change the lockout for each system or each site by pressing an assigned key while you power up the scanner or an opening screen is displayed Navigate to Set Startup Key there are di...

Page 44: ...systems according to the assigned quick key Systems assigned to quick key 1 are scanned first then 2 3 4 etc Systems not assigned to a quick key are scanned last then unlocked searches Within a quick...

Page 45: ...etting the Group Quick Key on Page 78 Follow these steps to activate or deactivate a channel group within a system while scanning 1 Tap F then turn the Scroll Control to switch to the Function Mode Th...

Page 46: ...canning a trunked system the scanner can be in either ID Scan or ID Search mode ID Scan the scanner only stops on talk group ID s TGID that you have programmed into the system that are unlocked ID Sea...

Page 47: ...frequency or talk group ID you want to store press No twice to enter hyphens in talk group ID s 3 To quick store the channel or talk group ID press EYES Otherwise press No If you enter a frequency the...

Page 48: ...rd line on the display with trunking activity indicators When the scanner is monitoring on EDACS or Motorola system the activity indicators will show which system frequencies have activity Note For Mo...

Page 49: ...nel then press F 0 The scanner displays Display Mode 2 To return to Mode 1 press F 0 Mode1 indicates the channel data under the Channel Name Mode2 indicates the frequencies under the Channel Name for...

Page 50: ...rammed See Scanner Programming reprint Program Location Choose GPS related locations for data to alert confirm location and provide you with an audible warning if desired Srch CloCall Opt Lets you adj...

Page 51: ...dlights the scanner can automatically dim the display when you turn on the headlights Tapping VOL overrides the menu setting and cycles through all backlight settings MENU Settings F Set Backlight F A...

Page 52: ...ou can hear them at a similar volume Use this setting if you listen to an audio source that has natural changes in audio level for which you want to compensate You can set the mode to be on or off to...

Page 53: ...o the scanner DMS DDD MM SS ss Enter the location in Degree Minute Second format DEG DDD dddddd Enter the location in Degree and fraction format Setting the Time Format MENU Settings F Set GPS Format...

Page 54: ...Serial Port Speed MENU Settings F Set Serial Port F Set Baud Rate F Set Front Port or Set Rear Port F Use this setting to control the data rate used for the front and back panel serial ports You typic...

Page 55: ...Scanner s Memory Warning This clears data you have entered You cannot restore user programmed data that has been deleted You can at a last step restore only the original factory data 1 To initialize t...

Page 56: ...XLT Wired cloning between other models to the UBC800XLT is not possible MENU Wired Clone F Master or Slave select one as the master and one as the slave To clone transfer data directly from one UBC800...

Page 57: ...er The master scanner checks the connection between the two scanners then transfers its data to the slave scanner 5 When the transfer is complete Complete appears on both scanners If the transfer did...

Page 58: ...up to a total of 1000 sites Each system can have up to 20 channel groups The following table provides you the information to successfully perform various steps connected with programming each of the s...

Page 59: ...p P 77 Copy System P 71 Delete System P 71 System Option Settings CNV MOTOROLA EDACS LTR See Pages TYPE I TYPE II WIDE NARROW SCAT Set Quick Key P 64 Set Startup Key P 65 Set Lockout P 65 Set Hold Tim...

Page 60: ...lert P 68 EDCS ID Format P 69 Set Record P 69 Rvw ID Srch L O P 70 Clr All L O IDs P 70 System Option Settings CNV MOTOROLA EDACS LTR See Pages TYPE I TYPE II WIDE NARROW SCAT UB356ZH fm Page 60 Wedne...

Page 61: ...Splinter 800MHz Standard 800MHz Splinter 900MHz Band VHF Band UHF Band WIDE NARROW SCAT Edit Name Set Quick Key Set Startup Key Set Frequencies Set Modulation Set Attenuator Set Lockout Set Hold Time...

Page 62: ...t this is a conventional system After creating the system 1 Set system level settings that apply to conventional systems in Programming System Settings 2 Create one or more channel groups with channel...

Page 63: ...specific channels create one or more channel groups with channels as described in Programming Channel Groups Programming System Settings Throughout the following sections you will notice a heading on...

Page 64: ...move the cursor to the right press 6 To clear a character press No twice To clear all characters press No 3 times To accept an entry press EYES or F MENU Program System F Select a conventional system...

Page 65: ...MENU Program System F Select a conventional system F Edit Sys Option F Set Lockout F Unlocked The system is scanned when its quick key is enabled Temporary L O The system is not scanned even if its qu...

Page 66: ...s 2 seconds for each system This setting applies to all channels within the system MENU Program System F Select a Conventional system F Edit Sys Option F Set Data Skip F This setting controls whether...

Page 67: ...stom fleet map Enter the size code 0 to 14 for each block Press F to select For Motorola Type I and Type IIi Hybrid systems you must enter a system fleet map in order for the scanner to properly track...

Page 68: ...code Ignore the scanner does not return to the control channel until the carrier drops Note The default setting is Yes MENU Program System F Select a Motorola Type I II or EDACS Wide Narrow system F E...

Page 69: ...oup ID s are commonly provided in one of two formats AFS and Decimal This setting determines how you enter EDACS ID s and how the scanner displays them AFS Format the scanner uses AFS format for Talk...

Page 70: ...d out ID then press EYES If no ID s are locked out the scanner displays Nothing Locked Press Any Key MENU Program System F Select a trunked system F Edit Sys Option F Clr All L O IDs F To quickly unlo...

Page 71: ...enter characters Press F when finished MENU Program System F Select the existing system F Delete System F Confirm Delete Yes E No Important Deleted systems cannot be restored You must re enter them Th...

Page 72: ...Site F Edit Name F To enter a letter turn the Scroll Control until the character you want appears To enter a decimal point press No To move the cursor to the left press 4 To move the cursor to the rig...

Page 73: ...enabled when it is unlocked If you press a different key at startup the system is locked out If you do not assign the system a startup key the system is not affected by any key press during startup ME...

Page 74: ...e The default setting is Auto This setting controls the modulation method used for the frequency band In most cases if you leave this set to Auto the scanner automatically selects the correct modulati...

Page 75: ...system The scanner always scans LTR or SCAT systems for at least 1 second to check for current activity If you select 0 and the control channel is received the scanner stays on the system for a minima...

Page 76: ...ts to On MENU Program System F Select a trunked system F Edit Site current F Select a site F Set LocationInfo F This setting control whether the system is automatically enabled and disabled when you c...

Page 77: ...it Name F Follow these steps to enter edit the group name 1 The current name displays with the first character of the name highlighted 2 Rotate the Scroll Control to select a new first letter Press 6...

Page 78: ...e you create a channel group store channels in that group See Programming Channels on Page 79 for specific channel options MENU Program System F Select an existing system F Edit Group F Select an exis...

Page 79: ...ystems or Talk Group ID for Trunked systems Enter the information for the channel then press F to proceed to setting additional channel options MENU Program System F Select a system F Edit Group F Sel...

Page 80: ...ems or the talk group ID for trunked systems when it stops on a channel MENU Program System F Select a conventional system F Edit Group F Select a channel group F Edit Channel F Select the channel F E...

Page 81: ...r searches for and displays any CTCSS or DCS tone that accompanies the transmission CTCSS the scanner only opens squelch if the CTCSS tone you select is also present with the signal The scanner then p...

Page 82: ...thod used for the channel In most cases if you leave this set to Auto the scanner automatically selects the correct modulation type for the channel you are programming MENU Program System F Select a c...

Page 83: ...f MENU Program System F Select a system F Edit Group F Select a channel group F Edit Channel F Select the channel F Set Alert F Off the scanner does not alert you when the channel becomes active Alert...

Page 84: ...channel s record setting or Marked Channel which only records the channels you ve set to record MENU Program System F Select a system F Edit Group F Select a channel group F Edit Channel F Select a c...

Page 85: ...tem At this point you can paste that channel information to another group or compatible system MENU Program System F Select a system F Edit Group F Select a channel group F Edit Channel F Select a cha...

Page 86: ...Search F The following search ranges appear as you scroll Air Marine CB AM Radio CB FM Radio PMR LPD The scanner searches the service you selected stopping on any transmission it finds and displaying...

Page 87: ...go to the search menu Custom Search Custom Search lets you program and search 10 custom search ranges You can search any of these ranges simultaneously and select each custom search range you set Dur...

Page 88: ...rching press HOLD RESUME To lock out a frequency found while searching press L O There are two different results based on the number of times you press L O Press L O 1 time Temporary L O appears Press...

Page 89: ...canner will skip data transmissions during search Set Step lets you set the custom search range s step the gap between frequencies Set C Ch Only lets you search for a Motorola control channel If it fi...

Page 90: ...unlock it You can also assign a System Quick Key to the search to make it easy to quickly enable disable the search range for search and scan The Search with Scan Hold time determines how long the sca...

Page 91: ...not attenuated Set Record to enable real time audio output from REC to an audio recording device On the scanner outputs the signal Then press F to select Off the scanner does not output any audio Then...

Page 92: ...uto Search and Store Your scanner s Auto Store feature lets you search for new frequencies in custom search ranges or within a service search range on a conventional system or new talk group ID s on a...

Page 93: ...searching The scanner creates this group if it doesn t already exist Trunked Search and Store You can store talk group ID s into the system you selected in Selecting a System Otherwise the scanner sto...

Page 94: ...urces Several factors affect Close Call performance however Performance is increased with higher transmit power receive antenna tuned to the target band and a low background RF level Other than the an...

Page 95: ...every 2 seconds Set CC Override Lets you select how the Close Call feature works with other scanning activities If you turn this option off when the scanner detects a Close Call signal CC Found Press...

Page 96: ...anner detects a Close Call hit it alerts you according to the Override and Alert settings in the previous section While listening to a Close Call hit you can press HOLD RESUME to hold on the hit frequ...

Page 97: ...llow these steps to set up the option MENU Close Call F Hits with Scan F Set Quick Key or Set Lockout or Set Hold Time F Set the available option as you would for other menu items This special channel...

Page 98: ...ked Out Frequencies While searching or during Close Call operation if you press L O while the scanner is stopped on a frequency that frequency is locked out of these modes The temporary L O frequency...

Page 99: ...otate the Scroll Control or press to select a different frequency If there are no frequencies to review you see Nothing Locked Press Any Key Otherwise to cancel press MENU to backstep Searching for Su...

Page 100: ...ncy range for broadcast screen Turn the Scroll Control to select an option then press F to change the following setting To set the custom range of a band select one and press F to set the limit Band 1...

Page 101: ...anner uses FM frequency modulation for the frequency band WFM the scanner uses wideband FM for the frequency band WFM Broadcast the scanner uses FM Broadcast for the frequency band Setting Attenuation...

Page 102: ...ch CloCall Opt F Set Delay Time F This setting determines how long the scanner waits after a transmission ends before resuming Quick Search or Close Call operation 1 5 sec The scanner waits the set am...

Page 103: ...iority Scan while scanning the radio interrupts its scan every two seconds to check the priority channel P Ch PRI appears on the screen There are two ways to set Priority Scan 1 Press PRI to set one o...

Page 104: ...n unlocked conventional systems PRI flashes when you select this mode 2 You can choose how the scanner treats Priority Channels using the Menu options MENU Set Priority F Choose Off On or Plus On F UB...

Page 105: ...he settings to monitor All tone outs that have the same frequency modulation and attenuation setting as the one you select are also monitored In standby mode the display cycles through all monitored t...

Page 106: ...two tone pages enter a value for A and B For one tone pages using short tones of less than 3 75 seconds enter the tone value for A and 0 zero for B For long tone pages such as group pages of more than...

Page 107: ...ion will always be FM If you switch to Tone Out Standby Mode for Multi Channel Monitoring the display switches every 2 seconds to show the FM frequency it is checking However it is at the same time ch...

Page 108: ...al connector Insert that plug into the male 9 pin socket on the back of the scanner labeled REMOTE GPS Once the GPS is connected refer to the following sections dealing with inputting selections to en...

Page 109: ...e system actually has one site and use different location settings for each of those additional sites See the programming section for specific steps required to apply location data to a radio system N...

Page 110: ...cified direction Speed is equal to zero and a direction is entered along with a location This setting is used for a dangerous intersection alert Speed is set to zero and no direction is entered but on...

Page 111: ...n still set a different volume level with the new Alert Tone for all three types Set LocationInfo F Input the latitude and then longitude Set Lockout F As you near your target location an alert sounds...

Page 112: ...sound levels plus Auto and Off As you rotate the Scroll Control the Alert tone is played louder and louder Press F to select a volume level You can also select no sound Off or Auto a level that is th...

Page 113: ...S Mode Important While you are in normal GPS mode or Scan Mode and you press and hold GPS for 2 seconds location data at that point is stored The scanner opens a dialog to store your current location...

Page 114: ...OLD RESUME enter Scan Hold mode F enter Function Mode select a programmed location from all stored locations The location data is stored in the order POI Dangerous Xing and Dangerous Road Then within...

Page 115: ...so try changing the height or angle of the antenna Cleaning Disconnect the power to the unit before cleaning Clean the outside of the scanner with a mild detergent To prevent scratches do not use abra...

Page 116: ...reposition the antenna Move the scanner You might be in a remote area that could require an optional multi band antenna Check with your dealer or local electronics store Scan won t stop The squelch m...

Page 117: ...ata frequency The scanner might need to be changed to a Type 1 scanner setup Change to a Type 1 scanner setup See the programming instructions on the web at www butelsoftware com The system you are tr...

Page 118: ...ry another preset fleet map or program your own fleet map One or more of the system s frequencies might not be entered Make sure all the system s frequencies have been entered The system you are tryin...

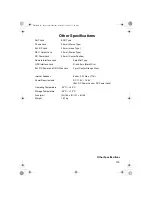
Page 119: ...ote Interface Jack 4pin Mini Type GPS Interface Jack D sub 9 pin Male Wire Ext DC Power and ORG Wire Jack 3 pin Center Orange Wire Internal Speaker 8 ohm 5 W Max 77 Power Requirements DC 11 0V 16 6V E...

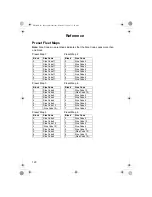
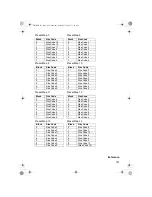
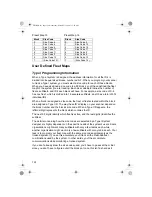
Page 120: ...Size Code 4 7 Size Code 11 7 Size Code 4 Block Size Code Block Size Code 0 Size Code 4 0 Size Code 12 1 Size Code 4 1 Size Code 12 2 Size Code 4 2 Size Code 4 3 Size Code 4 3 Size Code 4 4 Size Code 4...

Page 121: ...Code 0 3 Size Code 0 4 Size Code 0 4 Size Code 0 5 Size Code 0 5 Size Code 0 6 Size Code 0 6 Size Code 4 7 Size Code 0 7 Size Code 4 Block Size Code Block Size Code 0 Size Code 4 0 Size Code 0 1 Size...

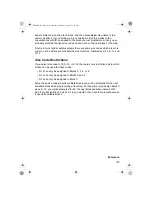
Page 122: ...xt 2 3 digits identify which fleet is active and the last digit s identifies the subfleet The details concerning how the size codes are selected by a Type I System designer are highly dependent on the...

Page 123: ...S 12 Size Code Restrictions If you select size code S 12 S 13 or S 14 there are some restrictions as to which blocks can be used for these codes S 12 can only be assigned to Blocks 0 2 4 or 6 S 13 ca...

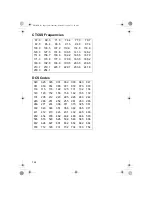
Page 124: ...233 6 241 8 250 3 254 1 023 025 026 031 032 036 043 047 051 053 054 065 071 072 073 074 114 115 116 122 125 131 132 134 143 145 152 155 156 162 165 172 174 205 212 223 225 226 243 244 245 246 251 252...

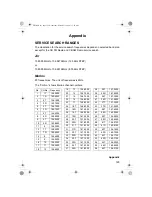
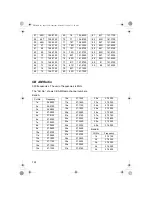
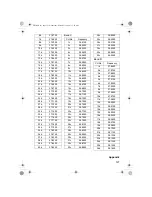
Page 125: ...500 13 7R 160 9500 14 8 156 4000 15 9 156 4500 16 10 156 5000 17 11 156 5500 18 12 156 6000 19 13 156 6500 20 14 156 7000 21 15 156 7500 22 16 156 8000 23 17 156 8500 24 18T 156 9000 25 18R 161 5000 2...

Page 126: ...157 2250 84 84R 161 8250 85 85T 157 2750 86 85R 161 8750 87 86T 157 3250 88 86R 161 9250 89 87 157 3750 90 88 157 4250 CH No Frequency 1a 26 9650 2a 26 9750 3a 26 9850 4a 27 0050 5a 27 0150 6a 27 0250...

Page 127: ...6150 10c 26 6250 11c 26 6350 12c 26 6550 13c 26 6650 14c 26 6750 15c 26 6850 16c 26 7050 17c 26 7150 18c 26 7250 19c 26 7350 20c 26 7550 21c 26 7650 22c 26 7750 23c 26 8050 24c 26 7850 25c 26 7950 26...

Page 128: ...30e 26 4050 31e 26 4150 32e 26 4250 33e 26 4350 34e 26 4450 35e 26 4550 36e 26 4650 37e 26 4750 38e 26 4850 39e 26 4950 40e 26 5050 CH No Frequency 1f 28 3150 2f 28 3250 3f 28 3350 4f 28 3550 5f 28 3...

Page 129: ...8650 10h 28 8750 11h 28 8850 12h 28 9050 13h 28 9150 14h 28 9250 15h 28 9350 16h 28 9550 17h 28 9650 18h 28 9750 19h 28 9850 20h 29 0050 21h 29 0150 22h 29 0250 23h 29 0550 24h 29 0350 25h 29 0450 26...

Page 130: ...0 0050 31j 30 0150 32j 30 0250 33j 30 0350 34j 30 0450 35j 30 0550 36j 30 0650 37j 30 0750 38j 30 0850 39j 30 0950 40j 30 1050 CH No Frequency 41G 26 5650 42G 26 5750 43G 26 5850 44G 26 5950 45G 26 60...

Page 131: ...6E 27 95125 37E 27 96125 38E 27 97125 39E 27 98125 40E 27 99125 CH No Frequency 1P 26 9600 2P 26 9700 3P 26 9800 4P 27 0000 5P 27 0100 6P 27 0200 7P 27 0300 8P 27 0500 9P 27 0600 10P 27 0700 11P 27 08...

Page 132: ...3250 33a 27 3350 34a 27 3450 35a 27 3550 36a 27 3650 37a 27 3750 38a 27 3850 39a 27 3950 40a 27 4050 CH No Frequency 1b 27 4150 2b 27 4250 3b 27 4350 4b 27 4550 5b 27 4650 6b 27 4750 7b 27 4850 8b 27...

Page 133: ...9650 10d 27 9750 11d 27 9850 12d 28 0050 13d 28 0150 14d 28 0250 15d 28 0350 16d 28 0550 17d 28 0650 18d 28 0750 19d 28 0850 20d 28 1050 21d 28 1150 22d 28 1250 23d 28 1550 24d 28 1350 25d 28 1450 26...

Page 134: ...30f 28 6550 31f 28 6650 32f 28 6750 33f 28 6850 34f 28 6950 35f 28 7050 36f 28 7150 37f 28 7250 38f 28 7350 39f 28 7450 40f 28 7550 CH No Frequency 1g 25 6150 2g 25 6250 3g 25 6350 4g 25 6550 5g 25 6...

Page 135: ...3150 10i 29 3250 11i 29 3350 12i 29 3550 13i 29 3650 14i 29 3750 15i 29 3850 16i 29 4050 17i 29 4150 18i 29 4250 19i 29 4350 20i 29 4550 21i 29 4650 22i 29 4750 23i 29 5050 24i 29 4850 25i 29 4950 26...

Page 136: ...1G 26 8650 72G 26 8750 73G 26 8850 74G 26 8950 75G 26 9050 76G 26 9150 77G 26 9250 78G 26 9350 79G 26 9450 80G 26 9550 CH No Frequency 1E 27 60125 2E 27 61125 3E 27 62125 4E 27 63125 5E 27 64125 6E 27...

Page 137: ...27 1700 19P 27 1800 20P 27 2000 21P 27 2100 22P 27 2200 23P 27 2500 24P 27 2300 25P 27 2400 26P 27 2600 27P 27 2700 28P 27 2800 29P 27 2900 30P 27 3000 31P 27 3100 32P 27 3200 33P 27 3300 34P 27 3400...

Page 138: ...650 25 433 675 26 433 700 27 433 725 28 433 750 29 433 775 30 433 800 31 433 825 32 433 850 33 433 875 34 433 900 35 433 925 36 433 950 37 433 975 38 434 000 39 434 025 40 434 050 41 434 075 42 434 1...

Page 139: ...de 76 Copying 84 Creating 79 CTCSS DCS 16 Delay 66 Delete 79 Deleting 85 Display Mode 49 Editing 70 Found Saving 92 Group 16 19 Group Name 42 Holding 47 Lock Unlock 46 78 Lockout 13 Logical Number 24...

Page 140: ...70 Channel Name 79 Channels 78 Custom Search Range 88 Frequencies 80 Service Search 90 Sites 70 System Quick Key 64 Talk Group ID 80 End Code 68 F Fleet 24 25 67 120 122 G GPS Compatible 108 Connectin...

Page 141: ...preprogrammed 15 86 Preset Edit Maps 67 Fleet Maps 120 Search Ranges 88 R Range All 112 Display 114 Edit 88 GPS 15 Search 20 43 87 91 Set 67 S Scan Close Call Hits 97 Control Channel Only 15 Conventio...

Page 142: ...ge 43 Reviewing ID Lockouts 70 Scan Delay 14 Service 86 Store ID 47 Trunked and Store 93 What Is 20 Squelch 13 20 43 56 Subfleet 24 25 subfleet 24 122 UB356ZH fm Page 142 Wednesday December 19 2007 11...

Page 143: ...Tokyo 104 8512 Japan declare under our sole responsibility that this equipment Uniden Bearcat model UBC800XLT is in compliance with the essential requirements and other relevant provisions of the EMC...

Page 144: ...2008 Uniden Corporation All rights reserved UBZZ01356ZZ 0 Printed in P R C UB356ZH fm Page 144 Wednesday December 19 2007 11 28 AM...

Reviews: