background image

69


BUTTONS

DESCRIPTION

Refresh

Recheck identifiable disks (hard drive, USB 

drive, etc.)

Browse

Displays file names and other information for 

the selected drive. Allows you to delete files.

Format

Deletes data on the selected hard disk 

(including locked fines and images.)

2.  Select a drive to review (in the screen above, select 01). Select 

Browse

.  The Information screen displays for reviewing the hard 

drive. 
 

3.  Select 

Cancel

 to return to the 

Disk Management

 screen.

Summary of Contents for UDVR45-4

Page 1: ...DIGITAL VIDEO RECORDER UDVR45 4 UDVR85 4 UDVR85 8 2015 Uniden America Corporation Issue 1 October 2015 Irving Texas USA...

Page 2: ...rt website at www uniden com Images in this manual may differ slightly from your actual product Uniden surveillance products are not manufactured and or sold with the intent to be used for illegal pur...

Page 3: ...to alert the user to the presence of important operating and maintenance servicing instructions in the literature accompanying the device The lightning flash with arrowhead symbol within an equilatera...

Page 4: ...he device should not be blocked 5 It is highly recommended to connect the device to a surge protector to protect from damage caused by electrical surges It is also recommended to connect the device or...

Page 5: ...into your outlet consult an electrician to replace the outlet A polarized plug has two blades with one wider than the other A grounding plug has two blades and a third grounding prong 5 Power Sources...

Page 6: ...ification mark 10 Ventilation Slots and openings in the case provide ventilation for reliable device operation and to protect it from overheating These openings must not be blocked or covered The open...

Page 7: ...to confirm if they can be installed outdoors When installing cameras outdoors place them in a sheltered area SERVICE 1 Servicing Do not attempt to service this device yourself as opening or removing...

Page 8: ...Entry Never push objects of any kind into this device through openings as they may touch dangerous voltage points or short out parts that could cause a fire or electric shock Never spill liquid of any...

Page 9: ...UTER 14 CONNECT MONITOR OR HD TELEVISION TO DVR RECEIVER 14 SETUP 14 SYSTEM LOGIN 15 REQUIRED SETTINGS 15 DEFAULT OPERATION SETTINGS 16 HOW DO I 16 SEARCH FOR FILES 16 PLAY BACK RECORDED FILES 16 FIND...

Page 10: ...CH TAB 60 EVENT SEARCH TAB 61 FILE MANAGEMENT TAB 62 IMAGE TAB 63 BACKUP ICON 64 INFORMATION ICON 65 SYSTEM ICON 65 EVENT ICON 66 LOG ICON 66 NETWORK ICON 67 ONLINE USERS ICON 68 EXIT ICON 68 DISK MAN...

Page 11: ...k Its professional network video surveillance software provides strong network communication and telecommunication ability ABOUT THIS MANUAL This manual provides operating procedures for UDVR system T...

Page 12: ...up to 16x Record search by time and event Night vision to 100 ft in total darkness 12V 500mA power 6W power consumption IP66 Environmental rating WHAT S IN THE BOX UDVR Receiver Cameras 4 or 8 Camera...

Page 13: ...video power splitter cable and connect camera s power connector to the BNC Power Camera power connector The connectors are labeled TO CAMERA SIDE ONLY and TO DVR SIDE ONLY 2 Connect video connector o...

Page 14: ...or 1 Plug an HDMI cable into the DVR receiver s HDMI port 2 Plug the other end into the HDMI port on the television monitor 3 Plug the TV monitor s power cable into power Connecting to Monitor 1 Plug...

Page 15: ...nd time so recorded files will be correctly timestamped Next create a password for the admin user Set Date and Time The correct date and time are critical for the timestamp on recorded files If the ti...

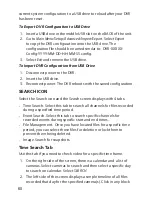
Page 16: ...s and search for events through the Information screen The first two methods use the Search screen Main Menu Search 1 Select Main Menu Search The Search screen displays 2 Select the Time Search tab to...

Page 17: ...ol 2 Channel audio switch Not available on all models 3 Function Hidden key 4 Operate playback Playback control details as follow BUTTON FUNCTION BUTTON FUNCTION Play Pause Next Frame Fast Forward Pre...

Page 18: ...ee page 32 for details Set Up Email Notification and Alert Go to Main Menu Setup Network Email tab See page 49 for field descriptions and details Configure Alarms Go to Main Menu Setup Alarms Select t...

Page 19: ...19 Add or Change a Password Go to Main Menu Setup Users User Management Change Password button The screen prompts for old and new passwords See page 53 for details...

Page 20: ...ction you made in the previous step See page 53 to set up a password It is strongly recommended you add a password to the admin account and to all other accounts you may add to the system LIVE VIEW Li...

Page 21: ...cts motion Audio Recording On Network Disconnected DD MM YYYY HH MM SS Date and Time Stamp for recorded files SYSTEM MENU In Live view right click on any screen to bring up the System menu Right click...

Page 22: ...ng a specific camera displays before moving to the next camera Colour Set image parameters for all channels The image parameters include brightness contrast saturation and hue E Zoom When the screen i...

Page 23: ...click in the live view quadrant of the camera you want to take snapshots The System menu displays Select Snap and that camera s snapshot cycle activates A camera icon displays Start Record Stop Record...

Page 24: ...Main Menu icons to select that feature Icons submenus or screens display to help you manage the system Many of these screens have tabs across the top to further refine operations Click the icon to re...

Page 25: ...ails Disk Management Select the Disk Management icon to view information about the system hard disk and any connected USB drives See page 68 for icon and screen details Logoff This selection logs you...

Page 26: ...name Click the field and a popup keyboard displays Enter a name if desired System Number Used when managing multiple DVR systems Click the field and a popup number keypad displays Enter a sequential...

Page 27: ...t time format time zone you can also adjust the system time manually Note the default time zone of the system is GMT 05 00 Select Sync Time with NTP Server to the correct time Set the network server t...

Page 28: ...stem Date Set date through pop up calendar System Time Set time DST Tab Set the start and end time of daylight saving time by week or date FIELD DESCRIPTION Enable Turn DST on or off This does not set...

Page 29: ...er If Mode Week set DST by month number of week day of week and hours to be offset i e November the 1st Sunday 02 00 00 If Mode Date set DST by date according to popup calendar Default Select Default...

Page 30: ...the color settings Channel number Brightness Hue Saturation Contrast Live Tab Name the camera and set up how the image displays color contrast etc 1 Select a camera to rename A keyboard displays 2 Re...

Page 31: ...ther channel to adjust When you are finished select Ok 6 The Live screen displays again Main Monitor Tab This screen lets you determine in what order the cameras live video displays in the screen s se...

Page 32: ...left mouse button and drag it across the area you want to block A white rectangle covers the area you indicated Release the mouse 3 Right click to return to the Video Blind tab Select Apply to save yo...

Page 33: ...Recycle Record Snap Enable Tab Use this tab to determine if the selected camera will record video or audio or both FIELD DESCRIPTION Record Check to set the channel to record video Uncheck to skip rec...

Page 34: ...termine how large a recorded file will be FIELD DESCRIPTION Resolution Supports both 720P AHD camera and 960H analog camera resolution Default 720P FPS Range 1 30 Default 30 fps Encode Support VBR Var...

Page 35: ...ve video displays for that channel along with the date time block in a small text frame 2 Left click and hold over the date time block Move the block to where you want it to display Release the mouse...

Page 36: ...terval between snapshots Snap Number Number of snapshots taken at one time Schedule Icon Select the Schedule icon to display the Schedule screen The Schedule screen lets you set up recording schedules...

Page 37: ...er channel select that channel in the dropdown box for Apply Settings To Then select Copy The configuration is now copied to the second desired channel 6 If you want to apply the settings from one cha...

Page 38: ...all channels 6 Select Exit Sensor Tab This tab sets up a recording schedule for other motion sensors not included Default All recording blocks selected 1 Select a channel 1 8 or All whose sensor recor...

Page 39: ...a specific channel Motion Establish parameters for motion detection as well as a motion detection oeration schedule Video Loss Set up an alarm notification plan if any cameras lose video Other alarm...

Page 40: ...the alarm delay time for a specific channel Options are 5 sec 10 sec 20 sec 30 sec 60 sec 120 sec or Always Trigger Select this field to set alarm trigger configuration trigger recording PTZ camera li...

Page 41: ...r A buzzer sounds when an alarm is triggered if this selection is enabled Show Full Screen A big screen popup alarm displays when an alarm is triggered To Alarm Out This tab directs alarms to optional...

Page 42: ...l X screen To Record Tab Select which cameras record when an alarm is triggered Trigger Channel X screen To PTZ Only applies if PTZ camera is installed not included Sets what type of action to take Pr...

Page 43: ...tion alarm and takes action according to presets from this screen The Trigger and Area fields lead to other screens to set parameters FIELD DESCRIPTION Enable Enable this function on a channel to dete...

Page 44: ...f you have pets In this interface drag the scrollbar to adjust the sensitivity value 1 8 The default value is 6 the smaller the value is the higher the sensitivity Since the sensitivity is affected by...

Page 45: ...tailed description of the trigger screen Video Loss Icon If you lose video from a camera someone cuts the cable the system alerts you according to the presets from this screen Select Trigger for the c...

Page 46: ...gered the system sends information relevant to the alarm alarm event device name etc to the user specified mailbox To Alarm Out When enabled triggers will send an alarm to the specified alarm output D...

Page 47: ...vice s subnet mask Leave blank if Obtain an IP Address Automatically is checked Gateway Device s default gateway Leave blank if Obtain an IP Address Automatically is checked Preferred DNS Preferred DN...

Page 48: ...o you receive on your mobile device FIELD DESCRIPTION Resolution Supports CIF FRS Choice range 1 6 Encode Support VBR and CBR Default VBR Quality Select one of the following quality levels Lower Low M...

Page 49: ...ain name if domain name confirm that the DNS setting is right then it can be correctly resolved e g smtp gmail com Port Mail server port number dependant on your provider SSL Check Provides secure soc...

Page 50: ...the DVR is connected directly to the internet Not recommended if using P2P standard connection If the DVR is connected to a router configure DDNS in that router FIELD DESCRIPTION DDNS Server DNS servi...

Page 51: ...reen This screen allows you to add and delete users and to change the passwords of existing users The admin user does not have a password Uniden strongly recommends that you add a password to the admi...

Page 52: ...uter s unique hardware number NOTE If a computer s physical address is 0 the UDVR system does not bind to a specific computer and the user can use any computer to log into the client to use the DVR Ho...

Page 53: ...ayback per camera Backup per camera PTZ Control per camera Remote Live View per camera Deleting a User 1 Select a user from the User Management screen 2 Select Delete The system displays a confirmatio...

Page 54: ...may or may not support all of these features The Point Tilt Zoom icon configures an optional PTZ camera Tabs in this icon help you set movement patterns These patterns are Presets move the camera fro...

Page 55: ...NG NEON STAR VIDO DSCP VISCA SAMSUNG RM110 HY N control Simulative Cruise Allows the camera to use cruise patterns whether the camera supports PTZ cruise functions or not Advanced Tab This tab helps y...

Page 56: ...Setting to display the Tracking screen on the full screen for the selected channel In the Preset column select Setting for the channel you want to work with The Preset Channel X screen displays Preset...

Page 57: ...umber from the drop down Number list No to assign to the Preset 4 Click Save and the preset points are setting successfully You can set a maximum of 128 preset points Cruise Channel X Screen Select Se...

Page 58: ...58 1 Select Add to add up to 8 cruise lines 2 Double click one of the entries and the Cruise Preset screen displays 3 Select the Add Preset Point button A popup field displays...

Page 59: ...es Hide function Adjust PRZ direction Note Each channel can record only one track and auto saves after recording is completed Advanced Icon Select the Advanced icon the Advanced Setup screen displays...

Page 60: ...icon and the Search screen displays with 4 tabs Time Search Select this tab to search all channels for files recorded during a specified time period Event Search Select this tab to search specific ch...

Page 61: ...ct to view that file 3 The video plays back in full screen for that search from the time selected Icons on the playback bar allow you to control the video Event Search Tab This tab helps you find spec...

Page 62: ...k recorded files and then keep or delete them FIELD DESCRIPTION Search Click to display recorded files according to channel number Lock Check the box of a file you do not want to accidently be deleted...

Page 63: ...mage from that date time setting Direction arrows let you move forward or backward through the saved video Double click the image to play back the video from the time when the image was captured FIELD...

Page 64: ...is an alternative USB slot for the mouse only 1 Insert USB device into USB slot on back of unit 2 Go to Main Menu Backup The Backup screen displays 3 Set up search criteria to locate the files you wan...

Page 65: ...em Event Log Network Online Users Exit System Icon Select the System icon and the System screen displays This screen displays basic system information such as system type firmware version etc It also...

Page 66: ...e Event List screen Use this screen to gather event information for various types of alarms during a specified time frame Log Icon Select this icon to display the Log List screen The Log List screen d...

Page 67: ...start end times and select what types of operations to search for 3 Select Search and the system displays all events that fit those criteria Network Icon Select this icon to display the Network scree...

Page 68: ...users currently connected to the DVR system Exit Icon Select this icon to return to the Main Menu screen DISK MANAGEMENT ICON Select this icon to view files on your hard drive and on a connected USB...

Page 69: ...mation for the selected drive Allows you to delete files Format Deletes data on the selected hard disk including locked fines and images 2 Select a drive to review in the screen above select 01 Select...

Page 70: ...own the system but only logs you as a user out of the system When you select the Logoff icon a confirmation screen displays SHUT DOWN ICON Select the Shut Down icon save your data and changes and shut...

Page 71: ...ugh Uniden s ProHD app for iOS or Android devices Go to the Apple App Store or Google Play to download the free Uniden ProHD app The app is designed to be self explanatory However you can download the...

Page 72: ...urrent UDVR firmware version 2 Go to http unidensupport com Find Your Product Downloads and look for the UDVR Check your DVR s firmware number against the latest firmware download available 3 If there...

Page 73: ...he hard disk cables are damaged The front end video signal is not stable Poor heat dissipation too much dust bad running environment for the DVR DVR hardware is damaged Cannot detect hard disk after t...

Page 74: ...e reasons Something is wrong with the data cable or the jumper of the hard disk The hard disk is damaged or no video data Upgrade firmware which is different from the original firmware files The video...

Page 75: ...The time display is wrong Possible reasons The setting is wrong Internal batteries are not properly connected or the voltage is too low DVR can not control the PTZ Possible reasons The PTZ camera is n...

Page 76: ...preview video Camera not connected properly not transmitting data correctly Connection issues between camera and DVR Something wrong with the USB backup Possible reasons There are not enough DVR resou...

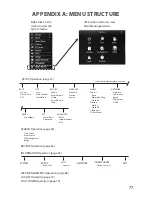
Page 77: ...nsor Sensor Basic Alarm Handling Schedule Motion Motion Schedule Video Loss Other Alarms PTZ Italic text indicates tabs on screen SEARCH Operation page 60 Time Search Event Search File Management Imag...

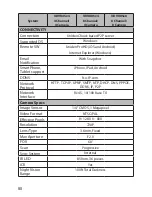
Page 78: ...BNC HDMI Yes VGA Out Yes Audio In 4 Audio Out 1 USB Ports 1 Front 2 Back Alarm In Yes Alarm Out Yes Video Input Resolution 1280 x 720 PTZ Control RS 485 Pelco D P protocol etc Power DC 12V DISPLAY Liv...

Page 79: ...me Rate NTSC 1 30 fps Recording Quality 256 2048kbps Substream Resolution CIF Frame Rate 6fps Recording Schedule Calendar style by hour day recording mode by channel Watchdog Yes Auto recovery Playbac...

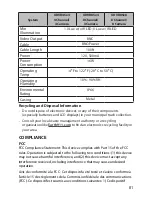
Page 80: ...ith Snapshot SmartPhone Tablet support iPhone iPad Android DDNS No IP com Network Protocol HTTP TCP IP UPNP SMTP NTP DHCP DNS PPPOE DDNS IP P2P Network Interface RJ 45 10 100 Base TX Camera Specs Imag...

Page 81: ...cipal trash collection Consult your local waste management authority or a recycling organization like Earth911 com to find an electronics recycling facility in your area COMPLIANCE FCC FCC Compliance...

Page 82: ...Tout changement ou modification non approuv express ment par la partie responsable pourrait annuler le droit l utilisateur de faire fonctionner cet quipement ONE YEAR LIMITED WARRANTY Important SAVE Y...

Page 83: ...OF MERCHANTABILITY OR FITNESS FOR A PARTICULAR PURPOSE THIS WARRANTY DOES NOT COVER OR PROVIDE FOR THE REIMBURSEMENT OR PAYMENT OF INCIDENTAL OR CONSEQUENTIAL DAMAGES Some states do not allow this exc...

Page 84: ...84...

Reviews: