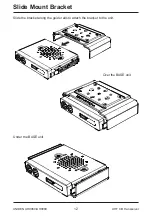
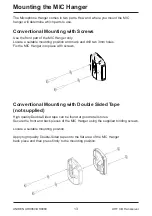
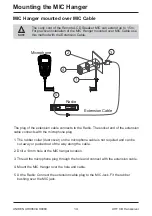
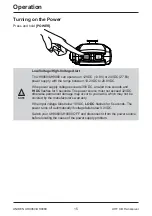
background image

UH9060/UH9080

Remote Speaker MIC

UHF CB Transceiver

For more exciting new products please visit our website:

Australia: www.uniden.com.au

Summary of Contents for UH9060

Page 1: ...UH9060 UH9080 Remote Speaker MIC UHF CB Transceiver For more exciting new products please visit our website Australia www uniden com au ...

Page 2: ...ks Using the POLICE button Only for UH9080 18 Triple Watch 19 Transmitting 19 CTCSS Continuous Tone Coded Squelch System 20 DCS Digital Coded Squelch 20 Call Tone 21 Using Repeater Channels 21 Operating the UHF CB Radio in Duplex Mode 22 Scanning 23 Add Remove Channels from SCAN Memory 23 MASTER SCAN Mode 23 Open Scan OS Mode 25 Group Scan GS Mode 26 Priority Watch 27 Busy Channel Lockout 28 Roger...

Page 3: ... to the ID Memory 39 Tone Calling Making a Selcall Call 40 Receiver Quiet TSQ Mode 40 To Activate Deactivate Tone Squelch TSQ on a Channel 41 Receiving a Selcall 41 Scanning Tone Squelched Channels 42 Group Calling 43 Selcall ID Format 43 Selcall Settings 44 Tone Period 44 Lead in Delay 44 Lead in Delay Programming 45 Lead in Tone 45 Alarm Mode 46 Call Alarm Auto Mode 46 Call Alarm Continue Mode 4...

Page 4: ...HFHLYHG Signals ORVH DOOTM RF Capture Feature2 4 2QH 7RXFK 6PDUW H 9RLFH QKDQFHU 4 9RLFH 6FUDPEOH 6HWWLQJV4 Control Features 5HPRWH 6SHDNHU 0LFURSKRQH Remote SPK MIC with Extension Cable LVSOD ZLWK DFNOLJKW RORXUV ULJKWQHVV RQWUDVW FRQWURO 6OLGH 0RXQW UDFNHW 9 WR 9 3RZHU QSXW 8QGHU DQG RYHU YROWDJH DOHUW IXQFWLRQ 6LJQDO 6WUHQJWK 3RZHU 0HWHU 9ROXPH RQWURO DVH 5HPRWH 0LF 6SHDNHUV WHUQDO 6SHDNHU DFN ...

Page 5: ...8V DC 27 6V ANT Controls Connectors 5 UNIDEN UH9060 UH9080 UHF CB Transceiver 23 24 7 9 10 11 12 13 14 15 22 16 8 4 5 6 3 1 2 Base Front Rear Remote LCD Speaker MIC 17 18 19 20 21 RM 980 FOR UH9080 RM 960 FOR UH9060 ...

Page 6: ...Display LCD 1 0 DFN 2 0 DFN 3 Main Speaker 4 Power Input Connection 13 8VDC or 27 6VDC 5 EXT SP WHUQDO 6SHDNHU DFN 6 UHF Antenna Connection 17 DCS CTCSS 6 7 66 Button POLICE Police CB Fire Button1 Move selection right 18 SCAN Scan Button MEM Memory Button 19 Volume Up Button 20 Volume Down Button 21 TSQ Tone Squelch Channel Close Call Close Call Button1 22 REPLAY Replay Button SELCALL Selective Ca...

Page 7: ...INST Instant Channel 11 TRI HOLD Triple Watch Hold Mode 12 SCAN Scanning 13 Signal Power Level 14 GS Group Scan a 15 SRF Signal Strength 16 PRI Priority Watch 17 UHF CB Channel 18 Channel Frequency Alpha Tag display 19 BCL Busy Channel Lockout 20 DUP LIST Duplex Channel Close Call Lockout List1 21 DCS CTCSS DCS CTCSS selected 22 DCS CTCSS Code Number Extra RX Channel Indicator1 23 TSQ Tone Squelch...

Page 8: ...wner s Manual Microphone Hanger with screws washers DC Power Cord with fuse Extension Cable EC770 Mounting Bracket Mounting Screws Washer Stars And Screws UH9060 UH9080 Remote Speaker MIC UHF CB Transceiver For more exciting new products please visit our website Australia www uniden com au Slide Mount Bracket Guide Rails and Screws ...

Page 9: ... Accessories DECT Wireless Speaker Microphone MK800W Visit the UH9060 UH9080 page on the website for more information on the availability of optional accessories www uniden com au for Australia 9 UNIDEN UH9060 UH9080 UHF CB Transceiver ...

Page 10: ...ocks into place Gently tug the MIC or Extension Cable cord to test that the connection is locked Use the rubber cover which is on the cord to seal the MIC jack entry from dust Disconnecting the MIC from the MIC Jack 3XOO EDFN WKH UXEEHU FRYHU DQG PRYH LW GRZQ DORQJ WKH FRUG 8VLQJ WKH ÀDW EODGH RI D screwdriver or similar object carefully push the lock tab of the MIC plug towards the MIC cord and a...

Page 11: ...to attach Slide Mount Bracket When you unpack the box ensure that you have the slide mount bracket guide rails and the screws Align the guide rails along the side of the base and insert them into the slots provided Then use the screws to lock them securely in position ...

Page 12: ...12 UNIDEN UH9060 UH9080 UHF CB Transceiver Slide the bracket along the guide rails to attach the bracket to the unit Slide Mount Bracket Over the BASE unit Under the BASE unit ...

Page 13: ...ng screws Locate a suitable mounting position SSO KLJK TXDOLW RXEOH 6LGHG WDSH RQWR WKH ÀDW DUHD RI WKH 0 DQJHU EDFN SLHFH DQG WKHQ SUHVV UPO WR WKH PRXQWLQJ SRVLWLRQ The Microphone Hanger comes in two parts How and where you mount the MIC hanger will determine which parts to use Conventional Mounting with Screws Use the front part of the MIC Hanger only Locate a suitable mounting position and mar...

Page 14: ...e plug of the extension cable connects to the Radio The socket end of the extension cable connects with the microphone plug 1 The rubber collar dust cover on the microphone cable is not required and can be cut away or pushed out of the way along the cable 2 Drill a 13mm hole at the MIC hanger location 3 Thread the microphone plug through the hole and connect with the extension cable 4 Mount the MI...

Page 15: ... ÀDVKHV IRU VHFRQGV 7KH SRZHU VRXUFH PXVW QRW H FHHG 9 otherwise permanent damage may occur to your radio which may not be covered by the manufacturer s warranty If the input voltage falls below 10VDC LO DC ÀDVKHV IRU VHFRQGV 7KH power turns off automatically if voltage falls below 9 0VDC Switch your UH9060 UH9080 OFF and disconnect it from the power source before locating the cause of the power s...

Page 16: ...4 VTXHOFK RSHQ LV VHOHFWHG WKHQ 021 PRQLWRU LFRQ ÀDVKHV I 64 WLJKW VTXHOFK LV VHOHFWHG WKHQ 647 LFRQ ÀDVKHV 6HOHFWLQJ WLJKW VTXHOFK PRGH PD SUHYHQW WKH UHFHSWLRQ RI ZHDN signals LJK QRLVH DUHDV PD VWLOO EUHDN WKH VTXHOFK 3 Press and hold MENU to save and exit from menu mode Smart Key Function The smart key S provides one touch access to one of these functions Instant Channel Call Tone or Equalizer...

Page 17: ... L3 High Enhancing the high frequency the sound quality becomes sharp Programming the Instant Priority Channel 1 1 Press MENU IRXU WLPHV 3 DQG FXUUHQW FKDQQHO VHWWLQJ ÀDVKHV 2 Press on the microphone to select the desired channel 3 Press and hold MENU to save and exit Programming the Instant Priority Channel 2 1 Press MENU YH WLPHV 3 DQG FXUUHQW FKDQQHO VHWWLQJ ÀDVKHV 2 Press on the microphone to ...

Page 18: ... will be available When the FIRE LFRQ LV VKRZLQJ WKHQ SUH SURJUDPPHG UH DPEXODQFH IUHTXHQFLHV ZLOO EH DYDLODEOH 7KH SROLFH UH DPEXODQFH IUHTXHQFLHV GR QRW KDYH channel numbers instead PO appears in the channel display for a police frequency and FI DSSHDUV IRU D UH RU DPEXODQFH IUHTXHQF 1 Press and hold POLICE to select the desired channel bank s combination The channel banks can be selected as fol...

Page 19: ...SRUDULO ZKHQ UHFHLYLQJ D VLJQDO 7ULSOH ZDWFK IXQFWLRQ LV LQYDOLG LQ 6FDQ PRGH Transmitting The UH9060 UH9080 transmits only on UHF CB Channels NOTE For your reference a list of the available channels corresponding frequencies and guidelines for their use and selection is printed on p 51 p 53 For Australia Channels 05 and 35 are reserved for Emergency Calls Select the desired channel Press PTT on t...

Page 20: ...e available channels corresponding frequencies and guidelines for their use and selection is printed on p 51 p 53 For Australia Channels 05 and 35 are reserved for Emergency Calls Press to select the desired channel to use CTCSS Press DCS CTCSS 7 66 LFRQ ÀDVKHV Press to select the desired CTCSS code 01 38 Press DCS CTCSS once to store the new setting To turn off CTCSS or DCS select the oFF code du...

Page 21: ...hielding effect caused by solid obstructions In normal Simplex operation your radio transmits on one particular frequency and receives on that same frequency If there is a barrier that partially blocks your transmitted signal the probability of another radio receiving the signal is very slim Hills tall buildings metallic structures etc tend to act as a screen between radios Standard Operation with...

Page 22: ...01 as the channel being used in your area for repeater use 1 Press MENU 2 times The duplex VHWWLQJ ÀDVKHV 2 Press to change the setting between ON or OFF standard channel numbering 3 Press and hold MENU WR VDYH H LW IURP WKH menu mode DUP icon displays when a selected channel is set to Duplex mode NOTE 2QO FKDQQHOV DQG FKDQQHOV DUH DYDLODEOH IRU XSOH KHFN ZLWK RXU ORFDO 5HWDLOHU IRU LQIRUPDWLRQ RQ...

Page 23: ...nel groups 1 Press SCAN to start Scanning 2 The SCAN icon appears 3 The scan direction can be changed at any time by pressing 4 Press SCAN to stop Scanning Add Remove Channels from SCAN Memory Select OS GS Scanning Mode Select the channel you want to store Press and hold MEM MEM icon appears and two beep tones sound To remove the channel from SCAN memory press and hold MEM once more The MEM icon d...

Page 24: ...channels from GS SCAN Memory refer the section above NOTE RX only Channels CH22 CH23 CH61 CH62 and CH63 Emergency Channels CH05 CH35 User Programmable RX Channels CH81 to DQG 3ROLFH RU LUH PEXODQFH FKDQQHOV JURXS ZLOO QRW EH included in MASTER SCAN Mode even though stored into GS Memory Also channels for which Duplex Setting are On will be skipped in MASTER SCAN Mode To select MASTER SCAN Mode 1 P...

Page 25: ...ve channels from OS SCAN Memory refer to p 23 Allows continuous scanning of all selected channels If an active channel is found scanning will stop on that channel If the received signal ceases the unit will wait 3 seconds for the signal to return otherwise scanning resumes After transmission in scan mode the unit will wait 20 seconds for the signal to return otherwise scanning resumes To select OS...

Page 26: ...le scanning see p 17 for setting Instant Priority Channel and p 27 to turn on Priority Watch GS Scanning checks the Instant Priority Channel for activity regularly when Priority Watch is ON If the Priority Channel becomes active the radio will stay on that channel for as long as the signal is present If the received signal ceases Priority Scanning continues after 3 seconds If scanning stops on a c...

Page 27: ...ated while it is tuned to an active channel the UH9060 UH9080 will stay on that active channel If none of the channels are active the UH9060 UH9080 will reinstate the scan start channel NOTE If OS GS Scanning is initiated when there are no channels programmed in OS GS memory an error tone will be heard and scanning will not start see Add Remove Channels from SCAN Memory p 23 NOTE If a button is no...

Page 28: ...U WR VDYH exit from the menu mode NOTE If a button is not pressed within 10 seconds the UH9060 UH9080 will automatically exit the Menu Mode Roger Beep 1 Press MENU ten times The roger beep ROGER VHWWLQJ ÀDVKHV 2 Press to change the setting between ON or OFF 3 Press and hold MENU to save H LW IURP WKH PHQX PRGH NOTE If a button is not pressed within 10 seconds the UH9060 UH9080 will automatically e...

Page 29: ...ill automatically exit the Menu Mode Alpha Tag The SELCALL IDs and Extra Receive Channels have the option of displaying a name Alpha Tag instead of the ID or frequency Set Alpha Tag to ON to display the name if it has been programmed 1 Press MENU twelve times The Alpha Tag ALPHA VHWWLQJ ÀDVKHV 2 Press to change the setting between ON or OFF 3 Press and hold MENU WR VDYH exit from the menu mode NOT...

Page 30: ...LRXV volume setting KHQ DQ RSWLRQDO WHUQDO 6SHDNHU LV FRQQHFWHG WR WKH W 6S MDFN RI the base it substitutes for the Base unit speaker which becomes muted 7KHUHIRUH 0 1 6 1 FRQWURO WKH WHUQDO 6SHDNHU LQ SODFH RI the base unit speaker NOTE If a button is not pressed within 10 seconds the UHF CB Radio will automatically exit the Menu Mode Backlight Colour 1 Press MENU fourteen times The current Backl...

Page 31: ...DYH exit from the menu mode Scramble On Off Only for UH9080 Scramble enables private communications by scrambling the voice signal This prevents users without descrambler equipment or a compatible unit understanding the conversation Select desired channel 1 Press MENU HLJKWHHQ WLPHV 7KH 6FUDPEOH VHWWLQJ ÀDVKHV 2 Press to change the setting between OFF 1 Scramble 1 2 Scramble 2 3 Press and hold MEN...

Page 32: ...ording IWHU WKH PRVW UHFHQW UHFHLYHG VLJQDO KDV EHHQ SOD HG EDFN D ORQJ FRQ UPDWLRQ WRQH sounds and the radio returns to the previous mode During playback older recordings can be accessed by pressing to skip forward back between recordings stored within the 1 minute buffer The record number indicates which discrete recording is currently being replayed NOTE 5HFHLYHG VLJQDOV VKRUWHU WKDQ PV DUH QRW...

Page 33: ...en a name if desired Manually Programme a RX Channel Only for UH9080 In CB channel mode UHF CB channel 3UHVV KROG MENU 7KH ORZHVW DYDLODEOH HPSW 5 FKDQQHO ZLOO ÀDVK 2 Press if you wish to select another RX channel 3 Press REPLAY WR EHJLQ WKH IUHTXHQF HGLW 7KH 0 GLJLW UDQJH ÀDVKHV Use or WR VKLIW EHWZHHQ 0 UDQJH EHWZHHQ 0 N UDQJH LQ 12 5kHz steps Press WR VHOHFW WKH GHVLUHG IUHTXHQF ZLWKLQ 0 N UDQJ...

Page 34: ... microphone If an active frequency channel found scanning will stop on that frequency To skip press on the microphone to continue scanning 4 When desired frequency is found press REPLAY to move to Alpha Tag selection FXUVRU ÀDVKHV LQ WKH VW DOSKD SRVLWLRQ If you do not wish to name the channel then skip this step Press to select the desired alpha character Use or to shift between cursor positions ...

Page 35: ...WH WKH QHZ FKDQQHO LV programmed 7KH 5 FKDQQHO QXPEHU ÀDVKHV 4 If a name is desired press REPLAY twice to begin Alpha Tag edit see manual programming above 5 Press and hold ENTER to exit programming mode Store a frequency found using CLOSE CALL to a RX Channel Only for UH9080 Start Close Call RF Capture feature When an active frequency is found which you wish to store press HOLD to stay on that fr...

Page 36: ...VH DOO 5 FDSWXUH ZRUNV ZHOO IRU ORFDWLQJ WKH VRXUFH RI VWURQJ ORFDO transmissions such as mobile and handheld two way radios in areas with no other strong transmission sources However if you are in an area with many transmission sources such as pager radio transmitters PXOWL XVH UDGLR WRZHUV WUDI F FRQWURO GHYLFHV HWF ORVH DOO 5 FDSWXUH PLJKW QRW QG WKH WUDQVPLVVLRQ RX DUH VHDUFKLQJ IRU RU LW PLJK...

Page 37: ...cy is undesired for instance it is a data channel then the frequency can be added to the lockout list and ignored in future 1 First press HOLD to stay on that frequency 2 And then press and hold HOLD to lockout that frequency and resume Close Call RF Capture mode Unlock a Locked out frequency 1 The locked out frequencies can be reviewed by pressing MENU 2 GLVSOD V DQG WKH ORZHVW IUHTXHQF LQ WKH OR...

Page 38: ...her transceivers in its class Receiver Quieting Tone Squelch When activated on individual UHF CB channels except for emergency CH05 and CH35 it automatically mutes the receiver audio circuit of the radio It will stay in this Quiet mode as long as the Selcall tone code Selcall ID required to open the muting circuit is not received Call Alarm When a received code matches to your Selcall ID an alarm ...

Page 39: ...e ID Memory 1 Press and hold SELCALL The Selcall ID memory will open 2 Press to select the desired memory slot to edit NOTE 8S WR PHPRULHV FDQ EH VWRUHG I RX H SHFW WR PDNH FDOOV WR UDGLRV QRW VWRUHG LQ WKH PHPRU WKHQ leave memory ID 1 blank for manual ID entry at the time of the call 3 Press SCAN WR EHJLQ WKH HGLW 7KH WK GLJLW RI WKH ÀDVKHV 4 Use or to shift between digits A 6th digit for 6 tone ...

Page 40: ...ess SCAN WR EHJLQ HGLW 7KH WK GLJLW RI WKH ÀDVKHV b Use or to shift between digits A 6th digit for 6 tone Selcall is available and indicated by a _ c Press to select the desired ID 4 Press SELCALL to transmit the Selcall CAL will display when transmitting the Selcall An acknowledge tone coming from the called radio will be received if you have successfully made contact The acknowledge tone for the...

Page 41: ... perform the following operations a Automatically responds to the caller by transmitting Acknowledge Tones b Informs you that a caller is on the Channel by emitting a CALL ALARM Default Alarm Setting four successive beeps in a regular interval for 10 seconds Refer to p 46 Alarm Mode for other alarm settings and displays the CAL icon c Flashes the TSQ icon for about 20 seconds allowing you to use t...

Page 42: ...the call is not answered within 20 seconds TSQ Scanning resumes The CAL icon remains on the LCD display To look for the Channel where the CALL is received a Cancel TSQ Scanning by pressing SCAN b Using browse through the TSQ Channels The CAL indicator marks the Channel where the Call is received 2 When answered TSQ Scanning is automatically deactivated The Channel is removed from the QUIET Operati...

Page 43: ... 10 radios X X X X A 100 radios X X X A A 1000 radios X X A A A 10000 radios X A A A A ZKHUH LV D FRPPRQ 6HOFDOO SUH RI RXU JURXS and A is the CCIR Assigned Group Tone Code Example If one group comprises 10 members with Selcall IDs the ID numbers could be as follows Group ID Individual ID 1 2 3 4 0 1 2 3 4 1 1 2 3 4 2 1 2 3 4 3 to 1 2 3 4 9 all in TSQ mode at CH20 If someone transmits ID 1234A on ...

Page 44: ... by the dealer 1 Switch Off the Power 2 Press and hold POWER and MENU The SELCALL Settings Menu will display no tone will sound 3 Press MENU repeatedly to select the Tone Period setting which is indicated on the display as Pd 4 Press SCAN WR HGLW WKH VHWWLQJ 7KH FXUUHQW VHWWLQJ ÀDVKHV 5 Press to select the desired tone period from 40ms 70ms or 100ms 6 Press SCAN to exit the setting 7 Press and hol...

Page 45: ...The Lead in Tone when programmed rides on the Lead in Delay Hence when transmitting a Selcall ID a continuous tone will be heard for the duration of the Lead in Delay The main purpose of the Lead in Tone is to increase the probability of contact between your unit and another radio when TSQ Scanning 1 Switch Off the Power 2 Press and hold POWER and MENU The SELCALL Settings Menu will display no ton...

Page 46: ...or both of the above mentioned modes transmission by using the PTT button is possible when the TSQ LFRQ LV ÀDVKLQJ 1 Switch Off the Power 2 Press and hold POWER and MENU The SELCALL Settings Menu will display no tone will sound 3 Press MENU repeatedly to select the Alarm mode setting which is indicated on the display as AL 4 Press SCAN WR HGLW WKH VHWWLQJ 7KH FXUUHQW VHWWLQJ ÀDVKHV 5 Press to sele...

Page 47: ...26 162 2 7 85 4 27 167 9 8 88 5 28 173 8 9 91 5 29 179 9 10 94 8 30 186 2 11 97 4 31 192 8 12 100 0 32 203 5 13 103 5 33 210 7 14 107 2 34 218 1 15 110 9 35 225 7 16 114 8 36 233 6 17 118 8 37 241 8 18 123 0 38 250 3 19 127 3 Tone No Tone Frequency Hz Tone No Tone Frequency Hz 0 1981 8 1747 1 1124 9 1860 2 1197 A Group 2400 3 1275 B 930 4 1358 C 2247 5 1446 D 991 6 1540 E Repeat 2110 7 1640 F 1055...

Page 48: ...503 11 054 46 261 81 506 12 065 47 263 82 516 13 071 48 265 83 523 14 072 49 266 84 526 15 073 50 271 85 532 16 074 51 274 86 546 17 114 52 306 87 565 18 115 53 311 88 606 19 116 54 315 89 612 20 122 55 325 90 624 21 125 56 331 91 627 22 131 57 332 92 631 23 132 58 343 93 632 24 134 59 346 94 654 25 143 60 351 95 662 26 145 61 356 96 664 27 152 62 364 97 703 28 155 63 365 98 712 29 156 64 371 99 7...

Page 49: ... 87500 35 468 50000 60 469 07500 11 467 90000 36 468 52500 61 469 10000 12 467 92500 37 468 55000 62 469 12500 13 467 95000 38 468 57500 63 469 15000 14 467 97500 39 468 60000 64 469 17500 15 468 00000 40 468 61250 65 469 20000 16 468 02500 41 468 62500 66 469 22500 17 468 05000 42 468 63750 67 469 25000 18 468 07500 43 468 65000 68 469 27500 19 468 10000 44 468 67500 69 469 30000 20 468 12500 45 ...

Page 50: ...5 412 72500 50 416 17500 85 466 55000 16 412 75000 51 416 28750 86 466 60000 17 412 80000 52 416 41250 87 466 85000 18 412 85000 53 416 51250 88 466 87500 19 412 87500 54 416 53750 89 466 92500 20 412 95000 55 416 67500 90 466 95000 21 413 02500 56 416 78750 91 466 97500 22 413 05000 57 416 91250 92 467 25000 23 413 07500 58 417 03750 93 467 42500 24 413 10000 59 417 17500 94 467 47500 25 413 1125...

Page 51: ...l channels to be added up to 80 Channels This simply means that the new narrowband radio you have purchased will have more channels than older radios Please refer to the guidelines above and the channel chart for further channel information A list of currently authorised channels can also be obtained from the ACMA website in Australia and the MBIE website in New Zealand Interference Poor Audio Whe...

Page 52: ...X only 3 476 475 477 225 CH33 23 476 975 RX only 4 476 500 477 250 CH34 24 477 000 5 476 525 477 275 CH35 25 477 025 6 476 550 477 300 CH36 26 477 050 7 476 575 477 325 CH37 27 477 075 8 476 600 477 350 CH38 28 477 100 9 476 625 29 477 125 10 476 650 30 477 150 11 476 675 31 477 175 12 476 700 32 477 200 13 476 725 33 477 225 14 476 750 34 477 250 15 476 775 35 477 275 16 476 800 36 477 300 17 476...

Page 53: ...7 0125 45 476 5375 477 2875 CH 75 65 477 0375 46 476 5625 477 3125 CH 76 66 477 0625 47 476 5875 477 3375 CH 77 67 477 0875 48 476 6125 477 3625 CH 78 68 477 1125 49 476 6375 69 477 1375 50 476 6625 70 477 1625 51 476 6875 71 477 1875 52 476 7125 72 477 2125 53 476 7375 73 477 2375 54 476 7625 74 477 2625 55 476 7875 75 477 2875 56 476 8125 76 477 3125 57 476 8375 77 477 3375 58 476 8625 78 477 36...

Page 54: ...W UVW SXUFKDVHG HLWKHU LQ XVWUDOLD RU 1HZ HDODQG Product 5 Years Battery Pack Accessories 1 Year If a warranty claim is made this warranty will not apply if the Product is found by Uniden to be A Damaged or not maintained in a reasonable manner or as recommended in the relevant Uniden Owner s Manual 0RGL HG DOWHUHG RU XVHG DV SDUW RI DQ FRQYHUVLRQ NLWV VXEDVVHPEOLHV RU DQ FRQ JXUDWLRQV QRW VROG E ...

Page 55: ...RUP ZLWK WKLV warranty you should deliver the Product together with satisfactory evidence of your original purchase such as a legible copy of the sales docket to Uniden Please refer WR WKH 8QLGHQ ZHEVLWH IRU WKH DGGUHVV GHWDLOV RX VKRXOG FRQWDFW 8QLGHQ UHJDUGLQJ DQ compensation that may be payable for your expenses incurred in making a warranty claim Prior to delivery we recommend that you make a ...

Page 56: ... 2016 Uniden Australia Pty Limited Printed in Vietnam U01UT980ZZZ 0 ...

Reviews: