Setting Up the Microphone
9
Setting Up the Microphone
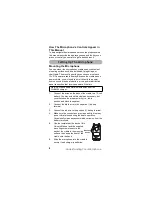
To remove the cradle from its
mounting location, use a flat
screwdriver to lift up the top of the
back cover on the cradle until it
snaps off. Then remove the
mounting screws on the back
of the cradle.
Installing the Battery
Your microphone uses a rechargeable battery (supplied) for
power. You can also use three optional rechargeable AAA
batteries to power it.
1.
Use a coin to unscrew the belt clip on
the back of the microphone.
2.
Lift up the case clips on both
sides of the microphone, then
lift up the cover over the
battery compartment.
3.
If you are installing AAA batteries
in the supplied battery holder,
make sure the polarity symbols (+ -)
inside the battery compartment match.
Otherwise, insert the supplied rechargeable battery’s
plug into the connector inside the battery compartment.
4.
Replace the battery compartment cover.
Caution: Be sure the rubber gasket around the battery
compartment is clean and completely seals the battery
compartment. This helps keep water out of the inside
of the microphone.
5.
Push down both case clips then reinstall the belt clip.
Recharge the batteries when the microphone stops
working or its range is too short.
Lift Here
Case Clips
Battery
Connector


