19
HYDRAULIC CONNECTIONS
(see also the enclosed installation drawings and hydraulic diagram)
1) CHECK
that the section of the chilled water pipes and the power of the circulation pump fitted are
sufficient. An inadequate water flow significantly reduces the cooling capacity of the unit.
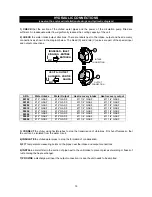
2) CHECK
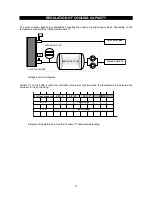
the water intake/output directions. There are labels next to the intake, output and heat recovery
connections as shown in the diagram below. The bleed (S) and drain (V) valves are part of the special input
and output connections.
INGRESSO - INLET
EINGANG - ENTREE
ENTRADA
I
ev
USCITA - OUTLET
AUSGANG - SORTIE
SALIDA
U
ev
OUTPUT
CONNECTION
V
INTAKE
CONNECTION
S
ARA
Water Intake
Water Output
Heat recovery intake
Heat recovery output
00152
Ø 2” GAS F.
Ø 2” GAS F.
Ø 1 1/4” GAS F.
Ø 1 1/4” GAS F.
00182
Ø 2” GAS F.
Ø 2” GAS F.
Ø 1 1/4” GAS F.
Ø 1 1/4” GAS F.
00202
Ø 2” GAS F.
Ø 2” GAS F.
Ø 1 1/4” GAS F.
Ø 1 1/4” GAS F.
00232
Ø 2” GAS F.
Ø 2” GAS F.
Ø 1 1/4” GAS F.
Ø 1 1/4” GAS F.
00252
Ø 2” GAS F.
Ø 2” GAS F.
Ø 1 1/4” GAS F.
Ø 1 1/4” GAS F.
00302
Ø 2” GAS F.
Ø 2” GAS F.
Ø 1 1/4” GAS F.
Ø 1 1/4” GAS F.
00403
Ø 2” GAS F.
Ø 2” GAS F.
Ø 1 1/4” GAS F.
Ø 1 1/4” GAS F.
00504
Ø 2” GAS F.
Ø 2” GAS F.
Ø 1 1/4” GAS F.
Ø 1 1/4” GAS F.
3) CONNECT
the chiller using flexible tubes to stop the transmission of vibrations. Fit shut-off valves so that
the unit can be isolated from the water circuit;
4) INSULATE
the chilled water pipes to stop the formation of condensation;
5) FIT
temperature measuring points on the pipes near the intake and output connections;
6) INSTALL
a metal filter in the section of pipe next to the unit intake to prevent pieces of welding or flakes of
rust entering the heat exchanger.
7) PROVIDE
a discharge well near the output connection in case the unit needs to be emptied.
Summary of Contents for Aquaflair 00152
Page 47: ...47...


