Contact 1.800.762.1142 for assistance. Do not return to place of purchase.
page no.
7
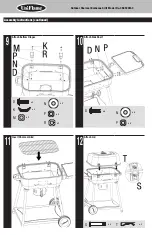
Assembly Instructions (continued)
CAUTION: Never use charcoal that has been pre-treated with lighter
fluid. Use only a high grade plain charcoal, charcoal/wood mixture,
lump charcoal or cooking wood.
CAUTION: Maximum load for side shef is 6.6 lbs.
First Use
1. Make sure all labels, packaging and protective films have been removed from the grill.
2. Remove manufacturing oils before cooking on this grill for the first time, by operating the
grill for at least 15 minutes with the lid closed. This will “heat clean” the internal parts and
dissipate odors.
Lighting Instructions
CAUTION: Check to make sure the air vents are free of debris and ash
before using the grill.
CAUTION: Make sure ash catcher is
empty and securely and completely in
place before using the grill.
1. Open lid and vents.
2. Make sure ash receiver is empty and secure.
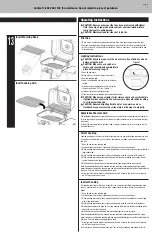
3. Remove cooking grid.
4. Lower the adjustable charcoal grid to the lowest
setting.
5. Arrange charcoal briquettes or other fuel on the
charcoal grid to the “Fill Line”. (Figure 1)
6. Light per instructions on fuel package.
7. Allow fuel time to ash into glowing coals before cooking.
CAUTION: When using a liquid starter always check ash catcher before
lighting. Fluid can collect in the ash receiver and could ignite resulting
in a fire below the bowl.
CAUTION: Never add lighting fluid to hot or even warm coals as
flashback may occur causing serious injury or damage to property.
Adjustable Charcoal Grid
The
patented
adjustable charcoal grid allows you to easily adjust the temperature of your grill.
To raise the charcoal grid and grill your food at a higher temperature, turn the knob to the right
(clockwise).
To lower the charcoal grid and grill your food at a lower temperature, turn the knob to the left
(counterclockwise).
Direct Cooking
Cooking directly over hot coals is ideal for searing in juices and grilling food requiring less than
25 minutes of grilling time, such as steaks, hamburgers, hot dogs, chicken parts, vegetables
and fruit.
1. Open lid and remove cooking grid.
2. Load and light charcoal per “Lighting Instructions” section. Leave lid open.
3. While wearing protective gloves, carefully spread hot coals evenly across charcoal grid with a
long handle tool.
4. While wearing protective gloves replace cooking grid, close lid and allow grill to preheat.
5. While wearing protective gloves open lid and place food onto cooking grids above the hot
coals with long handle tongs.
6. With lid open or closed, cook until desired internal food temperatures are achieved.
Note
: If additional briquettes are needed, remove food from cooking grid and while wearing
protective gloves remove the cooking grid and place additional briquettes without disturbing the
hot coals. Carefully replace cooking grid and food.
7. Allow charcoal to burn out by closing lid and all vents. Except in the case of an emergency,
do NOT pour water on hot coals.
Indirect Cooking
Not cooking directly over hot coals is ideal for slow cooking and grilling foods requiring more
than 25 minutes such as most roasts, loins, chops, whole chickens, turkey, fish and baked
goods.
1. Open lid and remove cooking grid.
2. Load and light charcoal per “Lighting Instructions” section. Leave lid open.
3. While wearing protective gloves, carefully spread hot coals to the outsides of charcoal grid
with a long handle tool.
4. While wearing protective gloves replace cooking grid, close lid and allow grill to preheat.
5. Wear protective gloves to open lid. Use long handled tools to place food onto cooking grids
above the areas without hot coals.
6. With lid closed, cook until desired internal food temperatures are achieved.
Note
: If additional briquettes are needed, remove food from cooking grid and while wearing
protective gloves remove the cooking grid and place additional briquettes without disturbing the
hot coals. Carefully replace cooking grid and food.
7. Allow charcoal to burn out by closing lid and all vents. Except in the case of an emergency,
do NOT pour water on hot coals.
For more tips on indirect cooking please see “Tips for Better Cookouts and Longer Grill Life”.
Operating Instructions
Figure 1
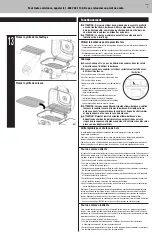
13
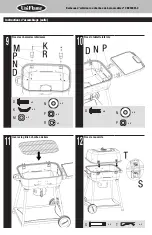
Insert Warming Rack
Insert Cooking Grid


