background image

PART II: NOTES FOR THE INSTALLER

12

Combustion head gas pressure curves 

Combustion head gas pressure depends on gas flow and combustion chamber backpressure. When backpressure is subtracted, it

depends only on gas flow, provided combustion is properly adjusted, flue gases residual O2 percentage complies with “Recommended

combustion values” table and CO in the standard limits). During this stage, the combustion head, the gas butterfly valve and the

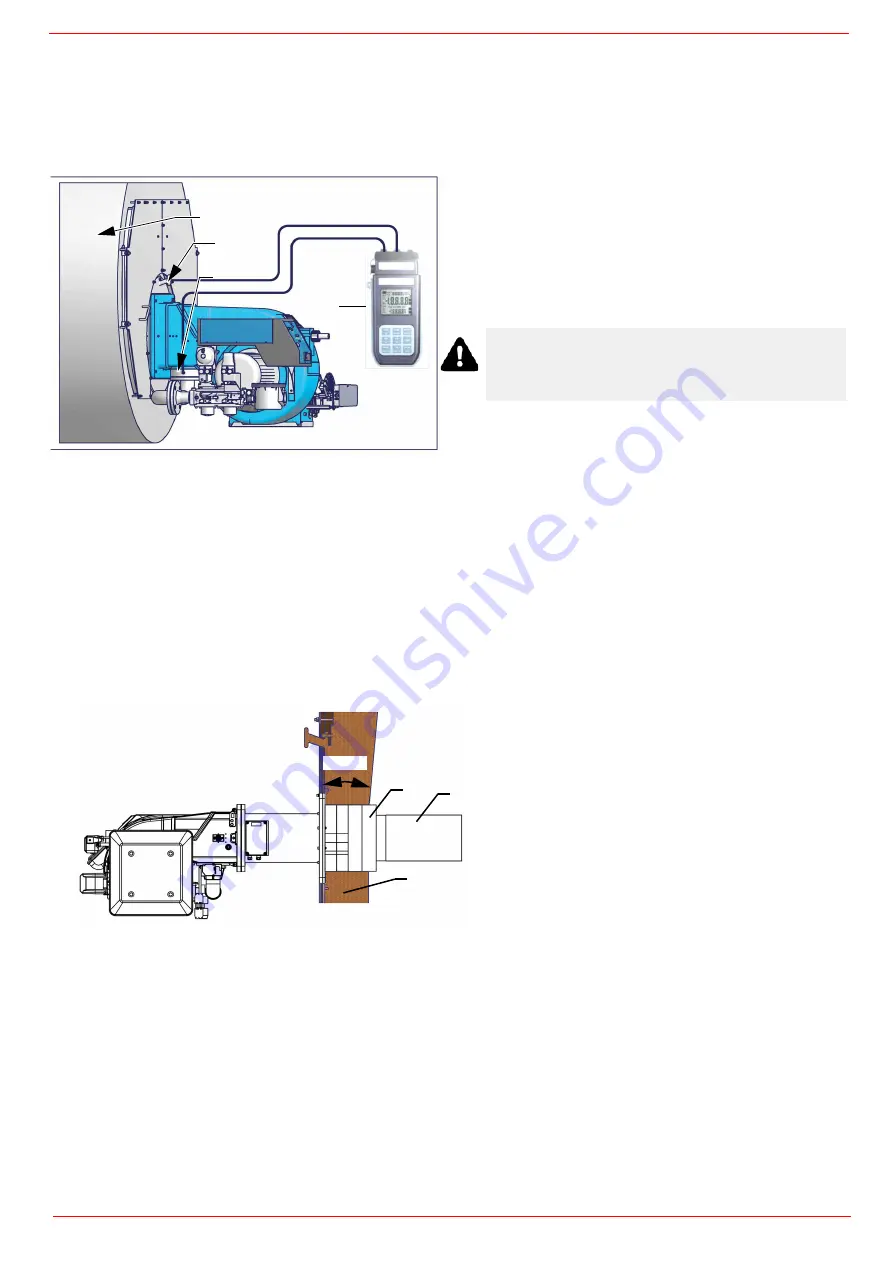
actuator are at the maximum opening. Refer to , showing the correct way to measure the gas pressure, considering the values of

pressure in combustion chamber, surveyed by means of the pressure gauge or taken from the boiler’s Technical specifications.

.

Matching the burner to the boiler 

(

low NOx burners)

The burners described in this manual have been tested in combustion chambers complying with standard EN676. If the burner is to be
matched to boilers with combustion chambers of a smaller diameter or shorter length than those indicated in the Standard, contact the
Manufacturer to check that it is suitable for the application for which it is intended.
To correctly match the burner to the boiler: 

Check that the required power and the pressure in the combustion chamber are within the working range.

Also check that the length of the combustion chamber is greater than the combustion head.

Verify that the neutral section of the head exceeds the refractory. The application does not always meet this requirement, so it may
be necessary to use a spacer of a suitable size, which serves to retract the burner to meet the above measurements.

The neutral section of the combustion head must be protected against high temperatures. A specially shaped panel for applications
with operating temperatures up to 1200° C is supplied.
If the above requirements cannot be met, the choice of burner must be reviewed in consultation with the manufacturer.

1

2

4

3

Note: the figure is indicative only.Key

1 Generator
2 Pressure outlet on the combustion chamber
3 Gas pressure outlet on the butterfly valve
4 Differential pressure gauge

ATTENTION: THE BURNED GAS RATE MUST BE 

READ AT THE GAS FLOW METER. WHEN IT IS NOT 

POSSIBLE, THE USER CAN REFERS TO THE 

PRESSURE-RATE CURVES AS GENERAL 

INFORMATION ONLY.

30° max

1

2

3

1 - Burner insulation
2 - Burner head
3 - Boiler door

Summary of Contents for C70N US

Page 1: ...M039682WA 0 0 01 2023 BURNERS BRUCIATORI BRULERS BRENNER QUEMADORES MANUAL OF INSTALLATION USE MAINTENANCE Microprocessor controlled C70N US LMV 2x 3x Gas burners Premix...

Page 2: ...non original components whether spare parts kits accessories and optionals Force majeure Furthermore the manufacturer declines all responsibility for non compliance with this manual Personnel training...

Page 3: ...rner shut down reser the control box by means of the RESET pushbutton If a second shut down takes place call the Tech nical Service without trying to RESET further The unit shall be operated and servi...

Page 4: ...UNI EN ISO 12100 2010 Safety of machinery General principles for design Risk assessment and risk reduction For the following information please refer to the data plate Burner type and burner model mu...

Page 5: ...trodes and a high voltage transformer a pilot flame may also be employed depending on burner configuration Pre ventilation of the combustion chamber is usually implemented according to gas directives...

Page 6: ...es gas proving system 8 2 gas valves gas proving system maximum gas pressure switch 8 GAS CONNECTION 32 1 1 4 NPT 40 1 1 2 NPT 50 2 NPT 65 2 1 2 NPT 9 MICRO PROCESSOR CONTROL EA micro processor contro...

Page 7: ...ge of the machine To get the input in kcal h multiply value in kW by 860 Data are referred to standard conditions atmospheric pressure at 1013mbar ambient temperature at 15 C Back pressurembar mbar C7...

Page 8: ...nt type of fuel please refer to the paragraph Fuel at the beginning of this chapter GAS PRESSURE IN Potenza kW Curves are referred to pressure 0 mbar in the combustion chamber Gas pressure in combusti...

Page 9: ...imensions mm C70N 87 981 1970 1020 545 P 305 4 5 3 320 320 12 M 28 338 338 P 204 400 239 10 15 590 376 400 350 302 637 345 342 200 345 302 P 295 190 238 405 burner flange Boiler recommended drilling t...

Page 10: ...ns ATTENTION Before executing the connections to the gas pipe network be sure that the manual cutoff valves are closed PS PSH PSL PSL PSH PS M M MB DLE VGD MBE gas inlet gas inlet gas inlet Legend 1 F...

Page 11: ...water steam Burner input Backpressure in the combustion chamber Dimensions of the combustion chamber inclu ded the reverse smoke chamber NOx emissions requested Choosing the burner To clearly explain...

Page 12: ...uitable for the application for which it is intended To correctly match the burner to the boiler Check that the required power and the pressure in the combustion chamber are within the working range A...

Page 13: ...g the burner The burner is designed to work positioned according to the picture below For different installations please contact the Manufacture WARNING before executing the connections to the gas pip...

Page 14: ...ed with a hydraulic lift or a small manual crane A The burner is mounted on a stirrup provided for handling the burner by means of a fork lift truck the forks must be inserted into the A anb B ways Re...

Page 15: ...ry connections and checks having been made 1 0 2 3 4 A A PHASE 1 Position the head and secure it with the nuts NB Position the head according to the reference given by the pin on the flange PHASE 2 In...

Page 16: ...g section 4 fix the burner flange with nuts 2 3 to the studs 4 of the boiler according to the picture After fitting the burner to the boiler ensure that the gap between the blast tube and the refracto...

Page 17: ...ording to the procedure set by laws in force CAUTION The direction of gas flow must follow the arrow on the body of the components mounted on the gas ramp valves filters gaskets NOTE the bellows unit...

Page 18: ...tube lines use appropriate sealing agent 2 Insert MB DLE note position of O rings 3 Remove MultiBloc between the threaded flanges 4 After installation perform leakage and functional test 5 Disassembl...

Page 19: ...s pressure switch 4 PGMAX maximum gas pressure switch 5 Actuator with integrated pressure stabiliser 6 On Off actuator 7 Valve body Threaded 8 Valve body Flange On equipment versions Facile VD R must...

Page 20: ...ens VGD VRD SKPx5 Auxiliary optional micro switch Gas valve If the auxiliary microswitch POC is required a dedicated actuator different from the one usually supplied must be ordered The con nection is...

Page 21: ...21 Siemens VGD Pressure taps G 1 4 G 1 8 G 1 4 G 3 4 G 1 8 G 1 4 G 1 8 Strainer 1 9 3 4 5 2 11 7 6 8 2 V 1 V 10 1 2 4 3 9 1 6 10 3 2 11 10 5 6 7 8 9 Legend pi Inlet pressure pm Pressure between valve...

Page 22: ...have in the implant there must be Have earthing connected to the burner always check the connection functionality and health and safety compliance of the earthing cable beforehand If in doubt request...

Page 23: ...lete with a terminal strip for the connection to the system electrical line and in case of on board control panel a plug for the connection to the modulation probe if any QF B QF A BURNER SUPPLY TERMI...

Page 24: ...ENTION the burners are supplied for three phase 380 400 415 480 V supply and in the case of three phase 220 230 240 V supply it is necessary to modify the electrical connections into the terminal box...

Page 25: ...PART III INSTALLATION 25 Probe connection with 7 pins connector Trasducer passive connection only...

Page 26: ...with fan motor driven by inverter in addition to the air and fuel adjustment curves also have a fan motor speed adjustment curve Generally the curve of the inverter goes from 50 to 100 of the engine...

Page 27: ...on the release button In the event of a lockout the cause must be evaluated if the flame back warning light is on before unlocking the control box it is mandatory to check the integrity and good cond...

Page 28: ...ves the air damper to the maximum opening position then the fan motor starts up the pre purge phase begins During the pre purge phase the air damper complete opening is signalled by the light B2 on se...

Page 29: ...seriously damage valves and pressure regulator 10 Check the sense of rotation of the electrical motors 11 Bleed the line getting rid of all the air in the pipe as far as the main gas valve 12 Ensure...

Page 30: ...equest 5 Oil pre heater energised 6 Fan motor energised 7 Ignition transformers energised 8 Open valves 9 Flame 10 Lock unlock codes 11 Closing actuator 12 Opening actuator 13 Unit measure 14 Key F A...

Page 31: ...TSA1 primo tempo sicurezza trasformatore accensione ON TSA1 1st safety time ignition transformer ON Ph42 TSA1 primo tempo sicurezza trasformatore accensione OFF TSA1 1st safety time ignition transform...

Page 32: ...me basic parameters as 5 Example choose parameter 102 to show the date the display shows parameter 102 flashing on the left and characters _ _ on the right 6 press InFo for 1 3 seconds the date will a...

Page 33: ...and find out the fault in the Error table To perform the reset press InFo for one second The unit displays an event which does not lead to shutdown The display shows current error code c alternating w...

Page 34: ...ameter list 2 Once the last parameter is accessed 143 by pressing the End message will blink 3 PressPress InFo for more than three seconds or for more than three seconds orto return to the normal disp...

Page 35: ...n reduces start flow rate anticlockwise rotation increases it Do not use a screwdriver on the screw VR The pressure stabilizer is adjusted by operating the screw VS located under the cover C By screwi...

Page 36: ...essure port of the minimum gas pressure switch Slowly close the manual cutoff valve placed upstream the pressure switch see gas train installation diagram until the detected pressure is reduced by 50...

Page 37: ...n and examine the gas filter cartridge and replace it if necesssary Remove and clean the combustion head Examine and clean the ignition electrodes adjust and replace them if necessary Examine and clea...

Page 38: ...twice as high compared to the last check You can change the filter without removing the fitting 1 Interrupt the gas supply closing the on off valve 2 Remove screws 1 4 using the Allen key n 3 and rem...

Page 39: ...to push 1 2 3 4 5 6 7 1 Position VD on VB fig 2 3 2 Slide VD forward up to the stop fig 4 3 Screw VD on with 2 M5 screws for each max 5 Nm 44 in lb fig 5 6 4 VD can be mounted rotated by 180 fig 7 VB...

Page 40: ...ring the electrode to the holder 4 5 Clean the electrode sensing element 6 Reinsert the entire electrode assembly following previous steps in reverse ATTENTION avoid the ignition and detection electro...

Page 41: ...o stop the burner in the seasonal stop proceed as follows 1 turn the burner main switch to 0 Off position 2 disconnect the power mains 3 close the fuel valve of the supply line Burner disposal In case...

Page 42: ...itch functions and links Burner control damaged Replace burner control BURNER LOCKS OUT WITHOUT ANY GAS FLOW Gas valves don t open Check voltage on valves if necessary replace valve or the burner cont...

Page 43: ......

Page 44: ...a L Galvani 9 35011 Campodarsego PD ITALY Tel 39 049 9200944 Fax 39 049 9200945 9201269 web site www cibunigas it e mail cibunigas cibunigas it Note specifications and data subject to change Errors an...

Reviews: