PART IV: MAINTENANCE
45
At least once a year carry out the maintenance operations listed below. In the case of seasonal servicing, it is recommended to carry
out the maintenance at the end of each heating season; in the case of continuous operation the maintenance is carried out every 6
months.
ROUTINE MAINTENANCE
Before any maintenance
1 - ensure that the manual valve at the gas ramp inlet is closed
2 - ensure that the main switch of the installation is switched off and make sure that it cannot be switched on again by third parties
3 - disconnect power to the panel. With the burner off, check that the gas meter is stopped. If it should turn, look for any leaks.
Clean the fan using, if available, compressed air and/or a dry brush or rags. If necessary, remove the fan from the motor shaft and
wash it using non-corrosive cleaning agents. Before disassembling the fan, note the measurements in relation to the motor shaft so
that it can be reassembled in the same position.
Check that all parts in contact with combustion air (air box, protective mesh and screw conveyor) are clean and free of any obstruc-
tions to free flow. Clean using compressed air and/or a dry brush or rags, if available. If necessary, wash using non-corrosive clea-
ning products.
Check the condition of the combustion head. The head must be intact in all parts and the mesh adhered to the inner metal cylinder.
If one or more parts are broken, punctured, cut or dislodged, it is imperative to replace the head itself. The nozzle must be replaced
in the event of obvious breakage or abnormal puncture. Slight deformations that do not affect combustion can be accepted.
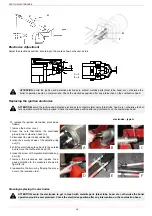
Examination of ignition electrodes, cleaning, possible adjustment and, if necessary, replacement
Check the detection electrode/photocell (depending on burner model), clean, adjust if necessary and replace if necessary. If in
doubt, check the detection circuit, after the burner has been put back into operation, follow the diagrams in the manual. The gasket
between combustion head and burner body flange must be replaced with a gas-tight flange suitable for the fuel used. Check the
condition of the gasket between burner and generator. If necessary, replace it
Before disassembling the burner's internal mixer, the position of the blades and position it so that it can be restored correctly after
cleaning or replacement. Examination of the motor: no specific maintenance is required. In the event of abnormal noises during
operation, check the condition of the bearings and replace them if necessary or replace the motor completely.
Check and clean the gas filter cartridge; replace if necessary.
Examination disassembly and combustion head cleaning
Cleaning and greasing of levers and rotating parts.
WARNING: ALL OPERATIONS ON THE BURNER MUST BE CARRIED OUT WITH THE MAINS DISCONNECTED
AND THE FUEL MANAUL CUTOFF VALVES CLOSED!
ATTENTION: READ CAREFULLY THE “WARNINGS” CHAPTER AT THE BEGINNIG OF THIS MANUAL.
ATTENTION: when servicing, if it was necessary to disassemble the gas train parts, remember to execute the gas
proving test, once the gas train is reassembled, according to the procedure imposed by the law in force.
At least every 2 months, or more frequently depending on the case, clean the burner installation room.
Avoid leaving installations, papers, nylon bags, etc., inside the room. They could be sucked by the burner and cause mal-
functioning.
Check that the room’s vents are free from obstructions.
PART IV: MAINTENANCE
Summary of Contents for G335A
Page 53: ......
Page 54: ......
Page 55: ......
Page 57: ...Service manual AZL2x LMV2x 3x Burner Management System M12916CD Rev 3 4 03 2023...
Page 64: ...8 Parameters level heating engineer...
Page 106: ...50 ERROR CODE TABLE...
Page 107: ...51...
Page 108: ...52...
Page 109: ...53...
Page 110: ...54...
Page 111: ...55...
Page 112: ...56...
Page 113: ...57...
Page 114: ...58...
Page 115: ...59...
Page 116: ...60...
Page 117: ...61...
Page 118: ...62...
Page 119: ...63...
Page 120: ...64...
Page 125: ......
Page 126: ......
Page 127: ......


