background image

C.I.B. UNIGAS - M039119CE

5

GENERAL FEATURES

This series burners are characterised by high performaces and width in the performance curves, when the pressure in the combustion
chamber is high. They are also provided with other important functional features: there are plugs which can be easily connected to the
boiler and to the detecting probes, a pressure plug in the combustion chamber, all mechanical components are mounted on a plate
which can be quickly taken off for maintenance. The head is adjustable by means of a graduated screw. The gas train can be mounted
either on the right side or on the left side.

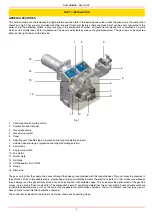
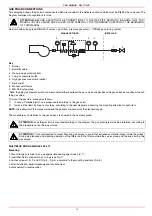
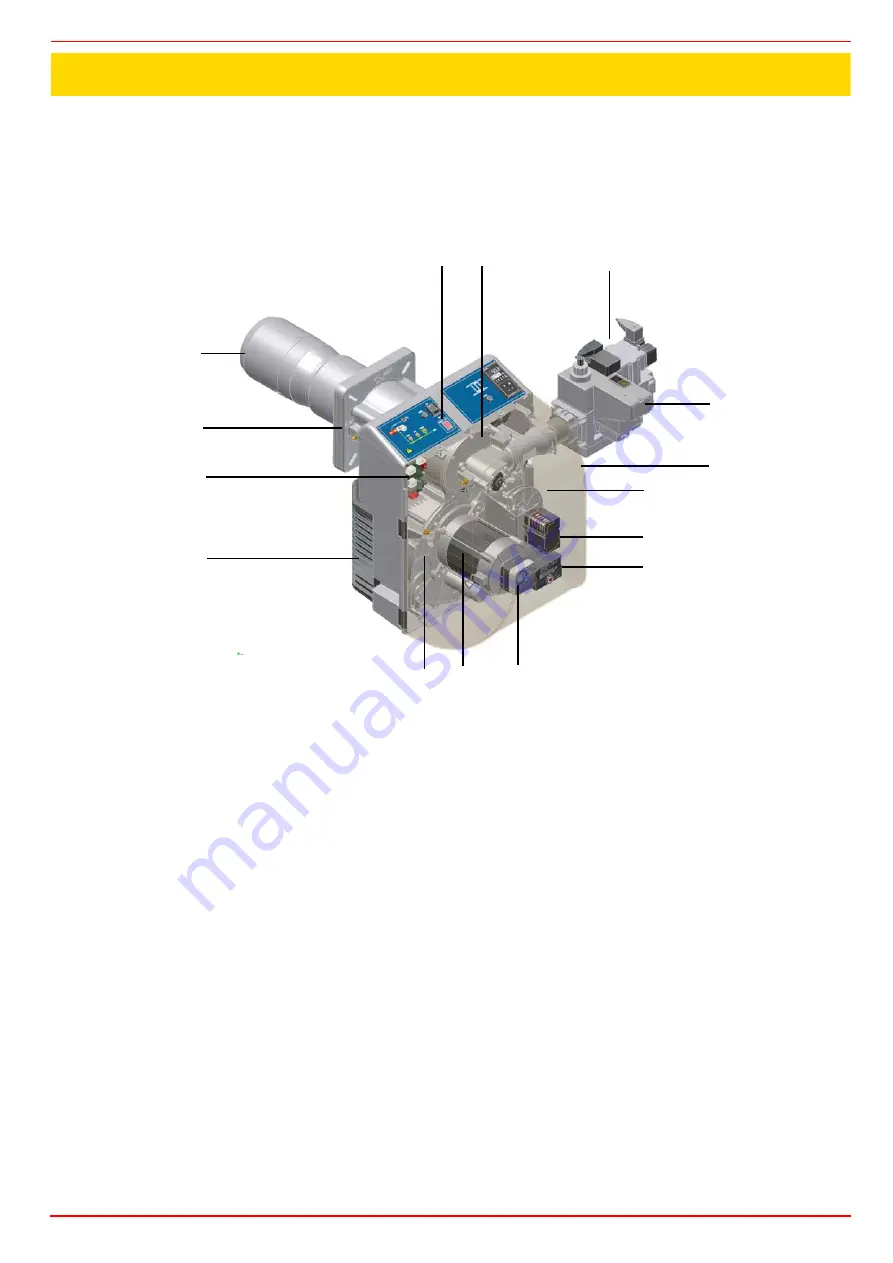
Fig. 1

1

Control panel with startup switch

2

Combustion head (inside)

3

Gas valves group

4

Gas proving system

5

Cover

6

Adjusting cam (double-stage, progressive and fully-modulating burners)

7

Actuator (double-stage, progressive and fully-modulating burners)

8

Control box

9

Air pressure switch

10 Fan motor

11 Burner plate

12 Air intake

13 Printed board circuit (PCB)

14 Flange

15 Blast tube

The gas coming from the supply line, passes through the valves group provided with filter and stabiliser. This one forces the pressure in
the utilisation limits. In the double-stage , progressive and fully- modulating burners, the electric actuator (7), that moves proportionally
the air damper and the gas butterfly valve, uses an adjusting cam with variable shape. This one allows the optimisation of the gas flue
values, as to get an efficient combustion. The combustion head (2) positioning determines the burner output. Fuel and comburent are
routed into separated ways as far as the zone of flame generation (combustion chamber). The air (comburent) and fuel (gas, gas oil,
heavy oil) are forced into the combustion chamber.

The control panel, placed on the burner’s front side, shows each operating stage. 

PART I: INSTALLATION

1

3

4

2

6

5

7

10

11

8

14

13

9

15

12

Summary of Contents for IDEA Series

Page 1: ...IDEA Series Gas burners LG550 NG550 NGX550 MANUAL OF INSTALLATION USE MAINTENANCE BURNERS BRUCIATORI BRULERS BRENNER QUEMADORES ГОРЕЛКИ M039119CE Rel 4 1 06 2010 ...

Page 2: ...ow rate curves 21 Startup Output 22 Adjustments brief description 22 Adjustment procedure 22 Fully modulating burners 24 Calibration of air and gas pressure switches 24 Calibration of air pressure switch only for single stage burners 24 Calibration of air pressure switch double stage progressive and fully modulating 24 Calibration of minimum gas pressure switch 25 Adjusting the high gas pressure s...

Page 3: ...ains electricity gas oil or other fuel z Observe caution with hot burner components These are usually near to the flame and the fuel pre heating system they become hot during the unit operation and will remain hot for some time after the burner has stopped When the decision is made to discontinue the use of the burner the user shall have qualified personnel carry out the following operations a Rem...

Page 4: ...of toxic or explosive mixtures DIRECTIVES AND STANDARDS Gas burners European directives Directive 90 396 CEE Gas Appliances Directive 2006 95 EC on low voltage Directive 2004 108 CEE on electromagnetic compatibility Harmonised standards UNI EN 676 Gas Burners CEI EN 60335 1 Household and similar electrical appliances Safety Part 1 General requirements EN 50165 Electrical equipment of non electric ...

Page 5: ...e progressive and fully modulating burners 8 Control box 9 Air pressure switch 10 Fan motor 11 Burner plate 12 Air intake 13 Printed board circuit PCB 14 Flange 15 Blast tube The gas coming from the supply line passes through the valves group provided with filter and stabiliser This one forces the pressure in the utilisation limits In the double stage progressive and fully modulating burners the e...

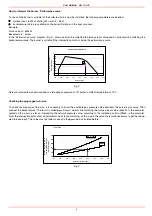
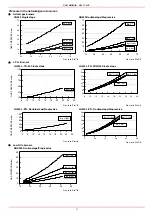
Page 6: ...ow the available gas pressure value upstream the burner s gas valve Then subtract the backpressure The result is called pgas Draw a vertical line matching the furnace input value 600kW in the example quoted on the x axis as far as intercepitng the network pressure curve according to the installed gas train DN65 in the example From the interception point draw an horizontal line as far as matching o...

Page 7: ...ast tube must protrude no more than 100 mm into the combustion chamber z Pressurised boilers with flame reversal in this case the blast tube must penetrate at least 50 100 mm into combustion chamber in respect to the tube bundle plate The length of the blast tubes does not always allow this requirement to be met and thus it may be necessary to use a suitably sized spacer to move the burner backwar...

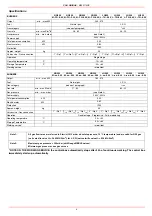
Page 8: ...0 Working service Internittent BURNERS NG550 M xx 0 25 NG550 M xx 0 32 NG550 M xx 0 40 NG550 M xx 0 50 LG550 L xx 0 25 LG550 L xx 0 32 LG550 L xx 0 40 LG550 L xx 0 50 Output min max kW 160 570 Fuel Natural gas L P G Gas category see next paragraph I3B P Gas rate min max Stm3 h 17 60 6 2 22 Gas pressure min max mbar see Note 2 Power supply 230V 50Hz Total power consumption kW 0 92 Electric motor kW...

Page 9: ...tric motor kW 0 62 Protection IP40 Approx weight kg 55 Valves size Gas connection 1 Rp 1 1 1 4 Rp 11 4 1 1 2 Rp 11 2 2 Rp 2 Operation Double stage Progressive Fully modulating Operating temperature C 10 50 Storage Temperature C 20 60 Working service Internittent Note1 All gas flow rates are referred to Stm3 h 1013 mbar absolute pressure 15 C temperature and are valid for G20 gas nett calorific val...

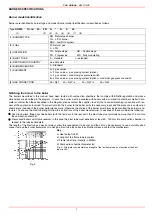
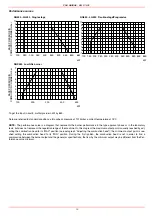
Page 10: ...n see paragraph Adjusting the combustion head the minimum output point is rea ched setting the combustion head to its MIN position During the first ignition the combustion head is set in order to find a compromise between the burner output and the generator specifications that is why the minimum output may be different from the Per formance curve minimum BACK PRESSURE IN COMBUSTION CHAMBER mbar NG...

Page 11: ...L PR Double stage Progressive Gas rate Stm3 h z Low NOx burners GAS PRESSURE mbar NGX550 Double stage Progressive Gas rate Stm3 h 0 10 20 30 40 50 60 70 20 30 40 50 60 70 R p 1 32 R p 1 40 R p 2 50 R p 1 25 0 10 20 30 40 50 60 70 15 25 35 45 55 65 75 Rp 1 Rp 1 40 Rp 2 50 Rp 1 10 30 50 70 90 110 8 10 12 14 16 18 20 22 24 26 Rp 1 25 2 6 10 14 18 22 26 30 8 10 12 14 16 18 20 22 24 26 Rp 1 32 Rp 1 40 ...

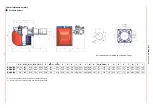
Page 12: ...d burner flange DN A S A L B S B L C D 5mm E 5mm F G H J K L M N Omin Omax P Q R S T W X Y NG LG550 25 32 843 943 253 353 590 671 245 426 165 178 384 241 384 M10 247 157 192 174 552 377 175 69 543 533 155 NG LG550 40 843 943 253 353 590 744 318 426 165 178 384 241 384 M10 247 157 192 174 552 377 175 69 553 533 155 NG LG550 50 843 943 253 353 590 744 318 426 165 178 384 241 384 M10 247 157 192 174 ...

Page 13: ...boiler drilling jig and burner flange DN A S A L B S B L C D 5mm E 5mm F G H J K L M N Omin Omax P Q R S T W X Y NGX550 25 32 874 974 253 353 590 671 245 426 176 198 384 241 384 M10 247 157 192 174 552 377 175 69 543 533 168 NGX550 40 874 974 253 353 590 744 318 426 176 198 384 241 384 M10 247 157 192 174 552 377 175 69 553 533 168 NGX550 50 874 974 253 353 590 744 318 426 176 198 384 241 384 M10 ...

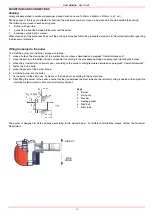
Page 14: ...tion chamber as described on paragraph Overall dimensions 2 place the burner to the boiler lift it up and handle it according to the procedure described on paragraph Handling the burner 3 place the 4 stud bolts 5 on boiler s door according to the burner s drilling template described on paragraph Overall dimensions 4 fasten the 4 stud bolts 5 place the gasket on the burner flange 6 install the burn...

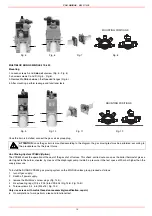
Page 15: ... gas valves are showed in the next paragraph MULTIBLOC DUNGS MB DLE 405 412 Mounting 1 Mount flange onto tube lines use appropriate sealing agent see Fig 7 2 insert MB DLE note position of O rings see Fig 7 3 tighten screws A B C and D Fig 5 Fig 6 accordind to the mounting positions Fig 8 4 after installation perform leakage and functional test 5 disassembly in reverse order ATTENTION BEFORE EXECU...

Page 16: ... it a pressure in the test space of 20 mbar higher than the supply pressure To install the DUNGS VPS504 gas proving system on the MD DLE valves group proceed as follows 1 turn off gas supply 2 Switch off power supply 3 remove the Multibloc s screw plugs Fig 13 A 4 iInsert sealing rings 10 5 x 2 25 into VPS 504 Fig 14 B Fig 13 B 5 Torque screws 3 4 5 6 M4 x16 Fig 13 C Only use screws with metric th...

Page 17: ... the pressure supply point PA Fig 14 If the test cycle is satisfactory after a few seconds the consent light LC yellow comes on In the opposite case the lockout light LB red comes on To restart it is necessary to reset the appliance by pressing the illuminated pushbutton LB Fig 13 Fig 14 A B LC LB PA C ...

Page 18: ...nection to the mains ATTENTION before executing the electrical connections pay attention to turn the plant s switch to OFF and be sure that the burner s main switch is in 0 position OFF too Read carefully the chapter WARNINGS and the Electrical connections section WARNING the burner is fitted with a bridge between terminals T6 and T8 on CN2 TAB connector external side link male connector remove th...

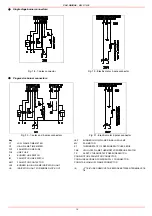
Page 19: ...USE FU3 LINE FUSE IL BURNER LINE SWITCH IM FAN MOTOR LINE SWITCH KM1 FAN MOTOR CONTACTOR LAF BURNER IN HIGH FLAME INDICATOR LIGHT LB INDICATOR LIGHT FOR BURNER LOCK OUT LBF BURNER IN LOW FLAME SIGNALLING LAMP MV FAN MOTOR ST THERMOSTATS O PRESSURE SWITCHES SERIE TAB HIGH LOW FLAME THERMOSTAT PRESSURE SWITCH TS SAFETY THERMOSTAT PRESSURE SWITCH CONN MOTORE FAN MOTOR CONNECTOR CONN LINEA BURNER POWE...

Page 20: ...OR FAN MOTOR FU3 LINE FUSE FU4 AUXILIARY FUSE IL BURNER LINE SWITCH IM FAN MOTOR LINE SWITCH KM1 FAN MOTOR REMOTE CONTACTOR SIEMENS RWF40 MODULATION REGULATOR LB BURNER LOCKOUT SIGNALLING LAMP LBF BURNER IN LOW FLAME SIGNALLING LAMP MV FAN MOTOR SD 0 10V VOLTAGE SIGNAL SD 0 4 20mA CURENT SIGNAL SD PRESS PRESSURE PROBE SMA MAN AUTO SELECTOR SMF OPERATION SELECTOR MIN 0 MAX ST PRESSURE SWITCHES OR T...

Page 21: ...let on the butterfly valve 4 Differential pressure gauge Measuring the gas pressure in the combustion head In order to measure the pressure in the combustion head insert the pressure gauge probes one into the generator s pressure outlet Fig 24 2 to get the pressure in the combustion chamber and the other one into the butterfly valve s pressure outlet of the burner Fig 24 3 On the basis of the meas...

Page 22: ...ed on paragraph Technical specifications Be sure that the mains switch is closed ATTENTION During commissioning operations do not let the burner operate with insufficient air flow danger of formation of carbon monoxide if this should happen make the gas decrease slowly until the normal combustion values are achieved WARNING NEVER LOOSE THE SEALED SCREWS OTHERWISE THE DEVICE WARRANTY WILL BE INVALI...

Page 23: ... according to the burner operation Before starting the burner up adjust the valves group slow opening to set the slow opening remove cover T reverse it upside down and use it as a tool to twist screw VR Decrease the ignition flow rate by screwing increase it by unscrewing Do not use a screwdriver on the screw VR Note the screw VSB must be removed only in case of replacemente of the coil 1 remove t...

Page 24: ...age progressive or fully modulating burners 11 still in the high flame operation and with the actuator on its 90 position find the V screw on the adjusting cam SV see next pic ture matching with the bearings that move along the foil and related to the actuator position 12 unscrew the V srew to increase the air folw rate unscrew to decrease it 13 once the maximum flow rate is fixed shortcircuit for...

Page 25: ...he control box if the air pressure is not the one requested If it happens unlock the burner by means of the control box unlock pushbutton placed on the burner control panel The gas pressure switches check the pressure to avoid the burner operate when the pressure value is not in the requested pressure range Calibration of air pressure switch only for single stage burners Calibration is carried out...

Page 26: ... ring nut as to increase the pressure value until the burner stops z Slowly fully open the manual cutoff valve z Refit the transparent plastic cover on the pressure switch Calibration is carried out as follows z Remove the transparent plastic cap z With the burner in operation at the maximum power test the pressure on the pressure port of the pressure switch z Slowly close the manual shut off valv...

Page 27: ...FORE ANY OPERATION OF THE APPLIANCE MUST BE PREVENTED WHICH DEPARTS FROM THE INSTALLATION OPERATIONS OR WHICH HAPPENS AFTER TOTAL OR PARTIAL TAMPERING WITH THESE E G DISCONNECTION EVEN PARTIAL OF THE ELECTRICAL LEADS OPENING THE GENERATOR DOOR DISMANTLING OF PART OF THE BURNER NEVER OPEN OR DISMANTLE ANY COMPONENT OF THE MACHINE OPERATE ONLY THE MAIN SWITCH WHICH THROUGH ITS EASY ACCESSIBILITY AND...

Page 28: ...ion signalling lamp or air damper opening during pre purge stage G Low flame operation signalling lamp H Ignition transformer in operation signalling light I EV2 opening signalling lamp L EV1 opening signalling lamp P Modulator on fully modulating burners only Q Operation selector MAN AUTO operation in manual or automatic mode MIN operation with minimum output 0 Stop MAX operation at the maximum o...

Page 29: ...ard z At the end of the pre purge phase the air damper goes to the ignition position the ignition transformer comes on signalled by the LED H and few seconds later the solenoid valves EV1 and EV2 are energized LEDs L and I on the front panel z The flame must light up in the safety time few seconds after the gas valve opening totherwise the gas proving system locks out Few seconds after the opening...

Page 30: ... the filter if the pressure difference between pressure connection 1 and 3 Fig 34 Fig 35 is twice as high compared to the last check You can change the filter without removing the fitting 1 Interrupt the gas supply closing the on off valve 2 Remove screws 1 4 using the Allen key n 3 and remove filter cover 5 in Fig 36 3 Remove the filter 6 and replace with a new one 4 Replace filter cover 5 and ti...

Page 31: ...e other and must be replaced in its seat 2 Slacken the butterfly valve adjusting rod Fig 41 and take it out pulling outside 3 Remove the connector CR of the ionization electrode Fig 42 4 Unplug cable CA of the ignition electrode EA Fig 42 and extract it from the flange by removing the rubber G Fig 42 5 To remove the head the operator must pull it towards himself 6 Once the combustion head is remov...

Page 32: ...ge 31 1 disconnect the cables from the electrodes ER detection electrode EA ignition electrode 2 loosen the fixing screw V 3 remove the electrodes and replace them observing the measures quoted on next paragraph 4 re connect the cables and re assemble the combustion head see next picture Fig 40 Fig 41 Fig 42 Fig 43 Fig 44 Fig 45 V1 V3 V4 V2 S1 S2 LOCKED UNLOCKED H H G CA CR CA EA CR A B ER EA V ...

Page 33: ...s less than the value shown check the position of the detection electrode the electrical contacts and if necessary replace the detection electrode see Electrodes position setting on page 33 Fig 47 Seasonal stop To stop the burner in the seasonal stop proceed as follows 1 turn the burner main switch to 0 Off position 2 disconnect the power mains 3 close the fuel valve of the supply line Burner disp...

Page 34: ...GAS z z MAXIMUM GAS PRESSURE SWITCH DEFECTIVE IF PROVIDED z z THERMOSTATS PRESSURE SWITCHES DEFECTIVE z z z OVERLOAD TRIPPED INTERVENTION z AUXILIARIES FUSE INTERRUPTED z CONTROL BOX FAULTY z z z z z DEFECTIVE SERVOCONTROL IF PROVIDED z z z AIR PRESSURE SWITCH FAULT OR BAD SETTING z z z z MINIMUM GAS PRESSURE SWITCH DEFECTIVE OR GAS FILTER DIRTY z z z z z IGNITION TRANSFORMER FAULT z IGNITION ELEC...

Page 35: ... 2190341 2190341 2190341 VALVE GROUP Rp1 1 4 2190342 2190342 2190342 VALVE GROUP Rp1 1 2 21903L3 21903L3 21903L3 VALVE GROUP Rp2 21903L4 21903L4 21903L4 GAS PROVING SYSTEM option 2191604 2191604 2191604 ADJUSTING CAM FOIL 2440236 2440236 2440236 ACTUATOR double stage progressive and fully modulating Berger STA13 2480074 2480074 2480074 ACTUATOR double stage progressive and fully modulating Sie men...

Page 36: ...7 COVER FIXING SCREW 29 FRONT CONTROL PANEL 8 AIR INTAKE 30 FRONT CONTROL PANEL 9 AIR INTAKE 31 LIGHT 10 PRESSURE PLUG 32 LIGHT 11 BRACKET 33 CONTACTOR 12 COVER 34 LOCK OUT RESET BUTTON 13 FAIRLEAD 35 PROTECTION 14 FAIRLEAD 36 SWITCH 15 FAIRLEAD 37 FUSE 16 FLANGED PIPE 38 GAS MANIFOLD 17 BURNER HOUSING 39 EXTENDED COMBUSTION HEAD ASSY 18 MOTOR SUPPORT PLATE 40 IGNITION CABLE 19 FAN WHEEL 41 DETECT...

Page 37: ...C I B UNIGAS M039119CE 37 ...

Page 38: ... PG MINIMUM GAS PRESSURE SWITCH PS LOCK OUT RESET BUTTON PT100 TEMPERATURE PROBE PT1000 TEMPERATURE PROBE RC RC CIRCUIT SATRONIC DLG976 CONTROL BOX SATRONIC DMG972 CONTROL BOX SD 0 10V VOLTAGE SIGNAL SD 0 4 20mA CURRENT SIGNAL SD PRESS PRESSURE PROBE SD TEMP TEMPERATURE PROBE SIEMENS RWF40 MODULATOR SMA MANUAL AUTOMATIC SELECTOR SMF MIN 0 MAX FUNCTIONING MANUAL SELECTOR ST SERIES OF THERMOSTATS OR...

Page 39: ......

Page 40: ......

Page 41: ......

Page 42: ......

Page 43: ......

Page 44: ......

Page 45: ......

Page 46: ...ting time air pressure monitor LP and flame relay FR are tested for correct contact positions t11 Programmed opening time for actuator SA Only with LME22 The air damper opens until the nominal load position is reached Only then will fan motor M be switched on t10 Specified time for air pressure signal On completion of this period of time the set air pressure must have built up or else lockout will...

Page 47: ...ed time for air pressure signal t11 Programmed opening time for actuator SA t12 Programmed closing time for actuator SA SB R W GP AL M LP BV1 Z FS tw t1 t3n TSA t4 7 t10 EK2 12 10 3 7 4 6 1 8 t3 A B B C D 11 SB R W GP AL LP SA BV1 LR BV2 Z FS tw t1 t3n TSA t4 7101d02 0606 t11 t12 EK2 12 10 3 7 4 5 6 1 8 A B B C D 9 t3 t10 LK M I 11 SB R W GP AL LP BV1 LR BV2 Z FS tw t1 t3n t4 7101d05 0206 12 10 3 ...

Page 48: ...t W Limit thermostat pressure switch Z Ignition transformer LME22 connection diagram NT PC control RESET EK FSV ION 1 2 3 M 4 BV1 5 7 Z 10 AL T 12 R W GP STB 9 7101 24 0606 pa 6 LP 8 EK 11 K1 K2 1 K3 K2 2 H Si L N NT RESET EK FSV ION 1 2 3 M 4 BV1 5 BV2 7 Z 10 AL T 12 R W GP STB 9 pa 6 LP 8 EK 11 K1 K2 1 K3 K4 K2 2 H Si L N PC control NT PC control RESET EK FSV ION 1 2 3 M 4 BV1 5 BV2 7 Z 10 AL T ...

Page 49: ...ult status is showed by the red LED inside the LME s lockout reset buttonaccording to the Error code table RESETTING THE BURNER CONTROL When lockout occurs the burner control can immediately be reset by pressing the lockout reset button for about 1 3 seconds The LME can only be reset when all contacts in the line are closed and when there is no undervoltage LIMITATION OF REPETITIONS only for LME11...

Page 50: ......

Page 51: ......

Page 52: ...d and data subject to change Errors and omissions excepted C I B UNIGAS S p A Via L Galvani 9 35011 Campodarsego PD ITALY Tel 39 049 9200944 Fax 39 049 9200945 9201269 web site www cibunigas it e mail cibunigas cibunigas it ...

Reviews: