6
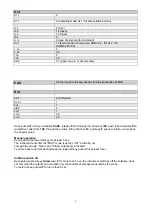
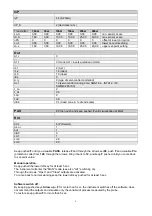
InP
….
tyP
44 (4÷20mA)
…
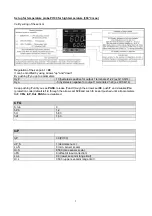
dP_S
2 (decimals num.)
Transmitter
1,6bar
3bar
10bar
16bar
25bar
40bar
Lo.S
0,00 0,00 0,00 0,00 0,00 0,00 min.
sensor
scale
Hi.S
1,60
3,00
10,00
16,00
25,00
40,00
max sensor scale
oFS
0
0
0
0
0
0
offset of input correction
Lo.L
0,00
0,00
0,00
0,00
0,00
0,00
lower set-point setting
Hi.L
1,60 3,00 10,00 16,00 25,00 40,00 upper
set-point
setting
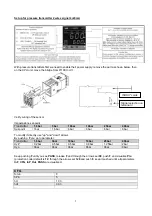
Out
A1.r 0
…
A1.t
3 (mode AL1 =inverse-relative-normal)
…
rL.1 2
(AL1)
rL.2
18 (open)
rL.3 19
(close)
rEL
0
A.ty
9 (type of servocontrol command)
Ac.t
12 (servocontrol running time: SQN72.4…/STA12..=12;
SQM40.265=30)
t_Lo 2
t_Hi
0.0
t.on 2
t.oF
0.0
dE.b
0,1 (dead zone in
%
of end scale)
PAS
99 then push and keep pushed
F
until visualization of
Hrd
Hrd
…
CtrL
6 (PID warm)
AL.nr 1
but
1
diSP 0
Ld.1
1
Ld.2 28
Ld.3
20
Keep pushed
F
until you visualize
PASS
, release
F
and through the arrows set
99
, push
F
and visualize
Pro
(protection code) from
128
, through the arrows, bring it back to
12,
and keep
F
pushed until you come back
to set-point value.
Manual operation
:
Keep pushed the lower left key for at least 5 sec.
The instrument will enter the "MAN" mode (see also "Ld1" switching on).
Through the arrows, "Open" and "Close" outputs are activated.
To come back to normal working keep the lower left key pushed for at least 5 sec.
Software switch off
:
By keeping pushed keys
Arrow up
+
F
for more than 5 sec. the instrument switches off the software, does
not command the outputs and visualize only the variable of process measured by the probe.
To restore keep pushed
F
for more than 5 sec.
Summary of Contents for TN90
Page 2: ......
Page 21: ...CIB UNIGAS M039259CA 21 Fig 9 Hydraulic diagram 3ID0014 Two or more burners configuration...
Page 34: ...CIB UNIGAS M039259CA 34...
Page 54: ......
Page 63: ......
Page 64: ......
Page 65: ...RWF50 2x RWF50 3x User manual M12922CB Rel 1 0 07 2012...
Page 80: ...16 Note Specifications and data subject to change Errors and omissions excepted...
Page 81: ...KM3 Modulator USER MANUAL M12927CA Rel 1 0 10 2020...
Page 82: ...M12927CA MOUNTING 2...
Page 106: ......
Page 107: ......
Page 108: ......
Page 109: ......
Page 110: ......
Page 111: ......
Page 112: ......


