background image

                                                     
                                                                                                                                                                        64 

UDR-204(C) Operation manual Revision 3.0 


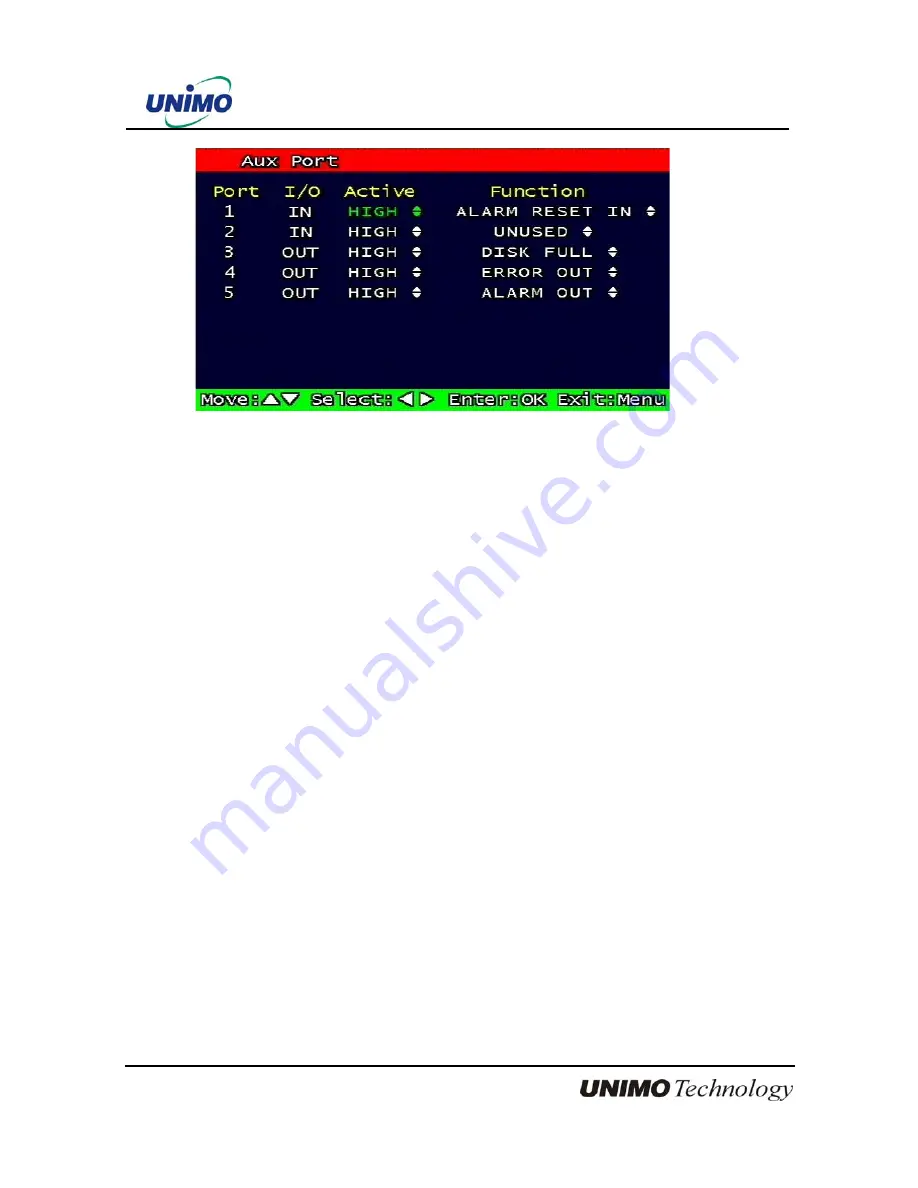
Figure 3-44 Set up AUX port screen 

3.7.8.1 Active 

Set up Active state. Low/High will be different depend on machine.. 

3.7.8.2 Function 

The following list contains a brief description of each function. 

3.7.8.2.1   Direction : IN 

• 

UNUSED: 


Do not use the AUX port. 

• 

ALARM RESET IN: 

Pause alarm or buzzer when event occurred 

• 

RECORD START IN:  Record image during user push the button 

• 

RECORD ON/OFF: 

Recording start/stop during user push the button & same as   

pushing remote controller or DVR machine 

3.7.8.2.2 


Direction : OUT 

• 

ALRAM OUT:  

Notice the assigned port when event occurred 

• 

ERROR OUT:  

Notice the assigned port when system error occurred   

(Mark system error) 

• 

RECORD START OUT: HDD of DVR is full, send signal to DVR which is connect with 


AUX port. During receiving recording signal through AUX port, 


it can record it and the mode of DVR AUX in port is RECORD   

START IN.


• 

DISK FULL:   

If HDD is full, send signal to the AUX port. 

• 

RECORD STATUS: 

Indicate whether it is recording or not 


Summary of Contents for UDR-204

Page 1: ...USER MANUAL Digital Hard Disk Recorder UDR 204 UDR 204C MPEG 2 Default system password 111111 for RAMS Record stop Menu setup System off Auto key lock Default ID admin for RAMS...

Page 2: ...n the equipment is operated in a commercial environment This equipment generates uses and can radiate radio frequency energy and if not installed and used in accordance with the instruction manual may...

Page 3: ...does not fit into your outlet consult an electrician for replacement of the obsolete outlet 10 Protect the power cord from being walked on or pinched particularly at plugs convenience receptacles and...

Page 4: ...3 3 Remote controller function 20 1 4 INSTALLATION 21 1 4 1 Installation and connection 21 1 4 1 1 Camera 21 1 4 1 2 Video Out 21 1 4 1 3 Audio 22 1 4 1 4 RS 232 22 1 4 1 5 PTZ AUX ALARM 22 1 4 1 6 N...

Page 5: ...System 27 2 9 2 UniPlayer 27 2 9 3 MultiViewer 27 2 9 4 Quick Installer 27 3 MAIN SETUP SCREEN 28 3 1 CAMERA SETUP MENU 28 3 1 1 Channel number 29 3 1 2 Camera Name Edit 29 3 1 3 Camera hide 29 3 1 4...

Page 6: ...3 3 1 Motion Detection Setting 38 3 3 1 1 Channel 38 3 3 1 2 Sensitivity 38 3 3 1 3 Detection Zone 39 3 3 2 Sensor Setting 40 3 3 2 1 Sensor Type 40 3 3 2 2 Channel Link 40 3 3 3 Alarm Output 41 3 3 3...

Page 7: ...ord 52 3 6 3 Network Type 52 3 6 4 Static 53 3 6 4 1 DDNS On off 53 3 6 4 2 Port 53 3 6 4 3 IP Address 53 3 6 4 4 Subnet Mask 53 3 6 4 5 Gateway 53 3 6 5 DHCP 54 3 6 5 1 Port 54 3 6 6 PPPoE 54 3 6 6 1...

Page 8: ...ult 65 3 8 BACKUP 66 3 8 1 Backup Device 67 3 8 2 Start Time 67 3 8 3 End Time 67 3 8 4 Channel 67 3 8 5 Event 67 3 8 6 Backup Start 67 3 8 7 Format 67 3 9 SYSTEM INFORMATION 68 3 9 1 Video type 68 3...

Page 9: ...RAM 77 4 1 OVERVIEW OF UDR 204 77 4 1 1 PC requirement minimum 77 4 2 INSTALLATION EXECUTION OF PROGRAM 77 4 3 RAMS REMOTE ACCESS MONITORING SYSTEM 78 4 3 1 Screen and button 78 4 3 2 Connecting to DV...

Page 10: ...ying pause temporarily pause move by interval of frame fast forward Playing 98 4 4 9 Water mark drawing 99 4 4 10 Panorama 100 4 4 11 Check the program version 102 4 4 12 Close Program 102 4 5 MULTIVI...

Page 11: ...1 2 Installing two hard disk drives 113 5 1 3 Installing CD RW drive 114 5 2 TERMINAL INFORMATION 116 5 2 1 DSUB 9P RS 232 116 5 2 2 DSUB 15P PTZ AUX ALARM SENSOR 116 5 3 FACTORY DEFAULT VALUE 117 5...

Page 12: ...3 0 All rights reserved No part of this publication may be reproduced or transmitted in any form or any means electronic or mechanical including photocopy recording or any information storage and ret...

Page 13: ...included as soon as you open the box 1 1 1 Components UDR 204 Removable HDD Rack or UDR 204C CD RW Drive Power cable DSUB 15 connector for PTZ AUX ALARM Quick Manual Software CD RAMS UniPlayer MultiVi...

Page 14: ...for recording frame rate resolution Various backup method support Removable HDD UDR 204 CD RW UDR 204C USB Network Selectable Quad MUX recording Audio recording available Multiple recording modes Time...

Page 15: ...d Forward Backward Sensor Input 4 NO NC Selectable Alarm Output 1 NO NC Aux Control In Out 2 3 Selectable Function Menu Alarm Reset In Record Start In Record ON OFF Alarm Out Error Out Record Start Ou...

Page 16: ...FULL Green light No more disk space for recording PTZ Pan Tilt Zoom Focus status is indicated by Green 3 Numeric button Live Viewing mode button 1 2 3 4 Channel selection for Live Viewing and Playback...

Page 17: ...access Main Menu Press again to return 5 Direction select button UP Used to move the cursor up change possible values in the setup menu under PTZ control sub menu used to move camera or used to adjus...

Page 18: ...on and Channel at playback setup of menu At pause mode it will release pause mode Under PTZ control menu used to increase the speed of Pan Tilt Zoom Focus PAUSE Press to freeze the picture at playback...

Page 19: ...site video and s video to connect with monitor 7 CAMERA IN Video input to connect with camera output OUT Video output Loop through output for video input 8 FAN Heat protection fan to reduce heat in th...

Page 20: ...n POWER NET HDD NUMBER SEQ DIRECTION OK REVERSE PLAY STOP FRZ PTZ 4 Division MUTE REC LOG INFO LOCK DVR SEARCH MENU MULTI PAUSE PLAY ZOOM OSD MUTE Voice Mute HDD HDD status information NET Network con...

Page 21: ...c 1 4 1 1 Camera The unit comes with 4 video IN and 4 video OUT for up to four camera connection Connect to IN terminal for video input and to OUT for loop through output When connecting the BNC cable...

Page 22: ...X Port consists of 2 input ports AUX 1 2 and 3 output ports AUX 3 4 5 and the function of each port is selectable according to user s purpose user s access to external DVR or controllers using the sup...

Page 23: ...1 4 Users can connect up to four N O N C type sensors and configure them within Main Menu Sensor Setting 1 4 1 6 Network Connect RJ 45 Ethernet cable 1 4 1 7 USB flash memory Perform backup of record...

Page 24: ...r to shutdown the system you must type in the password The default password for shutdown is 111111 2 2 Date time setting Set the date and time for the DVR System Setup in Main Menu Time Date 2 3 Passw...

Page 25: ...2 6 1 Press the Play button The DVR will playback either the first recorded file or the last recorded file according to the setting in the Playback Setup menu 2 6 2 Audio files You will hear audio whe...

Page 26: ...d time In the backup menu select backup time start backup and backup for capacity of CD RW The backed up files can be play backed by general Media player or by Uniplayer 2 8 3 USB flash memory User ca...

Page 27: ...and register selected DVR s IP address Port number from the DVR list After selecting the target DVR enter admin for ID and 111111 for default password This will enable you to access the DVR 2 9 2 UniP...

Page 28: ...28 UDR 204 C Operation manual Revision 3 0 3 Main Setup screen Figure 3 1 Main Setup screen 3 1 Camera Setup menu Figure 3 2 Camera setup screen...

Page 29: ...vailable 12 letters at maximum Selected name at this paragraph will be displayed at the left side of top portion on window By using CAPS button user can shift a letter to capital one and or inversion...

Page 30: ...choose NONE 3 1 4 2 PTZ ID Set the PTZ ID 0 255 The PTZ ID must match the ID number that has been set by the PTZ Controller Please verify the ID on the Controller first before setting the PTZ ID 3 1 4...

Page 31: ...m Focus mode will be controlled after entering OK key button PTZ control speed will be controlled by PLAY button for higher speed or by R PLAY button for precision control Users can access prior menu...

Page 32: ...Auto Pan To automatically pan the camera On off are selected by Left Right and OK buttons 3 1 5 Picture Setting 3 1 5 1 Contrast Brightness Hue Sharpness Contrast Brightness Hue Sharpness will be mana...

Page 33: ...e Under MUX Recording mode resolution will be applicable to all channel Picture quality recording time and recording mode can be selected channel by channel Under QUAD Recording mode Resolution pictur...

Page 34: ...g 1 2 3 5 7 10 15 30 fps will be available But with 720 x 480 resolution user should not set to exceed 30 frame per second with accumulated total channel recording 3 2 2 5 2 PAL Under MUX recording mo...

Page 35: ...Event Setup Menu Refer to paragraph 3 3 2 Motion Sensor Start to recording under motion detection or Sensor occurrence The detailed will be referred to previous motion detection sensor occurrence Sche...

Page 36: ...Frame rate at Quad Recording none Non recording 1 2 3 5 7 10 15 30 fps will be selectable This setting is applicable to all channels as equal forms 3 2 3 4 2 PAL User can set the recording Frame rate...

Page 37: ...sired position of time by pressing up down key and set the recording mode at the desired position of time by pressing the OK button with referring to the Help Message per Record Mode on the right posi...

Page 38: ...ad recording 3 3 1 1 Channel Sets up the motion detecting area and sensitivity for each channel It sets up all 4 channels when it is set on the Quad recording Under Quad recording mode multi channel i...

Page 39: ...s the area that was already selected as the motion detecting area When the cursor positions on the area that was selected as the motion detecting area it turns green Above screen is for MUX motion det...

Page 40: ...installed sensor s contact point is usually open in normal condition and changed from open to close at sensor s detect event N C Normal Close Operation mode for the installed sensor s contact point is...

Page 41: ...Motion Configure the alarm out on off triggered by the motion detection 3 3 3 3 Relay Time Configure the alarm duration time It can be set up from 1 second to 60 seconds in the unit of 5 seconds 3 3 4...

Page 42: ...vent occurs The event will be transmitted 15 seconds after the event occurs 3 3 5 1 FTP Server IP address Configure the IP address of the FTP server The number changes by moving left and right and the...

Page 43: ...evision 3 0 3 3 5 2 ID Configure the FTP ID The ID can contain maximum of 31 characters Figure 3 16 FTP ID 3 3 5 3 Password Configure the FTP password The password can contain maximum of 12 characters...

Page 44: ...path can contain maximum of 31 characters Figure 3 18 FTP Target Path 3 3 5 5 FTP Length of Image second Select FTP length of image by second 5 to 10 seconds are selectable to transmit image files for...

Page 45: ...figure motion events 3 3 7 E Mail Address Setting Transmits the content of an event log periodically through e mail Configure up to four e mail address to transmit under event status simultaneously Th...

Page 46: ...ess setting 3 3 8 E Mail Setting Figure 3 21 E Mail Setting 3 3 8 1 Send Period Configure the e mail transmitting cycle It does not transmit when it is set to NO The setting time can be set up at the...

Page 47: ...for Unimo employees and will not work for your set up C ping mail unimo co kr Pinging mail unimo co kr 211 104 85 230 with 32 bytes of data Reply from 211 104 85 230 bytes 32 time 342ms TTL 114 Reply...

Page 48: ...sion 3 0 3 3 9 Event Log Shows the event log of the selected channel It can reset periodically by setting e mail as described in paragraph 3 3 7 Figure 3 22 Event Log Display screen 3 4 Playback Setup...

Page 49: ...osition when the Replay button is pressed FIRST This can search for and replay the oldest recorded images from the selected channel LAST This can search for and replay the latest recorded images from...

Page 50: ...ision 3 0 3 6 Network Setup screen Figure 3 25 Network Setup screen 3 6 1 DDNS setting Set up DDNS Dynamic Domain Name System server address port number Users can set up two DDNS server address and po...

Page 51: ...ary to setup DDNS link on By indicating the address of a DDNS Server the UDR 204 will update its IP address and its MAC address periodically Therefore when users access the DVR over the network the sa...

Page 52: ...combined 6 units Figure 3 27 Remote Connection Login Password screen 3 6 3 Network Type Choose one type from the following Static DHCP PPPoE Static mode uses fixed assigned IP address in the network...

Page 53: ...ng System The default Port number is port 80 Change easily by using Jog shuttle equipped in front panel 3 6 4 3 IP Address Assign a fixed IP address to the UDR 204 Change easily by using Jog shuttle e...

Page 54: ...UDR 204 C Operation manual Revision 3 0 3 6 5 DHCP Figure 3 29 DHCP setup screen 3 6 5 1 Port Please refer to paragraph 3 6 4 1for Port setting of Static DHCP PPPoE 3 6 6 PPPoE Figure 3 30 PPPoE setti...

Page 55: ...h 3 6 4 3 6 6 2 ID Type in your user ID for the ADSL account PPPoE The password can contain maximum of 31 characters Figure 3 31 ID input screen 3 6 6 3 Password Type in your user Password for the ADS...

Page 56: ...f UDR 204 users must reboot the system User can restart the new network mode setting after entering yes key button Figure 3 33 Changing the Network setting screen 3 7 System Setup screen Figure 3 34 S...

Page 57: ...ual Revision 3 0 Figure 3 35 DVR name screen Using the arrow type in the DVR name Click OK when finished 3 7 2 System Password Figure 3 36 System password set up Set up part for system password relate...

Page 58: ...d Users can use any numeric number from 0 4 combined 6 units Password input screen present new confirm if it is wrong twice confirm to change Figure 3 37 Password input screen 3 7 2 2 Password Apply D...

Page 59: ...current password 3 7 3 Time Date Users can configure the view of time date on the system as well as Day Light Saving Time Figure 3 38 Set up Time Date 3 7 3 1 Set up Time Date Set up date and time on...

Page 60: ...mode 3 7 3 3 4 Apply hour Set up the duration time in Day Light Saving Time mode 3 7 4 Buzzer Users can turn the buzzer On Off depending on the situations Usable situation is Sensor Motion Video Loss...

Page 61: ...stem events The items that manage by Log are Video Loss Power On Power Off Menu entry HDD Full failure of FTP transmission failure of E mail transmission Figure 3 40 System Log screen 3 7 7 HDD Setup...

Page 62: ...at off is setup the recorded images shall not be erased In case that 30 is setup the images recorded 30 days earlier than today shall be erased 3 7 7 4 Internal HDD 3 7 7 4 1 Capacity Indicate the use...

Page 63: ...ackup It is fixed to auto backup system will automatically backup recording image If it is fixed by extension it will be the same as Internal HDD If backup mode Manual Auto backup is changed to extens...

Page 64: ...h the button RECORD ON OFF Recording start stop during user push the button same as pushing remote controller or DVR machine 3 7 8 2 2 Direction OUT ALRAM OUT Notice the assigned port when event occur...

Page 65: ...factory default Figure 3 45 Confirmation box for Factory Default 3 7 10 Software Upgrade Users can upgrade the software of Ramdisk and Kernel using the USB flash drive thumb drive by the following st...

Page 66: ...ion 3 0 Figure 3 46 Software Upgrade After the unit recognizes the USB flash drive and upgrading end the unit will reboot Figure 3 47 Ramdisk Upgrade 3 8 Backup Backup recording data to HDD or USB Fla...

Page 67: ...nel to backup 3 8 5 Event Choose the event to backup In case of none mode selected files according to time will be backed up 3 8 6 Backup Start Based on the input date time channel and event other con...

Page 68: ...ation 3 9 1 Video type It shows that present Video type of System is NTSC or PAL 3 9 2 H W version It shows the H W Version of system 3 9 3 S W version It shows the S W Version of system 3 9 4 KERNEL...

Page 69: ...nnel Event UDR 204 saves lat searching condition so it automatically displayed last search condition under search mode Screen where the condition of search will be input Figure 3 51 Search by time 3 1...

Page 70: ...ct the Event as follows NONE All of files are searched regardless of Event MOTION The file recorded by MOTION is searched SENSOR The file recorded by SENSOR is searched 3 10 1 5 Example of Search Resu...

Page 71: ...n of Still Image 3 10 3 Search of back up HDD The images that were backed up manually or automatically can be searched by Time Channel Event Figure 3 54 Screen for input data of HDD Search The method...

Page 72: ...r Played back directly 3 11 1 1 Method of playback In order to play back the recorded images put the Curser to the selected content in the Menu of Search and press Button OK The screen of Search resul...

Page 73: ...of playback users press button LEFT and speed is controlled 3 11 1 3 4 Change of Direction of Playback There s forward and Backward directions In order to change direction from Forward to Backward use...

Page 74: ...thod of playback As the paragraph 3 2 1 users put the curser to contents In the searched still Image Lists and press Button OK The screen of search list disappears and still image is played back as th...

Page 75: ...ally from the recorded images in the system are played back The functions for Playback of backed up images screen during playback control during playback are same as those of Playback of Recorded imag...

Page 76: ...play It substitutes the OSD button on the remote control 3 12 3 Audio Mute Turns on off the audio It substitutes button on the remote control 3 12 4 HDD Displays the HDD information It substitutes the...

Page 77: ...r 16x1CH DVR QuickInstaller is a setup configuration template for quick easy multiple unit setup using RS 232 or network It can used to derive setting parameters of DVR system and to save setting para...

Page 78: ...H 2CH 3CH 4CH Quad Quad Capture Quad Record button sound On Off volume adjustment Click to view program version and to upgrade DVR S W Time date indicator PC Hard disk information Live view or Playbac...

Page 79: ...ss and port number Click Add to add the newly entered DVR information into the DVR list After selecting a DVR Name from the list and making changes click Modify to update the changes made to the item...

Page 80: ...is screen will be phased out Under bad network transmission condition if users use selected channel pre allocated channel transmission will be better If users enter this icon again entered channel wil...

Page 81: ...icon in the main menu full screen form appears If users press the key of ESC you will return to the selected screen 4 3 6 Program setup If users click this button in the main window window of program...

Page 82: ...rrence is on or off when motion detection or sensor icon activated Close the window without saving the setup Close the window after saving the setup 4 3 7 DVR recording It works as recording button of...

Page 83: ...83 UDR 204 C Operation manual Revision 3 0 DVR Recording mode 4 3 8 DVR playback search This button is used for playback search playback and backup functions for DVR and after logging in by admin...

Page 84: ...revious research result will appears 4 3 9 DVR playback search Search data will appear list form if users push two buttons at DVR playback screen DVR search files will appear recording start end time...

Page 85: ...ode to playback mode Display playback picture derived from DVR system Button for reverse playback pause still reverse phase forward phase slow fast previous search next search Comeback playback mode t...

Page 86: ...next files of present viewing files 4 3 10 DVR backup DVR search files will appear recording start end time channel and event information included Indicator backup progress at backup Button for stari...

Page 87: ...asily It can be activated after logging in by admin 4 3 12 Still image Capture Yon can save playing image such as live viewing image DVR playback image into still image by capture Besides users can ca...

Page 88: ...till image recording folder through setup menu among RAMS program 4 3 13 Watermark insertion Click the watermark checkbox then push the save button to save still image with watermark 4 3 14 Printing s...

Page 89: ...ecording option automatically close it With starting record button will be changed to button In order to stop recording users just push record button again record The recording destination is record d...

Page 90: ...d on pushing this icon Select hard disk It shows total capacity of HDD It shows the used capacity of HDD used It shows the capacity of HDD to be used It shows the capacity of HDD used and to be used C...

Page 91: ...de button in the program version check screen Select targeted files to upgrade Select targeted files saved in local PC Enter targeted DVR information such as DVR address Port user and password admin o...

Page 92: ...for playback progress rate Reverse playback playback still pause reverse phase forward phase slow fast Channel selection button 1CH 2CH 3CH 4CH Quad Panorama playback button Click the logo to check p...

Page 93: ...ing of files users can access it 4 4 2 1 Search option from video image backup file Select whether recording files at RAMS Multiviewer or backup files Enter targeted recording date for search Enter ta...

Page 94: ...manual Revision 3 0 If there is nothing to special condition for searching all files saved in recording folder will be displayed on search window after searched Search window after selected channel nu...

Page 95: ...date for search Enter targeted DVR name for search Enter targeted channel Enter keyword to classification to list Start to search accordingly Close search option window If there is nothing to special...

Page 96: ...date June 22 004 as search option 4 4 3 Searching by directory You can use it when you know the directory has AVI file or still image file It will be set up default directory at first After that user...

Page 97: ...4 4 4 Still Image Capture Save replaying images into still image by capture Besides users can capture image by push capture button for each channel or push capture button at the foot of a screen Still...

Page 98: ...watermark 4 4 6 Printing still image To print still image please push the button in capture screen Then use this button in main page But In the motion picture state this button only is applicable to...

Page 99: ...trol by click this button Play file quickly User can control by click this button 4 4 9 Water mark drawing When still image is display if push this button watermark will be drawn If you find other col...

Page 100: ...can see the panorama screen when you push this button while file playing Button will change into like this button And button can help user to view screen while control screen back and forth And click...

Page 101: ...101 UDR 204 C Operation manual Revision 3 0 Screen in panorama mode...

Page 102: ...02 UDR 204 C Operation manual Revision 3 0 Image when click one screen in panorama mode 4 4 11 Check the program version Click Unimo logo to confirm version 4 4 12 Close Program Close UniPlayer progra...

Page 103: ...am login Insert program password If inserted password is right multiviewer runs Close program Modify program password After inserting current password change password confirm password accordingly chan...

Page 104: ...or channel Connect Disconnect Capture Record Channel SCREEN Click on UNIMO logo to check the version of program Actual Time shows Information of Hard Disk of PC shows Button for dividing screen 4 scre...

Page 105: ...ist management connection window appear DVR List that user recorded appears Input DVR name IP address domain name port Input id name Input id password Delete the information selected in DVR List Modif...

Page 106: ...screen If connection is impossible it displays error defectives on screen 4 5 4 Camera On Off In order to connect to DVR in the main screen please click button and select DVR and log in After connecti...

Page 107: ...107 UDR 204 C Operation manual Revision 3 0 4 5 5 Full Screen Click the Full Screen button to open a screen in full view Press ESC to return 4 5 6 Program Setup Click to launch Setup...

Page 108: ...ge among 4channels Check the image among 9 channels Close the Screen after storing the setup Cancel the Screen without storing the setup 4 5 7 Link with UniPlayer Click this button in the main screen...

Page 109: ...s the used capacity of HDD It shows the free capacity of HDD It shows both the used capacity of HDD and free space Click to close the screen 4 5 10 Confirmation of Version of Program Click the UNIMO l...

Page 110: ...n System parameter setting window is same form as Main menu used in DVR system Users can change DVR system parameter by entering each menu Main menu description File Open Read to display saved paramet...

Page 111: ...le language 9 Information Click to display program version information 4 6 3 Communication over Network or serial port Click to open system parameter Write to DVR The below window will be activated on...

Page 112: ...one removable HDD Please note that the Jumper setting must be set to MASTER To Install a single HDD in the Removable Bay please follow these steps Prepare one HDD Verify the Jumper setting It must be...

Page 113: ...3 0 Slide in the Removable Bay in to the DVR Lock the Removable Bay 5 1 2 Installing two hard disk drives The Jumper setting should be done as follows The Internal HDD Master The Removable Bay HDD Sl...

Page 114: ...removable HDD to Slave Follow the procedure as listed in paragraph1 1 1 of Appendix V 5 1 3 Installing CD RW drive To install the CD RW drive in the Removal Bay as backup purpose set the Jumper setti...

Page 115: ...115 UDR 204 C Operation manual Revision 3 0 The CD RW drive installed in the DVR system...

Page 116: ...Transmit Data 9 Alarm Out Alarm Out NO 2 RS 485 RS 485 Transmit Data 10 Alarm Out Alarm Out COM 3 AUX1 11 Alarm Out Alarm Out NC 4 AUX2 Auxiliary In Port RSI ARI RONOFFI 12 Sensor1 5 AUX3 13 Sensor2...

Page 117: ...Brightness 9 Level Hue 9 Level Sharpness 9 Level Picture Setting Default Camera Setup Sequence Time 2 sec Record Type MUX MUX QUAD MUX 360 240 NTSC 360 288 PAL Resolution QUAD 720 480 NTSC 720 576 PAL...

Page 118: ...splay Setup Alpha Blending 4 Level 8 Levels DDNS Server1 211 104 85 235 Port 7100 DDNS Server2 221 139 14 109 DDNS Setup Port 7100 Admin 111111 Remote Connection Login Password User 111111 DDNS Link O...

Page 119: ...city Used Cap Total Cap Function EXTENSION HDD Setup Removable HDD Format Active HIGH LOW HIGH IN UNUSED Aux Port Function Out UNUSED Factory Default Ramdisk S W Upgrade Kernel Device HDD USB CD RW HD...

Page 120: ...Value Remarks Start Time Date Date of Yesterday Time Current Time End Time Date Date of Today Time Current Time Channel CH1 Search by Time Event NONE Still Image Search Start Time Date Date of Yesterd...

Page 121: ...seq Sequence 18 kmulti Multi 19 klock Lock 20 kdvr DVR 21 ksearch Search 22 kmenu Menu 23 kup Up 24 kdown Down 25 kleft Left 26 kright Right 27 kok Ok 28 krplay R Play 29 kstop Stop 30 kplay Play 31 k...

Page 122: ...ft Jog left 58 kjright Jog right 59 kpower Power 5 4 2 Usage System protocol to control UDR 204 from remote client software installed in PC or remote controller It maps button function of remote contr...

Page 123: ...95 0 1786 2 7 44 3 65 3 89 3 109 7 163 9 5 67 0 98 7 134 9 165 7 247 7 Super Fine 3 100 9 148 6 203 1 249 5 372 9 7 65 6 96 6 132 0 162 2 242 4 5 99 8 147 0 200 9 246 8 368 9 Fine 3 150 5 221 7 302 9...

Page 124: ...74 0 109 1 149 0 183 1 273 7 Super Fine 3 92 7 136 6 186 6 229 3 342 8 6 67 0 98 7 134 9 165 7 247 7 4 108 0 159 1 217 4 267 1 399 3 Fine 3 129 3 190 5 260 3 319 8 478 0 6 81 2 119 7 163 5 200 9 300 3...

Page 125: ...125 UDR 204 C Operation manual Revision 3 0 UNIMO Technology Co Ltd 479 12 Bangbae 3Dong Seocho Gu Seoul KOREA 137 820 TEL 82 2 3470 4490 4499 FAX 82 2 581 3107 E Mail jsoh unimo co kr www unimo co kr...

Reviews: