background image


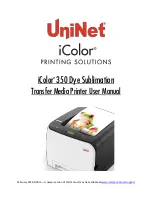
iColor

®


350 Dye Sublimation


Transfer Media Printer User Manual


February 2019 Edition – A newer version of this manual may be available at 

www.icolorprint.com/support


Summary of Contents for iColor 350

Page 1: ...iColor 350 Dye Sublimation Transfer Media Printer User Manual February 2019 Edition A newer version of this manual may be available at www icolorprint com support ...

Page 2: ...ore you print with the iColor 350 Page 22 23 Printing with the iColor 350 Page 23 Specific Substrate Recommendations Page 24 26 Removing Polymer Residue on Hard Surfaces Page 26 iColor 350 Printing Tips Page 27 Using Genuine iColor Consumables Page 27 Replacing the Print Cartridges Page 28 30 Replacing the Waste Toner Bottle Page 30 32 Non User Replaceable Components Page 32 Cleaning the Toner Den...

Page 3: ...ation The iColor 350 printer uses heat to transfer an image printed with dye sublimation toner onto polyester coated materials such as a plastic ceramics and fabric This is a fast and easy way to transfer images since it is a one step process and the image is permanent The toner serves as a carrier for the sublimation dye which transitions from a solid to a gas state Thus your transferred image is...

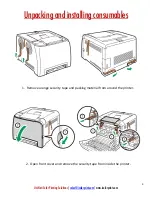
Page 4: ...tions sales icolorprint com www icolorprint com Unpacking and installing consumables 1 Remove orange security tape and packing material from around the printer 2 Open front cover and remove the security tape from inside the printer ...

Page 5: ...g Solutions sales icolorprint com www icolorprint com 3 Flip up the blue handles to engage the fuser then close the front cover 4 Open the top cover and remove orange security tape and packing material from inside the printer ...

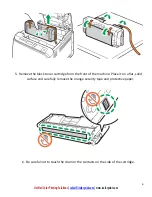
Page 6: ... icolorprint com 5 Remove the black toner cartridge from the front of the machine Place it on a flat solid surface and carefully remove the orange security tape and protective paper 6 Be careful not to touch the drum or the contacts on the side of the cartridge ...

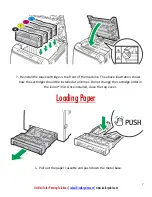
Page 7: ... the black cartridge in the front of the machine The above illustration shows how the cartridges should be installed at all times Do not change the cartridge order in the iColor 350 Once installed close the top cover Loading Paper 1 Pull out the paper cassette and push down the metal base ...

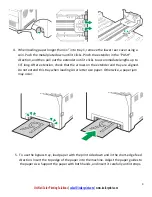
Page 8: ... move the paper guides forcefully Doing so may damage the tray 3 Load media with the print side face up and ensure it locks in underneath the guides before closing the cassette Ensure the paper stack does not exceed the upper limit mark inside the paper tray To avoid paper jams make sure the tray is securely inserted and the media is not excessively stacked ...

Page 9: ...ntil it clicks to accommodate lengths up to 14 long After extension check that the arrows on the extender and tray are aligned Do not extend this tray when loading A4 or letter size paper Otherwise a paper jam may occur 5 To use the bypass tray load paper with the print side down and in the short edge feed direction Insert the top edge of the paper into the machine Adjust the paper guides to the p...

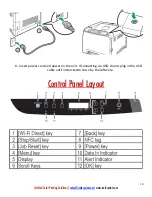
Page 10: ... Printing Solutions sales icolorprint com www icolorprint com 6 Insert power cord and power on the unit If connecting via USB do not plug in the USB cable until instructed to do so by the software Control Panel Layout ...

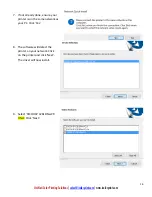
Page 11: ...USB drive that was shipped with your printer and double click to launch the setup program Compatible with Windows 7 8 10 only You must have Administrator privileges on the computer to proceed If you encounter a warning that the driver is potentially unsafe ignore and proceed 1 Click Continue to install the iColor 350 driver 2 Click Quick Install to continue the installation ...

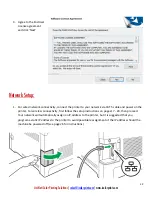
Page 12: ...er to your network via CAT 5 cable and power on the printer For wireless connectivity first follow the setup instructions on pages 17 20 then proceed Your network will automatically assign an IP address to the printer but it is suggested that you program a static IP address to the printer to avoid possible reassignment of the IP address should the machine be powered off see page 26 for instruction...

Page 13: ... Solutions sales icolorprint com www icolorprint com 5 Select Network Connection or Wireless Connection depending on how your printer is set up and click Next 6 Select Automatically configure the printer network and click Next ...

Page 14: ...colorprint com 7 If not already done ensure your printer is on the same network as your PC Click Yes 8 The software will detect the printer on your network Click on the printer and click Next The driver will now install 9 Select RICOH SP C261DNw PS ONLY Click Next ...

Page 15: ...s icolorprint com www icolorprint com 10 Click Finish to complete the installation If prompted to restart your PC click No Do not restart USB Setup 1 Connect the USB cable to the printer and power on the printer Do not connect to your PC yet ...

Page 16: ... iColor Printing Solutions sales icolorprint com www icolorprint com 2 Select USB Connection and click Next 3 Now connect the USB cable to your PC and wait 30 seconds 4 Select RICOH SP C261DNw PS ONLY Click Next ...

Page 17: ...ess point may be printed on a label affixed to the router access point For details about the SSID and Encryption key refer to the router access point manual Confirm the SSID and Encryption key and write them down on the blank space as shown below SSID _________________________ Encryption key _________________ Configuring Settings Using the Printer Control Panel Make sure the Ethernet cable is not ...

Page 18: ... f To go to the next characters press the OK key Press the Escape key to clear all characters 18 Display will read Connect Yes No Press the OK key After connecting to the network the Wi Fi screen is displayed 19 Using the up down keys select Wi Fi Status and then press the OK key When Connected is displayed the connection has been established If Disconnected is displayed the connection has not bee...

Page 19: ... Using the up down keys select Host Interface and then press the OK key 12 Using the up down keys select Network Setting and then press the OK key 13 Using the up down keys select Wi Fi Config and then press the OK key 14 Using the up down keys select WPS and then press the OK key 15 Using the up down keys select PBC and then press the OK key Connecting appears and the machine starts to connect in...

Page 20: ...enu button to the left of the LED screen Using the arrow keys to the right of the LED screen select Network Host Interface IPv4 Config IP Address Use the arrow keys to set the IP address You can set the subnet mask and default gateway under the same menu Your printer will now be listed along with your other printers and devices ...

Page 21: ...nt com You are now ready to install the iColor 350 Sublimation ICC Profile 1 Locate the file named iColor 350 Sublimation ICC Profile on the flash drive that came with your printer 2 Right click on the file then left click on Install Profile 3 The profile is now installed ...

Page 22: ...nd High Quality under Job Options Be sure to mirror print and select the proper ICC profile before printing if desired 2 For vector graphics or cartoon like images where color matching isn t as important as vibrancy do not use the ICC profile This allows the prints to press as vividly as possible Be sure to always mirror your image before you print 3 When printing black as part of your image be su...

Page 23: ...n pressed to the substrate after the sublimation process 2 When ready to press the image cover the transfer with copy paper instead of kraft paper as the image will sublimate upwards and transfer to it For most applications press at 380 F 193 C with low pressure The duration of the press depends on the type and thickness of the substrate used usually between 60 120 seconds Longer press duration in...

Page 24: ... Dye Sublimation Toner kit Mirror Print 3 Place the substrate on the lower platen of the press coated side face up Align the printed image to the substrate with the printed image on top image facing the substrate You can tape the paper to the substrate or lower platen for additional stability 4 Cover the transfer with copy paper or blow off sheets 5 Press at 380 F 193 C with low pressure for 60 se...

Page 25: ...s at 380 F 193 C with low pressure for 60 seconds 6 Open the press slowly and peel immediately hot peel 7 Cool substrate as quickly as possible 8 Clean excess toner residue with STC9 solution or use a SubliClean sheet during the pressing stage Coated Ceramic Heat Press 1 Close the press to preheat the lower platen 2 Print the image using the iColor Dye Sublimation Toner kit Mirror Print 3 Place th...

Page 26: ...ner residue from transferring to the substrate during the pressing process SubliClean is available in rolls and is used in between the substrate and the printed transfer 1 Peel and cut a piece of subliClean slightly larger than the size of the substrate 2 Lay it flat on the substrate then cover with the printed transfer sheet 3 Press as stated in the above instructions 4 When using SubliClean all ...

Page 27: ...e transfer Do this by air cooling or placing the textile on a cold surface such as stone or metal to retain color vibrancy Overbled images can sublimate onto the plates of the heat press so the use of copy paper below and above your project is recommended to protect the plates of your heat press Use of upper and lower covers is also suggested If you are using tape to secure your image to the subst...

Page 28: ...re pages but the print quality of those pages may be lower Do not allow paper clips staples or other small objects to fall inside the machine Do not expose the print cartridge without its cover to direct sunlight for a long time Do not touch the print cartridge s photo conductor unit or the ID chip on the side of the print cartridge as indicated in the illustration below When removing print cartri...

Page 29: ...over and then carefully raise the top cover 2 Carefully lift out the print cartridge vertically holding its center From the rear the print cartridges are installed in the order of cyan C magenta M yellow Y and black K 3 Take the new print cartridge out of the box and then take it out of the plastic bag 4 Hold the print cartridge and shake it from side to side five or six times Even distribution of...

Page 30: ...ace the waste toner bottle when the following message appears on the screen Replace Waste Toner Bottle Prepare a waste toner bottle when the following message appears on the screen Replace soon Waste Tnr Bottle Waste toner bottles cannot be reused When removing the waste toner bottle make sure not to tilt it Make sure the transfer unit is installed If the transfer unit is not installed install it ...

Page 31: ...ilt it backwards and lift it up 4 Holding the handle at the center of the waste toner bottle carefully pull it partially out without tilting it 5 Pull the waste toner bottle halfway out 6 Holding the bottle firmly pull it straight out 7 To prevent the waste toner bottle from coming into contact with the intermediate transfer unit the position shown by the arrow in the illustration below do not lif...

Page 32: ...e until it clicks Pressing the handle at the center push the bottle all the way in 12 Place the transfer unit on the front cover Slide the transfer unit along the guide rails into the machine 13 When it stops push on the PUSH mark until it clicks 11 Using both hands carefully push up the front cover until it closes 14 When closing the front cover push the upper area of the cover firmly Non User Re...

Page 33: ... panel Density Sensor Require Cleaning 1 Pull up the lever on the top cover and then carefully raise the top cover 2 Remove the rearmost print cartridge 3 Slide the toner density sensor lever once to the left 4 Carefully insert the print cartridge removed in Step 2 vertically 5 Using both hands hold the center of the top cover and close the cover carefully Be careful not to trap your fingers ...

Page 34: ... position shown by the arrow in the illustration below Do not touch the transfer roller 2 Clean the registration roller by applying a soft damp cloth while turning it using both hands carefully push up the front cover until it closes 3 When closing the front cover push the upper area of the cover firmly Cleaning the Paper Tray Friction Pad and Paper Feed Roller If the friction pad or paper feed ro...

Page 35: ...ving Paper Jams Caution The inside of this machine becomes very hot Do not touch the parts labeled indicating a hot surface Some of this machine s internal components get very hot For this reason take care when removing misfed paper Not doing so could result in burns Some of the internal components of this machine might be fragile When you remove jammed paper do not touch the sensors connectors LE...

Page 36: ...ear Torn pieces remaining inside the machine will cause further jams and possibly damage the machine Paper jam can cause pages to be lost Check your print job for missing pages and reprint any pages that did not print out If paper jams inside the fusing unit follow the procedure below to remove it Since the temperature around the guide is high wait for it to cool down before checking for jammed pa...

Page 37: ... jams inside a tray 1 Pull out the jammed paper carefully Do not pull out the paper tray or touch the fusing unit If paper has jammed inside the transfer unit 2 Holding both sides of the paper pull the paper carefully forward 3 Then pull out 4 Once the jam is cleared using both hands carefully push up the front cover until it closes When closing the front cover push the upper area of the cover fir...

Page 38: ...t Windows 7 8 10 x32 x64 Macintosh OS X Native V10 9 10 12 Interfaces 10Base T 100Base TX IEEE 802 11b g n NFC Tag USB 2 0 High speed Type A For Pictbridge Scan to USB Flash Drives Paper Cassette 250 sheet Legal Letter Universal Paper Sizes Min Max A4 A5 A6 B5 B6 Legal Letter HLT Executive F Foolscap Folio Envelopes Com10 Monarch C5 C6 DL Custom size Min 90 x 148 mm Max 216 x 356 mm Paper Weight S...

Reviews: