


Do not introduce foreign objects into the ventilation holes or operate this product with any covers open or doors
removed as electric shock, fire and/or injuries may occur.
Do not use an extremely flammable spray near the product as the product contains high temperature parts that may
cause a fire.
Switch the product off before cleaning to prevent any risk of injury. Clean using a damp cloth. Do not use liquid or
aerosol cleaners.
Ensure loose clothing and hair is kept clear of moving parts when the product is in operation to prevent possible risk
of injury.
Do not carry out any operations on the product that are not specified in the User’s Guide. This may result in electric
shock, fire and/or injury.
Do not touch the battery if one is fitted to the product. There is a risk of explosion if the battery is replaced by an
incorrect type. The product battery should not require replacement during the life of the product.
Do not throw toner cartridges or image drum cartridges into a fire as you may receive burns from a dust explosion.
After installing additional memory, hard disk drive, or any other internally fitted option, any covers removed or doors
opened must be closed or replaced and secured to prevent risk of fire.
The acoustic noise of this product is less than 70 dB (A) as measured in accordance with EN ISO 7779.
The operating condition range for your product is: 10 to 32°C and 20 to 80% RH. Operation of the product outside
this range could result in damage to the product.
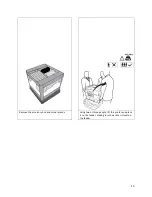
If a scanner, finisher etc. is fitted, exercise care when moving these items so as to avoid risk of entrapment or
personal injury.
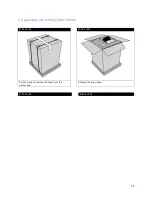
If the product is installed on a cabinet or high capacity feeder, ensure wheel locks are applied once placed in final
position for use, to prevent risk of movement or injury.
10
Summary of Contents for iCOLOR 900
Page 1: ...iCOLOR 900 APEX2Print Installation and User Guide ...
Page 23: ...Navigate to the 2 Install RIP vR2 Folder Run the Prepare_Uninet_RIP_v2 1 exe file 23 ...
Page 24: ...STEP 3 of 8 The KEYLOK and Sentinel Drivers will install 24 ...
Page 26: ...STEP 5 of 8 Click Done STEP 6 of 8 26 ...
Page 27: ...Navigate to the 3 Install APEX2Print folder Run the APEX2Print_Install msi file Click Next 27 ...
Page 53: ...Appendix 53 ...
Page 57: ...57 ...
Page 59: ...PAGE 3 59 ...
Page 68: ...STEP 2 of 4 The Creating a New User Media Entry window will display Click Edit STEP 3 of 4 68 ...
Page 80: ...STEP 7 of 10 The job is ready for printing Click Print Nesting 80 ...
Page 87: ...STEP 3 The Preview Screen will display the scaled object 87 ...
Page 100: ...Example 2 Guide Arms Example 3 Cutter Blade Glue Residue Glue Residue 100 ...
Page 108: ...STEP 21 Close the Guide Door and the system is ready to print 108 ...


