


3.
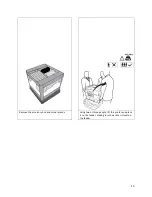
Safety Information
120 Volt Models
Your Uninet product has been carefully designed to give you years of safe, reliable performance. As with all
electrical equipment, there are a few basic precautions you should take to avoid hurting yourself or damaging the
product.
•
Save all provided documentation for future reference.
•
Read and follow all warning and instruction labels on the product itself.
•
Unplug the product before you clean it. Use only a damp cloth; do not use liquid or aerosol
cleaners.
•
Place your product on a firm, solid surface. If placed on something unsteady, it may fall and be
damaged. If placed on a soft surface, the vents may be blocked, causing the product to
overheat.
•
Protect your product from overheating. Make sure no obstructions block the openings of the
product. Do not put the product on or near a heat source (such as a radiator or heat register).
Keep the product out of direct sunlight.
•
Always use this product in a well ventilated area. Allow enough room around the product for
adequate ventilation and easy access to the paper trays. If the product is placed in any kind of
enclosure, make sure the enclosure is well ventilated.
•
Do not use the product near water. Do not spill liquid of any kind on it.
•
Be certain that your power source matches the rating listed on the back of the product. If you
are not sure, check with your dealer or local power company.
•
Do not connect this product to an uninterruptible power supply (UPS).
•
Your product has a grounded, three-prong plug as a safety feature. This plug only fits into a
grounded outlet. If the plug does not fit, the outlet may be an older, non-grounded type. Contact
an electrician to have the outlet replaced. Do not use an adapter to defeat the grounding.
•
Install the product near an easily accessible power outlet.
•
Avoid damaging the power cord. Do not put anything on it or place it where it will be walked on.
If the cord becomes damaged or frayed, replace it immediately.
•
If you are using an extension cord or power bar with the product, make sure the total amperes
required by all the equipment on the extension is less than the extension’s rating. The total
ratings of all equipment plugged into the outlet should not exceed 15 amperes.
•
Do not poke anything in the ventilation slots of the product. You could get an electrical shock
or cause hazardous electrical arcing, which could cause a fire.
•
Aside from the routine maintenance described in the documentation, do not try to service the
product yourself. Removing the cover may expose you to shocks or other hazards.
•
Do not make any adjustments other than those outlined in the documentation. You may cause
damage that will require extensive repair work. The provided documentation explains how to
get your product serviced by qualified Uninet technicians. If anything happens that indicating
your product is not working properly or has been damaged, unplug it immediately and follow
the procedures in the provided documentation for having your product serviced.
Here are some of the things to look for.
•
The power cord or plug is frayed or damaged.
•
Liquid has been spilled into the product or the product has been exposed to water.
•
The product has been dropped, or the cabinet is damaged.
•
The product does not function normally when following the operating instructions.
8
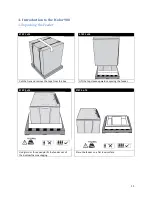
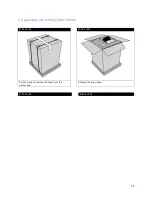
Summary of Contents for iCOLOR 900
Page 1: ...iCOLOR 900 APEX2Print Installation and User Guide ...
Page 23: ...Navigate to the 2 Install RIP vR2 Folder Run the Prepare_Uninet_RIP_v2 1 exe file 23 ...
Page 24: ...STEP 3 of 8 The KEYLOK and Sentinel Drivers will install 24 ...
Page 26: ...STEP 5 of 8 Click Done STEP 6 of 8 26 ...
Page 27: ...Navigate to the 3 Install APEX2Print folder Run the APEX2Print_Install msi file Click Next 27 ...
Page 53: ...Appendix 53 ...
Page 57: ...57 ...
Page 59: ...PAGE 3 59 ...
Page 68: ...STEP 2 of 4 The Creating a New User Media Entry window will display Click Edit STEP 3 of 4 68 ...
Page 80: ...STEP 7 of 10 The job is ready for printing Click Print Nesting 80 ...
Page 87: ...STEP 3 The Preview Screen will display the scaled object 87 ...
Page 100: ...Example 2 Guide Arms Example 3 Cutter Blade Glue Residue Glue Residue 100 ...
Page 108: ...STEP 21 Close the Guide Door and the system is ready to print 108 ...


