


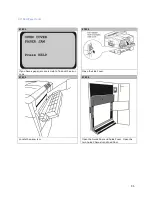


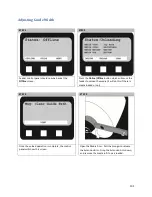


STEP 5
STEP 6
Open the Media Door of the feeder. Lower the Extension
Arm. Using both hands, rewind the paper roll until the
yellow LED light on the feeder menu begins flashing.
At this time, you want to ensure the tension on the
paper roll isn’t too tight and the roll isn’t damaged or
coning.
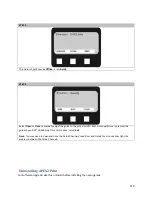
Reload media.
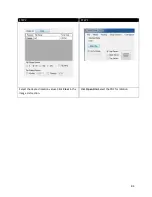
Avoiding Paper Jams
The following table summarizes possible causes of paper jams and suggests ways of avoiding them.
POSSIBLE CAUSE
SUGGESTED REMEDY
The printer is not level.
Place the printer on a steady, level surface.
Your print media is too light or too heavy.
Use appropriate media
Your print media is damp or charged with static
electricity.
Use media that has been stored in appropriate temperature
and humidity conditions.
Your print media is creased or curled.
Use appropriate media. Decurled media can be used.
Your print media sheets are not aligned with
each other.
Remove the sheets, jog them into alignment and reload them.
Your print media is not aligned properly in the
paper tray.
Adjust the paper stop and paper guides of the tray, or the
manual feed guide on the MP Tray to align the media properly.
96
Summary of Contents for iCOLOR 900
Page 1: ...iCOLOR 900 APEX2Print Installation and User Guide ...
Page 23: ...Navigate to the 2 Install RIP vR2 Folder Run the Prepare_Uninet_RIP_v2 1 exe file 23 ...
Page 24: ...STEP 3 of 8 The KEYLOK and Sentinel Drivers will install 24 ...
Page 26: ...STEP 5 of 8 Click Done STEP 6 of 8 26 ...
Page 27: ...Navigate to the 3 Install APEX2Print folder Run the APEX2Print_Install msi file Click Next 27 ...
Page 53: ...Appendix 53 ...
Page 57: ...57 ...
Page 59: ...PAGE 3 59 ...
Page 68: ...STEP 2 of 4 The Creating a New User Media Entry window will display Click Edit STEP 3 of 4 68 ...
Page 80: ...STEP 7 of 10 The job is ready for printing Click Print Nesting 80 ...
Page 87: ...STEP 3 The Preview Screen will display the scaled object 87 ...
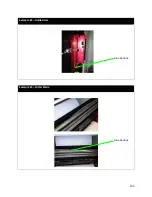
Page 100: ...Example 2 Guide Arms Example 3 Cutter Blade Glue Residue Glue Residue 100 ...
Page 108: ...STEP 21 Close the Guide Door and the system is ready to print 108 ...


