background image

3:  Installation

3-10

UPS469-01-00 PowerWAVE 3000T User Manual Dated 05-04-13

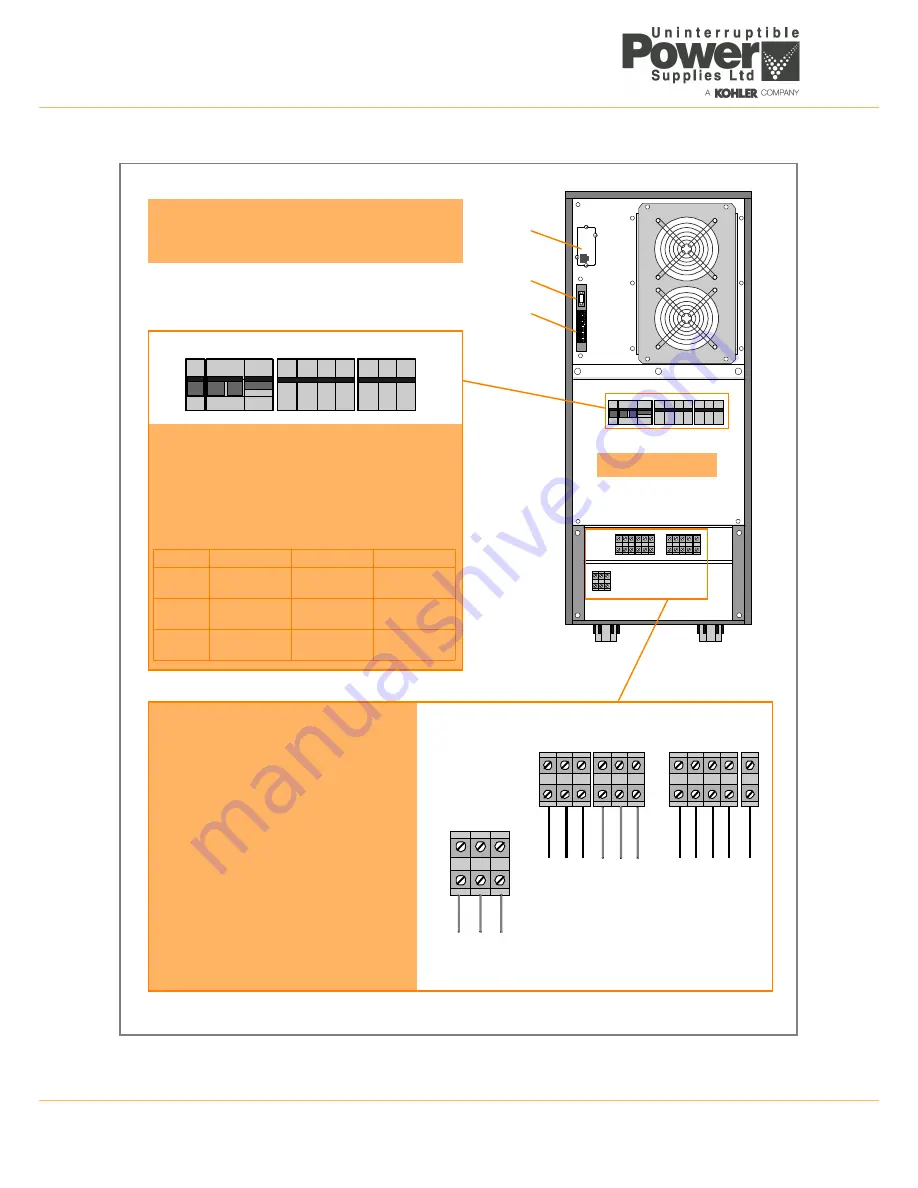
Figure 3.7   Cabinet A fuse and connection details (rear view) – three phase input

+

N

3L
1

3N

PE

PE

PE

2L
1

2N

1N

1L
3

External Battery

(

**

option)

Mains

Supply

Bypass

Supply

(

*

dual feed

Output

to Load

only)

SNMP

JD1

X1-X21

Customer Interface Connections

JD1 – Smart Port RS232 (Sub-D9P/F).
X1-X21 – Dry Port volt-free contacts on terminal block.

Power Switches & Fuses

IA1 – Maintenance Bypass Switch
IA2 – Output Switch
FA2 – Bypass Supply Line Fuse
FA1 – Input Supply line Fuse
FA3 – Battery Fuse

FA1

FA2

FA3

7.5 kVA

32A (10x38)

Ultrafast

50A (14x51)

GL/GC

32A (10x38)

Ultrafast

10 kVA

32A (10x38)

Ultrafast

50A (14x51)

GL/GC

32A (10x38)

Ultrafast

15 kVA

50A (14x51)

Ultrafast

80A (22x58)

GL/GC

50A (14x51)

Ultrafast

IA1   IA2    FA2            FA1          FA3

Input/Output Power Connections

In a ‘single feed’ (standard) installation 

terminals 2L1 and 1L1 are linked by cables 
fitted to the UPS side of the terminal blocks.
Terminals 2N and 1N are similarly linked.
When using a ‘dual feed’ supply these links 
should be removed and the bypass supply 
cable connected as shown in this diagram.

**

 The UPS internal battery is normally 

connected to the battery isolator switch (FA3). 
If an external battery cabinet option is used, 
the internal batteries are disconnected and 
the external battery cabinet is connected to 
the terminals shown in this diagram

(See Figure 3.9)

.

Cabinet Rear View

1L
1

1L
2

Summary of Contents for PowerWave 3000T

Page 1: ...Pioneering solutions for total power protection PowerWave PW 3000 T User Manual ...

Page 2: ......

Page 3: ...t Control ISSUE DATE REVISION SUMMARY Draft A 14 10 2011 Initial Draft Copy Draft A 1 14 02 2012 General Update Issue 1 1 03 03 2012 First general issue using Kohler style Issue 1 2 05 04 13 Updated contact details Issue 1 2 1 28 05 13 Updated 24Hr contact details ...

Page 4: ...to understand manual and will therefore assume no responsibility nor liability for direct indirect or accidental personal or material damage due to any misinterpretation of or accidental mistakes in this manual 2005 Uninterruptible Power Supplies Ltd This manual may not be copied nor reproduced without written permission of Uninterruptible Power Supplies Ltd ...

Page 5: ...teries 3 2 3 1 5 Storage 3 2 3 2 Planning the installation 3 3 3 3 UPS Power Cabling preparation and planning 3 4 3 3 1 External supply fuse and cable rating 3 5 3 3 2 Connecting an external battery cabinet 3 12 3 3 3 Input neutral grounding 3 12 3 4 Connecting the UPS power cables 3 13 3 4 1 Safety notes 3 13 3 4 2 Preliminary checks 3 13 3 4 3 Connecting the input supply 3 13 3 4 4 Connecting th...

Page 6: ...User responsibilities 5 1 5 4 Routine maintenance 5 1 5 5 Battery Testing 5 2 5 6 Battery Maintenance 5 2 5 7 Battery Disposal and Recycling 5 2 6 Troubleshooting 6 1 Alarms 6 1 6 2 Menu Commands Event Log Measurements 6 1 6 2 1 Event log screen 6 1 6 2 2 Fault identification and rectification messages and alarms 6 2 6 3 Contacting Service 6 2 7 Options 7 1 Introduction 7 1 7 2 Remote Emergency St...

Page 7: ...gs contained in this manual are read and fully understood WARNING High leakage current Ensure that the UPS has been correctly earthed before you connect the mains power supply WARNING This UPS must not be started up or put into use without having first been commissioned by a fully trained engineer authorised by the manufacturer WARNING All servicing must be performed by an authorised electrician o...

Page 8: ...1 Safety 1 2 UPS469 01 00 PowerWAVE 3000T User Manual Dated 05 04 13 ...

Page 9: ... devices and will provide your critical equipment with a steady and reliable power supply for many years The criteria and methods which are used in the design manufacture and maintenance of Uninterruptible Power Supply systems are certified to International Standard ISO 9001 EN 29001 and ISO 14001 A full UPS Specification is given in Chapter 8 of this manual 2 2 PowerWave 3000T Model Range The Pow...

Page 10: ... from false manipulations and inadequate charging voltages Proactive battery failure detection thanks to Advanced Battery Diagnosis ABD Algorithm User selectable battery tests 2 4 Warranty The PowerWave 3000T UPS is supplied with a limited warranty that the UPS and its component parts are free from defects in materials and workmanship for a period of one year from the date of original commissionin...

Page 11: ...ce Maintenance Support In addition to providing support for the PowerWave 3000T UPS Uninterruptible Power Supplies Ltd are able to provide maintenance and support on a wide range of different UPS products If you are interested in an extended warranty for your PowerWave 3000T UPS or any other UPS you may have please complete the enquiry form shown opposite and return or FAX to CAUTION The UPS may c...

Page 12: ...pspower co uk www upspower co uk Uninterruptible Power Supplies Ltd Woodgate Bartley Wood Business Park Hook Hampshire RG27 9XA Tel 01256 386700 Name Job Title Company Address Post Code Tel Fax E mail Please contact me to discuss Extended Warranty options for my PowerWave 3000T UPS Extended warranty options for my UPS System as below Manufacturer Model Nº Rating kVA Replacement Batteries Other ple...

Page 13: ...cally transporting the UPS equipment after it has been off loaded please observe the following precautions WARNING All the operations described in this chapter must be performed by an authorised electrician or other suitably qualified personnel Uninterruptible Power Supplies Ltd will take no responsibility for any personal or material damage caused by incorrect cabling or operations or activities ...

Page 14: ...binet or alternatively housed in an external battery cabinet The batteries are usually shipped separately and fitted by a manufacturer approved engineer when the UPS is commissioned Unless the batteries are to be stored see paragraph 3 1 5 leave them in their packaging until the UPS is commissioned 3 1 5 Storage UPS Cabinet storage If you plan to store the UPS cabinet prior to installation it shou...

Page 15: ...ient amount of cooling air to keep the room at or below the maximum permissible operating temperature Equipment accessibility 1 The available cable routing must be planned to enable the cables to be easily accessed when connecting the UPS and optional battery cabinet where used also see cable preparation and planning in the paragraphs below 2 A space of 200mm is required at the rear of the UPS for...

Page 16: ...ng preparation and planning It is the customer s responsibility to provide all external fuses isolators and cables used to connect the UPS to its input and output power supplies The following information should help in the planning and preparation of the UPS power cabling The UPS input supply and bypass supply should be connected to the utility mains through a LV Distribution board and protected b...

Page 17: ...ch FA1 Fuse B Load DUAL INPUT FEED Cable D Cable B Fuse C Cable C Rectifier Inverter Static Switch Fuse A Load SINGLE INPUT FEED standard Mains 3x380 220V 3x400 230V 3x415 240V Cable D Cable A EXTERNAL BATTERY CABINET option FA2 FA1 FA2 EXTERNAL BATTERY CABINET option F1 F1 Int Batts Int Batts FA4 FA4 Output Switch Maint Bypass IA2 IA1 Maint Bypass IA2 IA1 Output Switch 1 Fuse and Cable recommenda...

Page 18: ...nput Fuse Rectifier Bypass Fuse Inverter Static Switch 3L1 3N PE D D Maint Bypass Switch Fuse C BYPASS SUPPLY PE N L1 C C C 2L1 2N PE IA1 1 Fuse and Cable recommendations to IEC 60950 1 2001 2 The fuse and cable rating details in the above tables are a recommendation only 3 The UPS must be installed to prescribed IEC or local regulations e g BS7671 2008 4 External DC Cables and Battery fuses are b...

Page 19: ...e A L1 1N PE IL2 IL1 IL3 A A A A A IA1 FA1 INPUTMAINS SUPPLY PE N L3 Input Fuse L2 Fuse B L1 1N PE IL2 IL1 IL3 B B B B B 1 Fuse and Cable recommendations to IEC 60950 1 2001 2 The fuse and cable rating details in the above tables are a recommendation only 3 The UPS must be installed to prescribed IEC or local regulations e g BS7671 2008 4 External DC Cables and Battery fuses are bespoke to the ins...

Page 20: ...GL GC 32A 10x38 Ultrafast 10 kVA 50A 14x51 Ultrafast 50A 14x51 GL GC 32A 10x38 Ultrafast 12 kVA 50A 14x51 Ultrafast 50A 14x51 GL GC 32A 10x38 Ultrafast IA1 IA2 FA2 FA1 FA3 only Input Output Power Connections In a single feed standard installation terminals 2L1 and 1L1 are linked by cables fitted to the UPS side of the terminal blocks Terminals 2N and 1N are similarly linked When using a dual feed ...

Page 21: ...32A 10x38 Ultrafast 10 kVA 50A 14x51 Ultrafast 50A 14x51 GL GC 32A 10x38 Ultrafast 12 kVA 50A 14x51 Ultrafast 50A 14x51 GL GC 32A 10x38 Ultrafast IA1 IA2 FA2 FA1 FA3 only Input Output Power Connections In a single feed standard installation terminals 2L1 and 1L1 are linked by cables fitted to the UPS side of the terminal blocks Terminals 2N and 1N are similarly linked When using a dual feed supply...

Page 22: ... GL GC 32A 10x38 Ultrafast 10 kVA 32A 10x38 Ultrafast 50A 14x51 GL GC 32A 10x38 Ultrafast 15 kVA 50A 14x51 Ultrafast 80A 22x58 GL GC 50A 14x51 Ultrafast IA1 IA2 FA2 FA1 FA3 Input Output Power Connections In a single feed standard installation terminals 2L1 and 1L1 are linked by cables fitted to the UPS side of the terminal blocks Terminals 2N and 1N are similarly linked When using a dual feed supp...

Page 23: ... Ultrafast 20 kVA 32A 14x51 Ultrafast 100A 22x58 GL GC 50A 14x51 Ultrafast Input Output Power Connections In a single feed standard installation terminals 2L1 and 1L1 are linked on the UPS side of the terminal blocks Terminals 2N and 1N are similarly linked When using a dual feed supply these links should be removed and the bypass supply cable connected as shown in this diagram The UPS internal ba...

Page 24: ...inet which have more space for batteries than the Cabinet A Install the batteries in an external battery cabinet Note It is not permissible to connect an external battery cabinet in parallel with the UPS internal batteries If an external battery cabinet is used no batteries are fitted within the UPS cabinet 1 Disconnect the wires for internal battery at the bottom of FA3 shown red in the illustrat...

Page 25: ... load rating and maximum load rating of the individual load sockets should be indicated on the output distribution board d Ensure the provided fuses and cables satisfy the ratings shown in Figures 3 2 and 3 3 3 4 and are in accordance with the prescribed IEC Standards or local regulations e g BS7671 2008 2 Identify the operator controls and power connection details for the unit being installed fro...

Page 26: ...ation in Figure 3 5 to Figure 3 8 Connect the earth cable from the Output Load Distribution Board to the protective earth PE terminal on the UPS output supply terminal block 2 Connect the UPS output cables to terminals 3L1 and 3N on the UPS output terminal block 3 Secure the cables to the fixing rail mounted below the UPS terminal blocks 3 4 5 Final checks 1 On completion of the above cabling chec...

Page 27: ...8 Note DC fuses and cables are bespoke to the installation 3 6 Module interface facilities The UPS contains a communication port and a communication card that can provide a range of system information to a remote computer or building facilities monitoring device Standard interface facilities JD1 Smart Port Serial RS232 provides an interface between UPS system and a computer via a sub D9 female con...

Page 28: ...re this allows a computer to continuously monitor the UPS input mains voltage and the UPS operational status and display a message in the event of any UPS system changes Figure 3 11 and show the connection to a PC from the UPS for PC s with a 9 pin serial port and 25 pin serial port respectively Figure 3 11 Connector Cable PC Serial Port 1 2 3 4 5 9 1 2 3 4 5 9 1 2 3 4 5 9 1 2 3 4 5 6 7 25 Interfa...

Page 29: ...1 connections Term Contact Signal Function 1 NO ALARM MAINS FAILURE Mains Failure Mains Present 2 COM 3 NC 4 NO ALARM COMMON ALARM Common Alarm No Alarm Condition 5 COM 6 NC 7 NO STATUS LOAD ON INVERTER Load on Inverter Load on Bypass 8 COM 9 NC 10 NO ALARM BATTERY LOW Battery Low Battery OK 11 COM 12 NC 13 NO STATUS LOAD ON MAINS Load on Bypass Load on Inverter 14 COM 15 NC 16 Control Input ON GE...

Page 30: ...3 Installation 3 18 UPS469 01 00 PowerWAVE 3000T User Manual Dated 05 04 13 ...

Page 31: ...ifies communication with the UPS and also provides UPS monitoring information See paragraph 4 3 The menu driven LCD enables the access to The Event register Monitoring the input and output voltage current frequency power Monitoring battery run time Perform commands such as UPS start up and shut down Load transfer from INVERTER to BYPASS and vice versa Diagnostic service mode only Adjustments and t...

Page 32: ...urrents frequencies and other values on the LCD display Key function summary Indicator Indicator Status Interpretation LINE 1 GREEN RED Mains available Mains problem or unavailable LINE 2 GREEN RED Bypass mains available Bypass mains problem or unavailable ALARM OFF Flashing RED buzzer RED No alarm condition Alarm condition detected Alarm condition accepted has been reset INVERTER GREEN RED OFF Lo...

Page 33: ...y UPS power supplied by mains power load on bypass LOAD NOT PROTECTED 3 Load supply interrupted UPS has been switched off by ON OFF buttons LOAD OFF SUPPLY FAILURE 4 The UPS module is not supplying load The output switch is open LOAD DISCONNECTED OUTPUT SWITCH OPEN DESCRIPTION LCD DISPLAY 1 A log of the last 64 events is stored in the Power Management Display See paragraph 4 3 3 EVENT LOG MEASUREM...

Page 34: ...Y 1 Battery Runtime BATT RUN TIME MIN 00h 00mm 2 UPS Output Frequency OUTPUT FREQUENCY HZ 50 00 3 Bypass Frequency BYPASS FREQUENCY HZ 50 00 4 Battery Voltage BATTERY VOLTAGE V 0 0 0 0 5 Battery Charger Current BATT CHARGE CUR A 0 0 0 0 6 Battery Discharge Current DISCHARGE CURRENT A 00 00 7 Rectifier Input Voltage 1or 3 phases RECTIFIER VOLTAGE V 230 230 230 8 Bypass Input Voltage BYPASS VOLTAGE ...

Page 35: ...e general UPS Data are installed at the manufacturing plant UPS SERIAL NUMBER nn nnnnn 2 Manufacturing date DATE OF MANUFACTURE 15 03 11 3 EPROM Version EPROM VERSION V 000 4 Dynamic Password YES NO 5 Actual Date and Time DATE TIME dd mm yyyy hh mm ss DESCRIPTION LCD DISPLAY 1 Set up language SET LANGUAGE SET DATE AND TIME ENGLISH FRANCAIS DEUTCH DUTCH SPANISH POLISH PORTOGUESE 2 Set up Date and T...

Page 36: ...ent of a mains disturbance or failure and is always recommended if the critical load such as a computer system will not tolerate even a very brief supply interruption When operating in this mode in the unlikely event of an inverter fault or overload condition the UPS will transfer the load automatically to the static bypass supply without interruption transfer time 0 4 Set up operation with Gen Se...

Page 37: ...e connected load can tolerate interruptions of 3 to 5 ms which is the transfer time taken to change from Bypass mode to On Line mode 4 4 3 Maintenance Bypass Mode Figure 4 5 Maintenance Bypass Mode Each module is fitted with a Maintenance Bypass switch IA1 which when closed connects the UPS module output terminals directly to the UPS bypass Mains supply This facility enables a UPS module to be shu...

Page 38: ...ndicate as shown in the table below OFF Bypass Switch Open Normal operating condition Load on inverter LCD indication MAINTENANCE BYP OPEN LED Indicators will indicate as shown in the table below LED Indicator ON OFF LINE 1 Green Green LINE 2 Green Green BYPASS Green OFF INVERTER RED ON BATTERY Green Green CAUTION If the UPS is operating in the Maintenance Bypass mode the load will not be protecte...

Page 39: ...dication should be as per the following table The LCD panel should display LOAD PROTECTED If anything other than LOAD PROTECTED is displayed then press the RESET button and if LOAD PROTECTED is still not displayed there is a problem with the UPS seek assistance Transferring the UPS to Bypass mode 1 On the UPS module s mimic panel press the ENTER key once to access the menu system 2 Using the UP DO...

Page 40: ...e 7 On the UPS control panel simultaneously press both ON OFF buttons a The LCD panel will indicate LOAD OFF SUPPLY FAILURE 8 Open the battery fuse isolator F1 Note If using external batteries open the battery fuses isolator on the associated battery cabinet rack 9 On the UPS module open the module s Output Isolator IA2 LINE 1 LINE 2 BY PASS INVERTER BATTERY LOAD LED Colour LINE 1 Green LINE 2 Gre...

Page 41: ... Isolator switch IA2 4 On the UPS mimic panel simultaneously press both ON OFF buttons then release them and wait for approximately 60 seconds a The UPS module will begin to power up b Initially LINE 2 LED will be red then change to green c At this stage the LCD display will indicate LOAD NOT PROTECTED and the module mimic LED indications should be as follows WARNING The UPS module is still live a...

Page 42: ...s the menu system b Use the UP DOWN keys to move the cursor so that it is adjacent to COMMANDS and then press the ENTER key c Use the UP DOWN keys move the cursor so that it is adjacent to LOAD TO INVERTER and then press the ENTER key 9 The UPS will transfer the load to Inverter On line mode a The LCD display will now indicate LOAD PROTECTED b Check and confirm that the LED display is as shown bel...

Page 43: ...attery fuses isolator in the associated battery cabinet 5 Open the module s Output Isolator switch IA2 6 Open the Bypass Line fuse holder FA2 and the Rectifier Line fuse holder FA1 7 Open the UPS Input and Bypass supply fused isolators or circuit breakers in the power distribution panel 8 The UPS is now voltage free WARNING All the operations in this section must be performed by authorised and tra...

Page 44: ...4 Operation 4 14 UPS469 01 00 PowerWAVE 3000T User Manual Dated 05 04 13 ...

Page 45: ...g on the ambient temperature When the UPS is commissioned the commissioning engineer will attach a service record book to the front of the UPS which will be used to log the full service history of the UPS During a preventative maintenance inspection the service engineer will carry out the following checks Site environment conditions Integrity of the electrical installation Availability and quality...

Page 46: ...the operating mode Off line or On line and whether or not the load is connected The battery test procedure can be performed from the UPS front panel See paragraph 4 3 5 5 6 Battery Maintenance The battery maintenance shall be done by an authorized Uninterruptible Power Supplies Ltd Service Partner 5 7 Battery Disposal and Recycling Batteries contain dangerous substances that will harm the environm...

Page 47: ...e information provided on the following pages to identify and rectify and apparent fault conditions 6 2 Menu Commands Event Log Measurements A detailed description of the Menu Commands Event Log and Measurements that can be operated and displayed on the LCD can be found in Section 4 6 2 1 Event log screen As you step through the event memory make a separate note of each alarm condition as this wil...

Page 48: ...ll output connections and repair as required OVERLOAD Load exceeds the UPS rated power Identify which piece of equipment is causing the overload and remove it from the UPS Do not connect laser printers photocopiers electric heaters kettles etc to the UPS OVERTEMPERATURE UPS temperature has exceeded the allowed value Check the ambient temperature of the UPS is less than 30 C If the ambient temperat...

Page 49: ...lly closed contact connected between terminal port X1 20 and X1 21 on the communications board which opens to operate the emergency stop function To allow removal maintenance or testing of any remote emergency stop facility without disturbing the normal operation of the UPS it is recommended that a terminal block with linking facilities is installed between the UPS and the remote emergency stop bu...

Page 50: ...PS input power When used this facility inhibits the operation of the battery charger and or static bypass while the generator is on line See Set up User menu screen in section 4 3 7 1 Use a screened cable with 1 pair of wires 0 6mm2 and maximum length of 100 m 2 Connect the cable as shown in Figure 7 2 Figure 7 2 Generator ON Connection X1 X1 16 X1 17 ON GENERATOR N O contact UPS ON GENERATOR Port...

Page 51: ...ttery OK YELLOW Battery near the end of capacity OFF No UPS supply or UPS on bypass 3 INVERTER LED GREEN Load supplied by inverter OFF Inverter supply not available 4 LOAD LED GREEN Load is supplied RED FLASHING Load is not supplied 5 ALARM RESET Push button Silences the audible alarm 6 ALARM LED RED Alarm condition check other LEDs for indication of mains and or UPS status OFF UPS is in normal op...

Page 52: ...he shielding Both ends of the cable are to be terminated in a terminal block connection at the Remote Status Panel and at the UPS in accordance with Figure 7 3 Figure 7 4 Connection of Remote Status Panel RSP X1 1 X1 9 X1 10 X1 18 X1 19 3 4 5 2 6 12V Battery Low Load on Mains Inv Mains Failure Ground UPS X1 Interface Block Remote Signalling Panel Terminal Block Cabinet B C Cabinet A ...

Page 53: ...or computer systems 7 5 2 WAVEMON Shutdown and Monitoring Software WAVEMON is an external monitoring and shutdown software application that is designed to operate with many of Uninterruptible Power Supplies Ltd UPS products The package comprises a software installation CD suitable for most server operating systems a standard cable set and a user manual The WAVEMON system can monitor the dry port r...

Page 54: ...ingle CD ROM to shutdown multiple servers you have to purchase additional CD license keys The PowerWave 3000T can be integrated in a network in two ways 1 By means of the server which is being powered by the UPS and is integrated in the network In most of the cases the server is used as sub agent and you only need the PMC Software without any SNMP Adapter You need a standard serial connection betw...

Page 55: ...adaptor is used to monitor any device in the network and can be used utilising the RCCMD send function for an automatic network wide shut down or informing connected users The shut down procedure can be initiated from the remaining time downtime or as countdown timer from the beginning of the alarm A shut down is therefore possible without extra input from the operator but fully software controlle...

Page 56: ...7 Options 7 8 UPS469 01 00 PowerWAVE 3000T User Manual Dated 05 04 13 ...

Page 57: ...ing Air 25 30 C m3 h 110 110 110 150 200 Audible Noise with 100 Load dBA 50 50 50 53 53 Audible Noise with 50 Load dBA 47 47 47 49 49 Ambient Temperature for UPS C 0 40 Ambient Temperature for Batteries recommended C 20 Battery Storage Time at Ambient Temperature Max 6 months Relative Air humidity Max 95 non condensing Cooling Fan assisted Standards Safety Electromagnetic Compatibility Performance...

Page 58: ...put power kW 5 6 7 4 9 4 11 1 14 8 Max Input Power with battery charge and rated output power kW 6 1 8 1 10 3 12 1 16 2 kVA 7 5 10 12 15 20 Maximum Battery Charger Current standard 6A Battery Charging Curve IU DIN 41773 Temperature Controlled Battery Charger No Battery Charger Ripple 1 Battery Test Automatic and periodic adjustable Battery Type Lead acid Maintenance free and NiCd Variable Number o...

Page 59: ... max 250mA RJ45 port For multidrop purpose optional Relay card USB Including Customer Interfaces Outputs DRY PORTS RS232 on USB Port Common Alarm Load on Bypass Battery Low Load on Inverter Mains Failure For remote signalling and automatic computer shutdown SNMP Card slot already included For monitoring and integration in network management kVA 7 5 10 12 15 20 Dimensions WxHxD mm Cabinet A 340x820...

Page 60: ... 2 The fuse and cable rating details in the above tables are a recommendation only 3 The UPS must be installed to prescribed IEC or local regulations e g BS7671 2008 4 External DC Cables and Battery fuses are bespoke to the installation Power kVA SINGLE INPUT FEED DUAL INPUT FEED Fuse A Cable A Cable D Fuse B Cable B Fuse C Cable C Cable D Single phase input 7 5 1 x 40 3 x 6 0 3 x 6 0 1 x 40 3 x 6...

Reviews: