background image

PowerWAVE 9000 DPA UPS - Installation

3-19

(Issue 2.1  Oct. 2009)

3.7.3 DPA-50

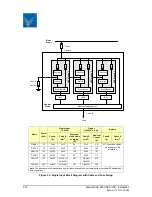
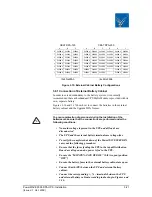
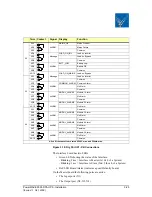
In a DPA-50 FRAME there is space for up to 280 x 9Ah internal batteries. 
Figure 3.13 shows the different Battery and System configurations. 
Batteries may be used as separate batches for each UPS-module or as a 
common battery for all three UPS-Modules.

Figure 3.13: DPA-50 Battery Configurations

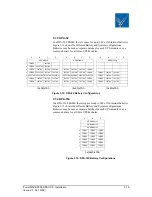
3.7.4 DPA-150

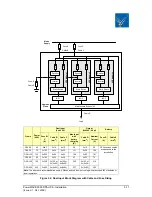
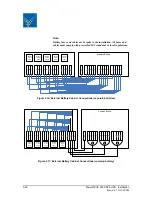
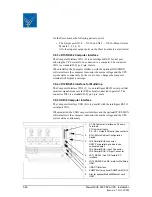
In a DPA-150 FRAME there is space for up to 240 x 9Ah internal batteries. 
Figure 3.13 shows the different Battery and System configurations. 
Batteries may be used as separate batches for each UPS-module or as a 
common battery for all three UPS-Modules.

Figure 3.14: DPA-150 Battery Configurations

A

B

C

D

A

B

C

D

A

B

C

D

UPS Module

UPS Module

UPS Module

7

10x7Ah

10x7Ah

6

10x7Ah

2x5x7Ah

10x7Ah

5

10x7Ah

10x7Ah

10x7Ah

10x7Ah

10x7Ah

10x7Ah

10x7Ah

10x7Ah

4

10x7Ah

2x5x7Ah

10x7Ah

10x7Ah

10x7Ah

10x7Ah

10x7Ah

10x7Ah

10x7Ah

10x7Ah

10x7Ah

3 2x5x7Ah

2x5x7Ah

2x5x7Ah

2x5x7Ah

2x5x7Ah 2x5x7Ah 2x5x7Ah 2x5x7Ah

10x7Ah

10x7Ah

10x7Ah

2

10x7Ah

10x7Ah

10x7Ah

10x7Ah

10x7Ah

10x7Ah

10x7Ah

10x7Ah

10x7Ah

10x7Ah

10x7Ah

1

10x7Ah

10x7Ah

10x7Ah

10x7Ah

10x7Ah

10x7Ah

10x7Ah

10x7Ah

10x7Ah

10x7Ah

10x7Ah

(5x50)x7Ah (4x50)x7Ah

(3x40)x7Ah 

A

B

C

UPS Module 3

UPS Module 2

UPS Module 1

6

10x7Ah

10x7Ah

10x7Ah

5

10x7Ah

10x7Ah

10x7Ah

4

10x7Ah

10x7Ah

10x7Ah

3

10x7Ah

10x7Ah

10x7Ah

2

10x7Ah

10x7Ah

10x7Ah

1

10x7Ah

10x7Ah

10x7Ah

3x(2x40)x7Ah

Summary of Contents for PowerWAVE 9000 DPA

Page 1: ...Uninterruptible Power Supply PowerWAVE 9000 DPA 8 200kW per rack Installation and Operating Guide Issue 2 1 Oct 2009 ...

Page 2: ...l therefore assume no responsibility nor liability for direct indirect or accidental personal or material damage due to any misinterpretation of or accidental mistakes in this manual 2007 Uninterruptible Power Supplies Ltd This manual may not be copied nor reproduced without written permission of Uninterruptible Power Supplies Ltd ...

Page 3: ...Document Control ISSUE DATE REVISION SUMMARY 2 0 02 08 08 Initial issue 2 1 29 10 09 Updated DIP Switch selection table in para 6 2 5 ...

Page 4: ......

Page 5: ...PA Series Models 2 3 Single and Multi Cabinet Parallel Configurations 2 3 Basic System Configuration 2 6 Single Parallel Modules Operation 2 7 Single Module 2 7 Parallel Module 2 7 Single Multi Cabinet Configurations 2 7 Warranty 2 8 Extended Warranty 2 9 Additional Service Maintenance Support 2 9 Installation 3 1 Introduction 3 1 Receipt of the UPS 3 1 Nameplate 3 1 Unpacking 3 1 Batteries 3 2 St...

Page 6: ...mmissioning 4 1 Control Panel 4 1 Power Management Display PMD 4 1 LED Indicators 4 2 Function Keys 4 3 ON OFF Start up and Shutdown Buttons 4 3 Defining a Single Parallel Module System DIP Switch SW1 1 4 4 Defining a Single Multi Cabinet Chain DIP Switch SW1 9 4 4 Description of the LCD 4 5 Status Screens 4 5 Main Menu Screen 4 6 Event Log Screen 4 6 Measurements Screen 4 7 Commands Screen 4 8 UP...

Page 7: ...Module System 5 7 Refitting a Module in a Capacity Multi Module System 5 9 Multi Cabinet Configuration 6 1 Multi Cabinet Configuration Concept 6 1 Installation Instructions 6 2 Introduction 6 2 Connection of Parallel Communication Cables Bus lines 6 4 Parallel Adapter and DIP Switch SW2 2 6 4 DIP Switch SW1 9 Settings 6 5 DIP Switch SW1 9 6 5 ON OFF Main Buttons 6 6 Parallel Isolator IA2 6 6 Maint...

Page 8: ...Remote Emergency Stop Facilities 9 1 Generator ON Facilities 9 2 WAVEMON Shutdown and Management Software 9 3 Why is UPS Management important 9 3 Wavemon Shutdown and Monitoring Software 9 3 SNMP CARD ADAPTER For Network Management Remote Moni toring 9 5 Specifications 10 1 Mechanical 10 1 Input Characteristics 10 3 Battery 10 3 Output 10 4 Environmental 10 5 Power Management Display PMD 10 6 Mimi...

Page 9: ...ninterruptible Power Supplies Ltd will assume no responsibility nor liability due to incorrect operation or manipulation of the UPS HIGH LEAKAGE CURRENT Make sure that the earthing is carried out correctly before you connect the mains power supply PowerWAVE 9000 DPA IS CLASS A UPS PRODUCT EN 50091 2 In a domestic environment it may cause radio interference In such an environment the user may be re...

Page 10: ... manual Excessive dust in the operating environment of UPS may cause damage or lead to malfunction The UPS should be always protected from the outside weather and sunshine If you intend to operate the system at an altitude higher than 1000 meters contact your local sales or service office for important information about high altitude operation The operating environment must meet the weight airflow...

Page 11: ...ompliance with the following European directives Low Voltage Directive 2006 95 EC EMC Directive 2004 108 EC Safety Standard EN 62040 1 1 2003 EN 60950 1 2001 A11 2004 Electromagnetic Compatibility Standard EMC EN 62040 2 2005 EN 61000 3 2 2000 EN 6100 3 3 1995 A1 2001 EN 61000 6 2 2001 EN 61000 6 4 2001 Performance Standard EN 62040 3 2001 ...

Page 12: ...1 4 PowerWAVE 9000 DPA UPS Safety Issue 2 1 Oct 2009 ...

Page 13: ...ual 2 2 General System Description The product described in this manual is a transformer less Uninterruptible Power System UPS It is a true online continuous duty double conversion solid state three phase system providing conditioned and uninterruptible AC power to protect the customer s load from power disturbances and failures The UPS system is housed in single freestanding cabinets The cabinets...

Page 14: ...extends the battery life due to less discharge cycles Battery discharge protection during load jumps Proactive battery protection with inadequate charging voltages Proactive battery failure detection using Advanced Battery Diagnosis ABD User selectable battery tests Optional temperature compensated charging to enhance battery life 2 2 4 DPA Technology Decentralized Parallel Architecture DPA parall...

Page 15: ...tion 2 3 PowerWAVE 9000 DPA Series Models The PowerWAVE 9000 DPA UPS is available in a range of power ratings between 10 and 250kVA A range of cabinets or frames and modular power assemblies offers unrivalled configuration options and upgrade paths 2 4 Single and Multi Cabinet Parallel Configurations The PowerWAVE 9000 DPA UPS has unique paralleling features Single Parallel Module Configurations A...

Page 16: ...5x780 Weight of Empty Frame kg 200 220 160 Weight of Frame with modules and no batteries kg 224 233 with 1 Module 292 319 with 3 Modules 280 325 with 5 Modules Colours Front RAL 9007 black inlets Side walls Graffito grey PowerWAVE DPA Modules DPA 10 DPA 15 DPA 20 DPA 25 Output Apparent Power KVA 10 15 20 25 Output Active Power KW 8 12 16 20 Output Power PF 1 KVA KW 8 8 12 12 16 16 20 20 Variable N...

Page 17: ...of Empty Frame kg 250 270 190 Weight of Frame with modules and no batteries kg 300 310 with 1 Module 420 450 with 3 Modules 440 490 with 5 Modules Colours Front RAL 9007 black inlets Sidewalls Graffito grey PowerWAVE DPA MODULES DPA 30 DPA 40 DPA 50 Output Apparent Power KVA 30 40 45 Output Active Power KW 24 32 40 Output Power PF 1 KVA KW 24 24 32 32 40 40 Number of 12V Battery Blocks No 40 50 40...

Page 18: ...odules Packed Weight Kg Packed Dimension mm Unpacked Weight Unpacked Dimension mm DPA 10 or 15 no Batt DPA 20 or 25 no Batt DPA 10 or 15 no Batt DPA 20 or 25 no Batt 2 1 DPA 25 1 284 293 700x1825x895 224 233 550x1650x780 2 2 DPA 75 1 304 313 700x2150x895 244 253 TBA 550x1975x780 2 328 346 700x2150x895 268 286 TBA 550x1975x780 3 352 379 700x2150x895 292 319 TBA 550x1975x780 2 3 DPA 125 1 244 253 70...

Page 19: ...n a chain It is possible to parallel Conceptpower DPA CLASSIC DPA 25 or 50 TRIPLE DPA 75 or 150 UPGRADE DPA 125 or 250 Cabinets into a Multi Cabinet Configuration including total up to 10 Modules in order to increase the number of paralleled Modules Fig UPS Modules Packed Weight Kg Packed Dimension mm Unpacked Weight Unpacked Dimension mm DPA 10 or 15 no Batt DPA 20 or 25 no Batt DPA 10 or 15 no B...

Page 20: ...ole option repair or replace the UPS All repaired or replaced parts will remain the property of Uninterruptible Power Supplies Ltd As a general policy Uninterruptible Power Supplies Ltd does not recommend the use of any of its products in life support applications where failure or malfunction of the product can be reasonably expected to cause failure of the life support device or to significantly ...

Page 21: ...port Hotline on 0800 731 3269 or for further details refer to the information contained on the following pages 2 9 Additional Service Maintenance Support In addition to providing support for the PowerWAVE 9000 DPA UPS Uninterruptible Power Supplies Ltd are able to provide maintenance and support on a wide range of different UPS products If you are interested in an extended warranty for your PowerW...

Page 22: ...ower co uk Uninterruptible Power Supplies Ltd Bacchus House Calleva Park Aldermaston Berkshire RG7 8EN Tel 0118 981 5151 Name Job Title Company Address Post Code Tel Fax E mail Please contact me to discuss Extended Warranty options for my PowerWAVE 9000 DPA UPS Extended warranty options for my UPS System as below Manufacturer Model Nº Rating kVA Replacement Batteries Other please specify Fax to 01...

Page 23: ...hanical and environmental damage To increase its protection the PowerWAVE 9000 DPA UPS is wrapped with a plastic sheet Upon receiving the UPS carefully examine the packaging and the UPS for any sign of physical damage Ensure that the received UPS corresponds to the description indicated in the delivery note 3 1 2 Nameplate The technical specifications of the PowerWAVE 9000 DPA UPS are provided on ...

Page 24: ...y environment with a temperature between 5 C to 40 C and humidity of less than 90 If the packing container is removed protect the UPS from dust 3 4 2 Battery The UPS system is equipped with sealed maintenance free batteries whose storage capability depends on ambient temperature It is therefore important not to store the UPS longer than 6 months at 20 C 3 months at 30 C and 2 months at 35 C storag...

Page 25: ...temperature are within prescribed limits Fire protection standards are respected Cabling can be performed easily Front and rear access is available for service or periodic maintenance Required cooling air flow is possible The site air conditioning system has sufficient capacity Dust or corrosive explosive gases are absent The site is vibration free Figure 3 1 UPS Battery Cabinet Space Requirements...

Page 26: ...es indicated on the nameplate of the UPS Earthing is performed in accordance with the prescribed IEC Standards or with local regulations UPS is connected to the mains through a LV Distribution Board with a separate mains line protected with a circuit breaker or fuse for the UPS Provide input fuses and cables according to Figure 3 3 and Figure 3 4 or in accordance with the prescribed IEC Standards ...

Page 27: ...shut down and disconnected The UPS is shut down and voltage free Remove the terminal cover of the UPS Before connecting the input power cables make sure that UPS is fitted in its correct position Maintenance Bypass IA1 is in position OFF Parallel Isolators IA2 are in position OFF Connect the input power cable coming from the LV Distribution Board to the terminals of the UPS as shown in Figure 3 3 ...

Page 28: ...ck Cable Connections 3 6 6 Dual Input Feed To achieve correct input cabling refer to Figure 3 4 and 3 5 NOTE The UPS is supplied as standard version with facilities for a single cable feed for rectifier and bypass For dual input feed remove the links between the terminals Connect the mains input cables to UPS Terminal according to following tables For minimum recommended Input Cable Sections and F...

Page 29: ...distribution board Maximum total load rating Maximum load rating of the load sockets If a common distribution board is used sockets for Mains and UPS voltage ensure that on each socket there is an indication of the applied voltage Mains or UPS Output power cable ratings should be in accordance with the recommended cable sections and fuses ratings or in accordance with the prescribed IEC Standards ...

Page 30: ... L2 3L2 Phase L3 3L3 NEUTRAL 3N EARTH PE FRAME Battery Input Output Separate N PE Bypass 3 N Rectifier 3 N PE 3 N PE DPA 25 DC Fuses and cables are bespoke to the installation 4 x 10 16mm2 T 5 x 10 16mm2 T 5 x 10 16mm2 T DPA 75 4 x 35 50mm2 T 4 x 35 50mm2 T PE 50mm2 T 4 x 35 50mm2 T PE 50mm2 T DPA 125 4 x 70 95mm2 T 4 x 70 95mm2 T PE 50mm2 T 4 x 70 95mm2 T PE 50mm2 T DPA 50 4 x 16 25mm2 T 5 x 16 2...

Page 31: ...PowerWAVE 9000 DPA UPS Installation 3 9 Issue 2 1 Oct 2009 Figure 3 2 Terminal Layouts DPA 25 DPA 50 DPA 75 DPA 150 DPA 125 DPA 250 Single Input Dual Input ...

Page 32: ... 75 3x125 5x50 101 5x50 108 DPA 125 125 3x225 5x95 169 5x95 181 DPA 50 80 3x100 5x25 67 5x25 72 DPA 150 150 3x250 5x120 or 5x 2x50 202 5x120 or 5x 2x50 218 DPA 250 250 3x400 5x 2x95 337 5x 2x95 362 Note The above are recommendations only All fuses and cables must comply with prescribed IEC standards or local regulations Rectifier Inverter Static Switch F1 F2 Rectifier Inverter Static Switch F1 F2 ...

Page 33: ...101 5x50 108 DPA 125 125 3x225 5x95 4x95 169 5x95 181 DPA 50 80 3x100 5x25 4x25 67 5x25 72 DPA 150 150 3x250 5x120 or 5x 2x50 4x120 or 4x 2x50 202 5x120 or 5x 2x50 218 DPA 250 250 3x400 5x 2x95 4x 2x95 337 5x 2x95 362 Note The above are recommendations only All fuses and cables must comply with prescribed IEC standards or local regulations Rectifier Inverter Static Switch F1 F2 Rectifier Inverter ...

Page 34: ... Multidrop ONLY 6 USB PC Interface 7 SNMP Slot for optional SNMP card ONLY 8 Slot for optional Modem Ethernet card ONLY 9 Battery terminal N for 16 25 mm2 10 Input Bypass terminal for Dual Input feed 10 16 mm2 11 Input Rectifier terminal for Single feed 10 16 mm2 12 Output Load terminal 10 16 mm2 13 IA1 Maintenance Bypass 14 18 IA2 1 Parallel Isolator UPS Module 1 19 21 F4 Battery Fuse Holder Modu...

Page 35: ... Slot for optional Modem Ethernet card ONLY 9 Battery terminal N for 16 25 mm2 9 3 Battery terminal for common battery for M6 PE 1x 16mm2 10 Input Bypass terminal for Dual Input feed 35 50mm2 11 Input Rectifier terminal for Single feed 35 50mm2 12 Output Load terminal 35 50mm2 13 IA1 Maintenance Bypass 14 IA2 1 Parallel Isolator UPS Module 1 15 IA2 2 Parallel Isolator UPS Module 2 16 IA2 3 Paralle...

Page 36: ...tional Modem Ethernet card ONLY 9 Battery terminal N for 16 25 mm2 9 3 Battery terminal for common battery for M10 PE 1x 50mm2 10 Input Bypass terminal for Dual Input feed 70 95mm2 11 Input Rectifier terminal for Single feed 70 95mm2 12 Output Load terminal 70 95mm2 13 IA1 Maintenance Bypass 14 IA2 1 Parallel Isolator UPS Module 1 15 IA2 2 Parallel Isolator UPS Module 2 16 IA2 3 Parallel Isolator ...

Page 37: ...ub D9 male for Multidrop ONLY 6 USB PC Interface 7 SNMP Slot for optional SNMP card ONLY 8 Slot for optional Modem Ethernet card ONLY 9 Battery terminal N for 16 25 mm2 10 Input Bypass terminal for Dual Input feed 16 25mm2 11 Input Rectifier terminal for Single feed 16 25mm2 12 Output Load terminal 16 25mm2 13 IA1 Maintenance Bypass 14 18 IA2 1 Parallel Isolator UPS Module 1 19 21 F4 Battery Fuse ...

Page 38: ... SNMP card ONLY 8 Slot for optional Modem Ethernet card ONLY 9 Battery terminal N for 16 25 mm2 10 Input Bypass terminal for Dual Input feed 3xM10 11 Input Rectifier terminal for Single feed 4xM10 12 Output Load terminal 4xM10 13 IA1 Maintenance Bypass 14 IA2 1 Parallel Isolator UPS Module 1 15 IA2 2 Parallel Isolator UPS Module 2 16 IA2 3 Parallel Isolator UPS Module 3 19 F4 Battery Fuse Holder M...

Page 39: ...8 Slot for optional Modem Ethernet card ONLY 9 Battery terminal N for 16 25 mm2 9 3 Battery terminal for common battery for M12 PE 1x M12 10 Input Bypass terminal for Dual Input feed 3xM12 11 Input Rectifier terminal for Single feed 4xM12 12 Output Load terminal 4xM12 13 IA1 Maintenance Bypass 14 IA2 1 Parallel Isolator UPS Module 1 15 IA2 2 Parallel Isolator UPS Module 2 16 IA2 3 Parallel Isolato...

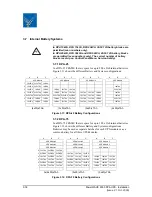
Page 40: ...tery Configurations A B C A B C A B C A B C UPS Module UPS Module UPS Module UPS Module 7 10x7Ah 2x5x7Ah 10x7Ah 6 10x7Ah 2x5x7Ah 10x7Ah 10x7Ah 5 10x7Ah 10x7Ah 10x7Ah 10x7Ah 10x7Ah 10x7Ah 2x5x7Ah 4 10x7Ah 2x5x7Ah 10x7Ah 10x7Ah 10x7Ah 10x7Ah 10x7Ah 10x7Ah 10x7Ah 10x7Ah 3 2x5x7Ah 2x5x7Ah 2x5x7Ah 2x5x7Ah 2x5x7Ah 2x5x7Ah 10x7Ah 10x7Ah 10x7Ah 10x7Ah 2 10x7Ah 10x7Ah 10x7Ah 10x7Ah 10x7Ah 10x7Ah 10x7Ah 10x...

Page 41: ...common battery for all three UPS Modules Figure 3 14 DPA 150 Battery Configurations A B C D A B C D A B C D UPS Module UPS Module UPS Module 7 10x7Ah 10x7Ah 6 10x7Ah 2x5x7Ah 10x7Ah 5 10x7Ah 10x7Ah 10x7Ah 10x7Ah 10x7Ah 10x7Ah 10x7Ah 10x7Ah 4 10x7Ah 2x5x7Ah 10x7Ah 10x7Ah 10x7Ah 10x7Ah 10x7Ah 10x7Ah 10x7Ah 10x7Ah 10x7Ah 3 2x5x7Ah 2x5x7Ah 2x5x7Ah 2x5x7Ah 2x5x7Ah 2x5x7Ah 2x5x7Ah 2x5x7Ah 10x7Ah 10x7Ah 1...

Page 42: ...Menu Service Set Up S type For Separate Battery C type For Common Battery CBAT DPA 120 S type item no 00 7912 C type item no 00 7964 CBAT DPA 200 S type item no 00 7913 C type item no 00 7965 BATTERY FRAMES Configuration accommodates Max 120 Batt block x 24Ah 28Ah on 8 shelf 3x5 15 blocks shelf 200 Batt blocks x 24Ah 28Ah on 7 shelf 6x5 30 blocks shelf Battery fuses Max Batt Strings Terminals S ty...

Page 43: ...cedure Ensure that the fuses feeding the UPS in the input Distribution Board are all open and no power is fed to the UPS Ensure the MAINTENANCE BYPASS IA1 is open position OFF Ensure the battery fuses in the external battery cabinet are open Connect Earth PE between the UPS and external battery cabinet Connect the corresponding N terminals between the UPS and external battery cabinet according to ...

Page 44: ...ons separate batteries Figure 3 17 External Battery Cabinet Connections common battery 1 N 1 2 N 2 3 N 3 4 N 4 5 N 5 P E Battery Fuses UPS1 Battery Fuses UPS2 Battery Fuses UPS3 Battery Fuses UPS4 Battery Fuses UPS5 Separate Battery P E 1 2 3 4 5 N N N N N 1 2 3 4 5 Common Battery 1 N 1 2 N 2 3 N 3 4 N 4 5 N 5 Battery Fuses UPS1 Battery Fuses UPS2 Battery Fuses UPS3 Battery Fuses UPS4 Battery Fuse...

Page 45: ...male Interface for Multidrop connection between several UPS cabinets USB Interface UPS system to computer 3 9 1 Smart Port Serial RS 232 The SMART PORT is an intelligent RS 232 serial port that allows the UPS to be connected to a computer The connector is a standard D Type 9 pin male When installed the optional SMART PORT software WAVEMON allows the computer to monitor the mains voltage and the UP...

Page 46: ...tion 9 chapter 1 2 OPTIONS Output Interfaces Terminal blocks X2 X3 X4 DRY PORTs Provision of signals for the automatic and orderly shutdown of servers AS400 or Automation building systems Term Contact Signal Display Function X1 X1 1 3 3Vdc GND Remote Shut down Do not remove the factory mounted bridge until external Remote Shut down is connected X1 2 X1 3 3 3Vdc GND Generator Operation X1 4 X1 5 3 ...

Page 47: ...mmon X2 4 Message LOAD_ON_INV Load on Inverter X2 5 Load on Bypass X2 6 Common X2 7 ALARM BATT_LOW Battery Low X2 8 Battery OK X2 9 Common X2 10 Message LOAD_ON_MAINS Load on Bypass X3 X3 1 Load on Inverter X3 2 Common X3 3 ALARM COMMON_ALARM Common Alarm X3 4 No Alarm X3 5 Common X3 6 ALARM MODUL_ALARM1 Module 1 Alarm X3 7 No Alarm X3 8 Common X3 9 ALARM MODUL_ALARM2 Module 2 Alarm X3 10 No Alarm...

Page 48: ...uter Interface JD12 5 l is an intelligent RS232 serial port that monitors signals from several UPS cabinets connected in parallel The connector JD12 is a standard D Type 9 pin male 3 9 5 USB 2 Computer Interface The Computer Interface USB 6 is in parallel with the intelligent RS 232 serial port JD11 When installed the USB Computer Interface and the optional WAVEMON software allows the computer to ...

Page 49: ...ST BE CONSIDERED AN ELECTRICAL HAZARD AND UNINTERRUPTIBLE POWER SUPPLIES LTD ACCEPTS NO RESPONSIBILITY FOR ITS SAFE OPERATION OR THE SAFETY OF ANY PERSONNEL ADDITIONALLY THE MANUFACTURER S WARRANTY IS IMMEDIATELY INVALIDATED IF THE UPS IS PUT INTO USE BEFORE IT HAS BEEN CORRECTLY COMMISSIONED 4 2 Control Panel The user friendly control panel is composed of three parts POWER MANAGEMENT LCD DISPLAY ...

Page 50: ... critical load When the Load is being supplied from the battery due to a mains failure the BATTERY LED indicator will flash The ALARM LED indicator gives a visual indication of any internal or external alarm condition At the same time an audible alarm will be activated INDICATOR INDICATOR STATUS MEANING ALARM OFF RED No alarm condition Alarm condition LINE 1 GREEN RED Mains rectifier available Mai...

Page 51: ...ROL PANEL ACTIVATION OF THE ON OFF BUTTONS WHEN THE UPS IS NOT IN MAINTENANCE BYPASS MODE WILL INTERRUPT THE POWER SUPPLY TO THE LOAD LOAD OFF in a PowerWAVE 9000 DPA Single Module System If for security or emergency reasons it is necessary to immediately disconnect the load from the UPS press the two red ON OFF Buttons simultaneously The simultaneous action of both buttons is necessary to avoid a...

Page 52: ... 6 Defining a Single Multi Cabinet Chain DIP Switch SW1 9 Using the DIP Switch SW1 9 located on the front of the Cabinet it is possible to determine the position of the Cabinet in the Multi Cabinet Chain First in the Multi Cabinet Chain Middle in the Multi Cabinet Chain there may be more than one Last in the Multi Cabinet Chain NOTE If a Cabinet is a Single Cabinet then it is seen as the First and...

Page 53: ...by UPS power Load is supplied by inverter Normal Operation LOAD PROTECTED Unit 01 1 2 Load is not protected by UPS Load is supplied by mains power load on bypass LOAD NOT PROTECTED Unit 01 1 3 Load supply completely interrupted UPS has been switched off by ON OFF buttons LOAD OFF SUPPLY FAILURE Unit 01 1 4 UPS module is not supplying load The output switch is open LOAD DISCONNECTED PARALLEL SWITCH...

Page 54: ...s and Battery test to be carried out COMMANDS UPS DATA 4 The UPS Data Allows access to the UPS personalized information serial number UPS DATA SET UP USER 5 Allows the user to set Date Time automatic battery test etc SET UP USER SET UP SERVICE 6 Allows the service engineer to set parameters and carry out adjustments SET UP SERVICE NO MORE MENU DESCRIPTION LCD DISPLAY 1 Logging Control 01 05 10 00 ...

Page 55: ...phases RECTIFIER VOLTAGE V 230 230 230 8 Bypass Input Voltage of all three phases BYPASS VOLTAGE V 230 00 00 00 00 9 Output Voltage of all three phases OUTPUT VOLTAGE V 00 00 00 00 00 00 10 Output Current of all three phases OUTPUT CURRENT A 00 00 00 00 00 00 11 Active Output Power of all three phases of all three phases ACTIVE POWER KW 00 00 00 00 00 00 12 Reactive Output Power of all three phase...

Page 56: ... LOAD TO BYPASS 2 Transfer Load to bypass LOAD TO BYPASS PERFORM BATT TEST 3 Battery Test PERFORM BATT TEST DESCRIPTION LCD DISPLAY 1 These general UPS Data are installed at the manufacturing plant UPS SERIAL NUMBER NW nnnnn 2 Manufacturing date DATE OF MANUFACTURE 15 03 2007 3 EPROM Version EPROM VERSION V 000 4 Actual Date and Time DATE TIME dd mm yy hh mm ss ...

Page 57: ...ADJUST ANY UPS PARAMETERS DESCRIPTION LCD DISPLAY 1 Set up Language SET LANGUAGE SET DATE TIME ENGLISH FRANCAIS POLISH 2 Set up Date and Time SET UP DATE TIME SET UP BATT TEST DD MM YY HH MM SS 3 Set up battery test SET UP BATT TEST SET UP GEN SET OPER DAY OF MONTH 1 31 HOUR OF DAY 0 23 REPETITIVE Y N YES NO 4 Set up operation with Gen Set SET GENERATOR OP BATT CHARGE LOCK Y N BYPASS LOCK YES NO D...

Page 58: ...t tolerate any interruption of the supply not even the shortest In the unlikely event of an inverter fault or overload condition the UPS will transfer the load automatically and without interruption to the static bypass mains supply transfer time 0 4 4 2 OFF Line ECO or BYPASS MODE In the Off Line mode the load is supplied directly from the mains through the static bypass Using the control panel p...

Page 59: ...IED BY THE INVERTER ON LINE MODE 4 4 3 Maintenance Bypass Mode The Maintenance Bypass Mode is performed by means of the IA1 BYPASS SWITCH on the front of the UPS BEFORE TRANSFERRING THE LOAD TO MAINTENANCE BYPASS IA1 ALWAYS MAKE SURE THE UPS SYSTEM IS IN THE BYPASS MODE OR ECO MODE IA1 SWITCH POSITION EFFECT ON Bypass Switch Closed Load supplied directly from mains LCD indication MAINTENANCE BYP C...

Page 60: ...em without the need of transferring the load to bypass 4 5 Start Up Procedure ALL THE OPERATIONS IN THIS SECTION MUST BE PERFORMED BY AUTHORISED ELECTRICIANS OR BY QUALIFIED INTERNAL PERSONNEL THE UPS MUST NOT BE STARTED OR PUT INTO USE WITHOUT HAVING FIRST BEEN COMMISSIONED BY A FULLY TRAINED AND AUTHORISED PERSON 4 5 1 Prestart Checks 1 The fuses for the supply of UPS System in the Input Distrib...

Page 61: ...CD Display LOAD OFF SUPPLY FAILURE will appear 2 UPS Module 1 Press both ON OFF Main Buttons to switch on UPS On LCD LOAD DISCONNECTED PARALLEL SWITCH OPEN will appear and the LED indicator will indicate as shown below 3 Via Control Panel Select LOAD TO INVERTER LED indicator will indicate as shown below 4 Scroll through the Measurement menu and check values 5 Modules 2 5 Repeat Steps 2 4 for each...

Page 62: ... ON of Module 4 On LCD PARALLEL SW CLOSED will appear Close Parallel Isolator IA2 5 position ON of Module 5 On LCD PARALLEL SW CLOSED will appear 11 Press simultaneously the two ON OFF buttons on the UPS control panel PMD on all three control panels to turn the modules ON On output Terminal Block there is now UPS power and on all three LCD s LOAD PROTECTED will appear 12 Load transfer to Maintenan...

Page 63: ...tended period of time It may be switched to Maintenance Bypass Mode for service or maintenance purposes or transferred to the OFF Line Mode if the load does not need the highest degree of protection The load may be disconnected by means of the two ON OFF LOAD OFF push buttons Two buttons are used for added security 4 6 1 Complete UPS Shut Down procedure THE UPS MAY BE SHUT DOWN COMPLETELY IF THE L...

Page 64: ...UPS it is possible to transfer the UPS into the MAINTENANCE BYPASS MODE BEFORE SWITCHING THE MAINTENANCE BYPASS TO POSITION ON MAKE SURE THAT THE LOAD HAS BEEN TRANSFERRED TO BYPASS OFF LINE MODE ALL THE OPERATIONS IN THIS SECTION MUST BE PERFORMED BY AUTHORISED ELECTRICIANS OR BY QUALIFIED INTERNAL PERSONNEL 4 7 1 Transferring the UPS to Maintenance Bypass UPS system status prior to transfer The ...

Page 65: ...panels The LCD panel will indicate LOAD OFF SUPPLY FAILURE and the panel shows 4 Open Parallel Isolators IA2 1 IA2 2 IA2 3 IA2 4 and IA2 5 5 Open battery fuses breakers in the external battery cabinets or racks THE LOAD IS SUPPLIED BY MAINS AND IS NOT PROTECTED LED Indicator Colour LINE 1 Green LINE 2 Green BYPASS Green INVERTER RED BATTERY Green LED Indicator Colour LINE 1 Green LINE 2 OFF BYPASS...

Page 66: ... Parallel Isolators IA2 1 IA2 2 IA2 3 IA2 4 and IA2 5 and check message PARALLEL SW CLOSED on LCD of each module 4 Simultaneously press both ON OFF buttons on the UPS control panel PMD on all three control panels Unit will start up and after about 60 seconds the LED display will give the following indications 5 Make sure that the bypass LED is green on all modules then open the Maintenance Bypass ...

Page 67: ...NS OF THE UPS ARE DESCRIBED WITHIN THIS MANUAL AND MUST BE STRICTLY ADHERED TO 5 1 1 Removing a UPS Module from a Single Module System If your PowerWAVE 9000 DPA consists of only one single UPS Module then perform the following steps to extract the module 1 Reset the Alarm on faulty Module The audible noise will stop If the Alarm condition persists the LED Indicator ALARM will remain red it means ...

Page 68: ... 50 40kW module is 60kg the weight of DPA 10 8kW60 kVA module is 24kg 10 Insert new UPS Modules or cover the opening UPS Modules Compartment with appropriate protection cover immediately and fix with four screws WHILE THE UPS IS OPERATING IN THE MAINTENANCE BYPASS MODE THE LOAD IS NOT PROTECTED AND IN THE EVENT OF A MAINS FAILURE THE LOAD SUPPLY WILL BE INTERRUPTED 5 1 2 Fitting a UPS Module to a ...

Page 69: ...f a DPA 50 40kW module is 60kg the weight of DPA 10 8kW60 kVA module is 24kg 3 Tighten the four screws on the front of each module passive and active 4 Check if the LED LINE1 and battery is flashing green If yes mains voltage is OK On the LCD LOAD OFF SUPPLY FAILURE will appear and the LED display will indicate as shown below 5 Close the bypass fuses F2 front of Module 6 Close external battery fus...

Page 70: ...ONS IN THIS SECTION MUST BE PERFORMED BY AUTHORISED ELECTRICIANS OR BY QUALIFIED INTERNAL TRAINED PERSONNEL BY OPENING OR REMOVING THE UPS MODULES AND MODULE COVERS YOU RUN RISK OF EXPOSURE TO DANGEROUS VOLTAGES BEFORE REMOVING A UPS MODULE MAKE SURE THE INTERNAL DC CAPACITORS HAVE BEEN DISCHARGED FOR AT LEAST 2 MINUTES NEVER LEAVE THE UPS MODULE COMPARTMENT WITHOUT AN APPROPRIATE PROTECTION COVER...

Page 71: ...ule completely into the rear connector Connect Control Panel cable to connector JD7 Push UPS module to its final position and push strongly to assure good contact on the rear plugs Tighten the eight screws on the front of modules active and passive 4 Check if LED LINE1 and battery is flashing green If yes mains voltage is OK On the LCD LOAD OFF SUPPLY FAILURE will appear and the LED display will i...

Page 72: ... OFF buttons 11 Close the Parallel Isolator Switch IA2 corresponding to the module LCD panel must show the message PARALLEL SW CLOSED 12 Press simultaneously both ON OFF buttons Module will restart automatically connecting load to inverter and run in parallel with other ON LINE modules LCD panel must show LOAD PROTECTED indication THE LOAD IS NOW PROTECTED BY THE UPS LED Indicator Colour LINE 1 Gr...

Page 73: ...IBED WITHIN THIS MANUAL AND MUST BE STRICTLY ADHERED TO 5 3 1 Removing a Module From a Capacity Multi Module System If in a capacity parallel system a UPS Module fails and there is not enough capacity left to protect the load by the remaining operating UPS modules the load will automatically be transferred to bypass Bypass Mode or Eco Mode and will continue to be supplied by the mains supply To ex...

Page 74: ...orresponding battery fuses 9 Remove the 4 fixation screws and slide out the UPS Modules 10cm paying particular attention to the cable connected to JD7 This operation will disconnect module by the power connection located on the back of the cabinet 10 Disconnect cables from connectors JD7 BEFORE DRAWING THE UPS MODULE COMPLETELY OUT WAIT 2 MINUTES UNTIL THE INTERNAL DC CAPACITORS ARE DISCHARGED 11 ...

Page 75: ...irds of UPS modules into dedicated UPS compartment make sure not to plug the UPS Module into the rear connector Connect Control Panel cable to connector JD7 Push UPS modules to its final position and push strongly to assure good contact on the rear plugs NOTE Two persons are needed to pull out the module from the UPS Frame The weight of a DPA 50 40kW module is 60kg the weight of DPA 10 8kW60 kVA m...

Page 76: ...rallel Isolator Switch of New Module position ON on LCD should appear PARALLEL SW IS CLOSED 13 Open Maintenance Bypass IA1 by turning it to position OFF The load is now supplied by the static bypass of all three Modules Check LED indicators on control panels 14 Transfer load to Inverter Mode by means of COMMAND LOAD TO INVERTER on any one of three control panels On LCD LOAD PROTECTED will appear a...

Page 77: ... WA V E D P A E N T E R O N O F F O N O F F R E S E T A L A R M L I N E 2 B Y P A S S L I N E 1 I N V E R T E R B A T T E R Y P o w e r WA V E D P A E N T E R O N O F F O N O F F R E S E T A L A R M L I N E 2 B Y P A S S L I N E 1 I N V E R T E R B A T T E R Y P o w e r WA V E D P A E N T E R O N O F F O N O F F R E S E T A L A R M L I N E 2 B Y P A S S L I N E 1 I N V E R T E R B A T T E R Y P o ...

Page 78: ...TERNALLY TRAINED PERSONNEL BY OPENING OR REMOVING THE UPS MODULES OR MODULE COVERS THERE IS A RISK OF EXPOSURE TO DANGEROUS VOLTAGES BEFORE REMOVING A UPS MODULE MAKE SURE THE INTERNAL DC CAPACITORS HAVE BEEN DISCHARGED FOR AT LEAST 2 MINUTES NEVER LEAVE THE UPS MODULE COMPARTMENT WITHOUT A APPROPRIATE PROTECTION COVER FITTED UNINTERRUPTIBLE POWER SUPPLIES LTD WILL ASSUME NEITHER RESPONSIBILITY NO...

Page 79: ...h UPS cabinet should be of equal length Similarly the UPS output cables to the output distribution board should be of equal length See Figure 6 2 below Figure 6 2 Cable Lengths for Multi Cabinet Configurations assuming a 2 cable input UPS 1 UPS 2 UPS 3 UPS 4 UPS 1 UPS 2 UPS 3 UPS 4 Recommended cable configurations The cable configuration below is not recommended Bypass Feed Rectifier Feed To Load ...

Page 80: ...nection sequences detailed below 1 Fit the Parallel Adapter over the Connector JD8 on all UPS cabinets 2 Set DIP Switch SW2 2 on each Parallel Adapter depending on the UPS Cabinet in the parallel cabinet configuration 3 Connect PORT JD6 on Parallel Adapter of UPS Cabinet 1and PORT JD5 of Parallel Adapter of UPSCabinet 2 with the corresponding BUS Cable 4 Connect PORT JD6 on Parallel Adapter of UPS...

Page 81: ...he position of a DPA Cabinet in a Multi Cabinet Chain Define each DPA Cabinet in a Multi Cabinet Chain as 1 The First 2 The Middle there may be more than one and 3 The Last Cabinet in the Multi Cabinet Chain by setting the DIP Switch SW1 9 on each cabinet according to the Table below Having set the SW1 9 on all the DPA Cabinets correctly the UPS s may be commissioned DIP Switches position on PCB N...

Page 82: ... SYSTEM IMPORTANT BEFORE CLOSING IA2 OF A UPS MODULE BE SURE THAT THE STATUS OF THAT MODULE IS THE SAME AS OF THE REST OF THE OPERATING MODULES WITH CLOSED IA2 EXAMPLE IF ALL UPS s WITH CLOSED IA2 ARE ON INVERTER MAKE SURE THAT THE UNIT ON WHICH ISOLATOR IA2 IS BEING CLOSED IS ALSO ON INVERTER 6 2 8 Maintenance Bypass IA1 There are two types of Parallel System Configurations redundant and capacity...

Page 83: ...ed correctly according to Chapter 3 of this User Manual 2 The parallel communication cables have been connected correctly according to Paragraph 6 2 2 of Chapter 6 3 All the DIP Switches for the Modules and Upgrade Line Cabinets been set correctly according to Paragraph 6 2 3 of Chapter 6 4 All the external battery cabinets racks have been connected correctly The start up of a Multi Cabinet Config...

Page 84: ...ue 2 1 Oct 2009 6 3 3 Replacement of a Faulty UPS Module in a Multi Cabinet Configuration If in a Multi Cabinet Configuration a UPS module fails replace the UPS module in in a similar way to the replacement procedures described in Chapter 5 of this User Manual ...

Page 85: ... free 7 3 Routine Maintenance The UPS is designed to receive regular preventative maintenance inspections These preventative maintenance inspections are essential to ensure that both the useful working life and the reliability of the UPS are maximised When the UPS is commissioned the commissioning field service engineer will attach a service record book to the front of the UPS and this will be use...

Page 86: ...le Power Supplies Ltd For further details on Extended Warranty Agreements please refer to section 2 8 pages 2 9 to 2 10 7 4 Battery Testing The battery test takes approximately 3 minutes and should be performed only if There are no alarm conditions The battery is fully charged Mains supply is present Battery testing can be carried out independently of the operating mode ECO MODE or ON LINE and whe...

Page 87: ...n on the following pages 8 2 Menu Commands Event Log Measurements A detailed description of the Menu Commands Event Log and Measurements that can be operated and displayed on the LCD can be found in Section 4 8 2 1 Event Log Screen The full list of Alarms and Messages are shown in Section 8 3 As you step through the event memory make a separate note of each alarm condition as this will assist in t...

Page 88: ...pment is causing the overload and remove it from the UPS Do not connect laser printers photocopiers electric heaters kettles etc to the UPS OVERTEMPERATURE UPS temperature has exceeded the allowed value Check the ambient temperature of the UPS is less than 30 C If the ambient temperature is normal call the authorised service centre for assistance BATTERY CHARGER OFF The attached battery and the ba...

Page 89: ... regarding your UPS please contact us We recommend that your UPS is protected by an Extended Warranty Agreement see Section 2 8 for details These agreements assist us in caring for your UPS correctly ensuring that it is well maintained and attended to promptly should any problems occur Uninterruptible Power Supplies Ltd Bacchus House Calleva Park Aldermaston Berkshire RG7 8EN Tel 0118 981 5151 080...

Page 90: ...8 4 PowerWAVE 9000 DPA UPS Troubleshooting Issue 2 1 Oct 2009 ...

Page 91: ...h opens to operate the emergency stop sequence The emergency stop port X1 1 and X1 2 is located at the bottom of the DPA frame on the communication card with terminal blocks X1 X4 See Figure 3 5 for location drawing In order to allow removal maintenance or testing of any remote emergency stop facility without disturbing the normal operation of the UPS it is recommended that a terminal block with l...

Page 92: ...loses to indicate that a generator is running and supplying input power to the UPS When used this facility enables the option to inhibit the operation of the battery charger and or static bypass See Installation and User Guide Chapter 4 Set Up User on page 4 8 Figure 9 2 Generator ON Connection UPS Generator Port X1 Generator Alarm Panel X1 3 X1 4 ...

Page 93: ...multinational companies A prolonged Mains failure may outlast the battery autonomy of the UPS system If this situation occurs UPS management software will initiate an automatic graceful shutdown of the operating system protecting valuable data Uninterruptible Power Supplies Ltd offer a wide range of local and remote monitoring and control systems offering maximum protection for computer systems Fi...

Page 94: ...UPS Management Software is UPSMAN which communicates via an RS 232 cable with the UPS Working as a background process UPSMAN collects messages received from the UPS The UPSMAN interprets received messages and makes them available to the client module UPSMON and to any SNMP station If UPSMAN detects voltage variations or a power failure it will execute various so called system event routines which ...

Page 95: ...module which executes a command in a distant system 9 5 SNMP CARD ADAPTER For Network Management Remote Monitoring The Simple Network Management Protocol SNMP is a worldwide standardized communication protocol It is used to monitor any device in the network via simple control language The UPS Management Software also provides its data in this SNMP format with its internal software agent The operat...

Page 96: ...ure 9 5 External SNMP Adapter The Internal SNMP Card can also be inserted into an appropriate expansion slot in the PowerWAVE 9000 Modules or Cabinet This adapter communicates via the serial port of the UPS and makes a direct multiple server shut down possible without additional SNMP management software Figure 9 6 Internal SNMP Adapter For detailed information please refer to the Software Manual p...

Page 97: ...50x1975x780 550x1975x780 Weight of Empty Frame kg 200 220 160 Weight of Frame with modules and no batteries kg 224 233 with 1 Module 292 319 with 3 Modules 280 325 with 5 Modules Colours Front RAL 9007 black inlets Side walls Graffito grey PowerWAVE DPA Modules DPA 10 DPA 15 DPA 20 DPA 25 Output Apparent Power KVA 10 15 20 25 Output Active Power KW 8 12 16 20 Output Power PF 1 KVA KW 8 8 12 12 16 ...

Page 98: ...t of Empty Frame kg 250 270 190 Weight of Frame with modules and no batteries kg 300 310 with 1 Module 420 450 with 3 Modules 440 490 with 5 Modules Colours Front RAL 9007 black inlets Sidewalls Graffito grey PowerWAVE DPA MODULES DPA 30 DPA 40 DPA 50 Output Apparent Power KVA 30 40 45 Output Active Power KW 24 32 40 Output Power PF 1 KVA KW 24 24 32 32 40 40 Number of 12V Battery Blocks No 40 50 ...

Page 99: ...charged battery per Module output CosΦ 1 0 kW 8 5 12 8 17 0 21 3 25 4 33 9 42 9 Max Input Current with rated output power and charged battery per Module output CosΦ 1 0 A 12 3 18 5 24 7 30 8 36 8 49 1 62 1 Max Input Power with rated output power and discharged battery per Module output CosΦ 1 0 kW 9 3 14 0 18 6 23 3 27 8 37 1 46 9 Max Input Current with rated output power and discharged battery pe...

Page 100: ...0 or 100 0 4 Output Voltage Distortion With Linear Load 2 With Non linear Load EN62040 3 2001 4 Output Frequency Hz 50 Hz or 60 Hz Output Frequency Tolerance Synchronized with mains 2 selectable or 4 Free running 0 1 Bypass operation At Nominal Input voltage of 3x400 V 15 or 190 V to 264 V ph N Permissible Unbalanced Load All 3 phases regulated independently 100 Phase Angle Tolerance With 100 Unba...

Page 101: ...Max 95 non condensing Accessibility Totally front accessibility for service and maintenance no need for side top or rear access Positioning Min 20 cm rear space required for fan Input and Output Power Cabling From the bottom on the front Efficiency AC AC up to cosΦi 1 0 depending on Module power Load 100 75 50 25 DPA 30 50 94 5 94 5 94 93 DPA 10 25 94 94 93 5 91 Efficiency Linear Load at cosΦ 0 8i...

Page 102: ... LED indicator ALARM is a visual indication of any internal or external alarm condition At the same time the audible alarm will be activated 10 6 2 Pushbuttons The push buttons serve to manage the UPS by performing commands The 2xON OFF push buttons serve to start up or shutdown the UPS if pressed simultaneously The UP and DOWN push buttons allow selection through the Power Management Display menu...

Page 103: ...ication Parallel Configuration standard A number of UPS units may be paralleled for redundancy or capacity Wavemon Software For automatic shut down and monitoring SNMP Adapter For network management and remote monitoring Input or Output Isolation Transformer For special voltages or for galvanic isolation Customized UPS and Battery Frames On request for OEM Projects only Parallel Plus Panel For the...

Page 104: ...10 8 PowerWAVE 9000 DPA UPS Specifications Issue 2 1 Oct 2009 ...

Reviews: