11
11.
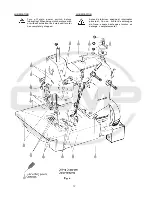
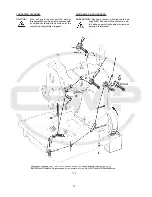
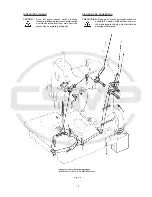
Hook the lifter chain to the lifter lever of the sewing
machine and to the small treadle on the sewing table.
12.
Assemble the thread stand and mount the thread stand
base with three wood screws on the right rear corner of
the table board.
13.
Before being put into service note the specified service
voltage and frequency of the motor. Check if the mains
voltage and frequency at site correspond with the factory
specified service voltage and frequency.
14.
Check the direction of rotation. The handwheel pulley
must rotate clockwise (to the right), when viewed from
the right end of the machine.
Switch on the motor. Only shortly and very slightly de-
press the motor treadle and check the direction of rota-
tion. Immediately release the treadle. Switch off and wait
until the motor has stopped.
CAUTION!
In case the direction of rotation has to be
changed, the reversing of the polarity is only
allowed to be done by a skilled electrician.
11.
Enganche la cadena a la palanca levantadora de la
máquina de coser y al pequeño pedal en la mesa de la
máquina de coser.
12.
Asegure la base del porta conos con tres tornillos al lado
derecho de la mesa de la máquina de coser y monte el
porta conos.
13.
Antes de comenzar a utilizar la máquina, verifique que
el voltaje y la frecuencia del motor coinciden con la ins-
talada en el lugar donde operará la máquina.
14.
Verifique la dirección de rotación. El volante debe girar
en dirección del reloj (a la derecha), cuando es visto
desde la parte derecha de la máquina.
Encienda el motor. Presione ligeramente el pedal y
chequee la dirección de rotación. Suéltelo inmediatamen-
te. Apague el motor y espere hasta que se detenga to-
talmente.
PRECAUCION! En el caso que la dirección de rotación
deba ser cambiada, la reversión de la pola-
ridad debe ser realizada por un electricista
calificado.
INSTALLATION
(continued)
INSTALACION
(Continuación)
Summary of Contents for 81500B2
Page 8: ...8 INSTALLATION INSTALACION...
Page 10: ...10...
Page 21: ...21...
Page 23: ...23 Fig 10 Fig 11 Fig 11 A Fig 11 B Fig 11 C Fig 12...
Page 25: ...25...
Page 28: ...28...
Page 33: ...33 VIEWS AND DESCRIPTION OF PARTS VISTAS Y DESCRIPCIONES DE LAS PARTES Y PIEZAS...
Page 34: ...34...
Page 36: ...36...
Page 38: ...38...
Page 40: ...40...
Page 42: ...42...
Page 44: ...44...
Page 46: ...46...
Page 48: ...48...
Page 50: ...50...
Page 52: ...52...
Page 54: ...54...
Page 56: ...56...
Page 58: ...58...
Page 60: ...60...
Page 62: ...62...
Page 64: ...64...
Page 68: ......


