


4
5
23.11.2021
DE
U S E R M A N U A L
EN
3.2. VORBEREITUNG ZUM BETRIEB/ ARBEIT MIT DEM
GERÄT
Automatische Synchronisation:
a)
Entfernen Sie den Sicherungsstift (A) und setzen
Sie die Batterie wie auf dem Gerät markiert in das
Batteriefach (B) ein.
b)
Die Zeiger bewegen sich in Richtung 12:00 Uhr.
HINWEIS: Wenn sich der Sekundenzeiger zwischen
11:55 und 12:00 Uhr befindet, dreht der Zeiger
eine volle Umdrehung, bevor er auf 12:00 Uhr
stehen bleibt, ebenso wie der Minutenzeiger,
wenn er zwischen 11:52 und 12:00 Uhr steht.
c)
Wählen Sie den Installationsort für das Produkt
aus.
d)
Warten Sie, bis das Gerät das Synchronisationssignal
von der Hauptuhr empfangen hat. Dies kann bis
zu 15 Minuten dauern. Bitte beachten Sie, dass
der Signalempfang in der Regel nachts stärker ist.
e)
Nach der Synchronisation nähern sich die Zeiger
der Position, die die richtige Uhrzeit anzeigt.
f)
Wenn die Uhr kein Funksignal empfängt, beginnt
sie, die falsche Zeit anzuzeigen. Und das Gerät
wird weiterhin versuchen, die Synchronisation
durchzuführen.
Uhrzeit manuell einstellen:
a) Halten Sie die M.SET-Taste (D) gedrückt, nach
ca. 3 Sekunden beginnen sich Minuten – und
Stundenzeiger zu bewegen.
b) Halten Sie die Taste M.SET gedrückt und lassen
Sie sie einige Minuten vor der gewünschten
Zeiteinstellung los.
c)
Um zur nächsten Minute zu gelangen, drücken Sie
die Taste einzeln, bis die gewünschte Zeit erreicht
ist.
d) Wenn innerhalb von 7 Sekunden keine
Taste gedrückt wird, beginnt die Uhr ab der
angegebenen Zeit zu zählen.
Zeitsynchronisation erzwingen
a)
Um die Synchronisation der Uhrzeit zu erzwingen,
drücken und halten Sie die Signal-Empfangstaste
(E) ca. 3 Sekunden lang, das Gerät versucht, sich
mit der Hauptuhr zu synchronisieren.
b) Wenn die Synchronisation erfolgreich ist,
beginnen sich die Zeiger in Richtung der richtigen
Zeit zu bewegen. Wenn die Synchronisation
fehlschlägt, bewegen sich die Zeiger auf die zuvor
angezeigte Zeit.
Zurücksetzen
a) Modell UNI_CLOCK_01: Um die Zeitanzeige
zurückzusetzen, berühren Sie die beiden
Metallrückstellpunkte (C) mit einem Stück Metall
(z. B. einer Büroklammer). Modell UNI_CLOCK_02:
Drücken Sie die Reset-Taste (C), um die Zeitanzeige
zurückzusetzen.
b) Alle Zeiger bewegen sich auf 12:00 Uhr und der
Speicher wird gelöscht. Die Uhr versucht, sich mit
der Hauptuhr zu synchronisieren.
3.3. REINIGUNG UND WARTUNG
a) Verwenden Sie zum Reinigen der Oberfläche
ausschließlich Mittel ohne ätzende Inhaltsstoffe.
b) Lassen Sie nach jeder Reinigung alle Teile gut
trocknen, bevor das Gerät erneut verwendet wird.
c) Bewahren Sie das Gerät an einem trockenen,
kühlen, vor Feuchtigkeit und direkter
Sonneneinstrahlung geschütztem Ort auf.
d)
Es ist verboten, das Gerät mit einem Wasserstrahl
zu besprühen oder in Wasser zu tauchen.
e) Hinsichtlich der technischen Effizienz und
eventueller Schäden sollte eine regelmäßige
Überprüfung des Gerätes durchgeführt werden.
f)
Zum Reinigen nutzen Sie bitte einen weichen
Lappen.
g) Die Batterie im Gerät nicht hinterlassen, wenn
der weitere Betrieb für längere Zeit unterbrochen
wird.
SICHERE ENTSORGUNG VON AKKUMULATOREN UND
BATTERIEN
Im Gerät werden folgende Batterien verwendet AA
1,5V. Demontieren Sie verbrauchte Batterien aus dem
Gerät, indem Sie die gleiche Vorgehensweise wie bei
der Installation befolgen. Zur Entsorgung geben Sie die
Batterien an die hierfür zuständige Einrichtung / Firma
ab.
ENTSORGUNG GEBRAUCHTER GERÄTE
Dieses Produkt darf am Ende seiner Nutzungsdauer
nicht über den normalen Hausmüll entsorgt werden,
sondern muss an die Sammel – und Recyclinganlage
für Elektro und Elektronikgeräte zurückgegeben
werden. Darüber informiert Sie das Symbol auf dem
Produkt, auf der Bedienungsanleitung oder der
Verpackung. Die im Gerät verwendeten Materialien
sind entsprechend ihrer Bezeichnung recyclebar.
Mit der Wiederverwendung, erneuten Nutzung von
Materialien oder anderen Formen des Gebrauchs von
Gebrauchtgeräten leisten Sie einen wichtigen Beitrag
zum Schutz unserer Umwelt. Informationen über die
entsprechenden Entsorgungspunkte erteilen Ihnen die
lokalen Behörden.
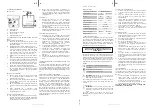
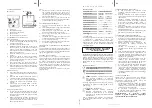
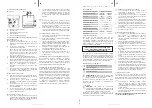
UNI_CLOCK_01
UNI_CLOCK_02
C
D E
A
B
B
A
C D
E
A. Sicherungsstift
B. Batteriefach
C. Reset-Taste/Rücksetzpunkt
D. „M.SET”-Taste
E. Signal-Empfangstaste
3.1. GERÄTEBESCHREIBUNG
The product satisfies the relevant safety
standards.
Read instructions before use.
The product must be recycled.
TECHNICAL DATA
PLEASE NOTE!
Drawings in this manual are for
illustration purposes only and in some details may
differ from the actual product.
LEGEND
2.1. SAFETY IN THE WORKPLACE
a)
If there are any doubts as to the correct operation
of the device, contact the manufacturer's support
service.
b) Only the manufacturer's service point may
repair the device. Do not attempt any repairs
independently!
c) Please keep this manual available for future
reference. If this device is passed on to a third
party, the manual must be passed on with it.
d) Keep packaging elements and small assembly
parts in a place not available to children.
e)
The device is not a toy. Children must be
supervised to ensure that they do not play with
the device.
2.2. SAFE DEVICE USE
a)
Device repair or maintenance should be carried
out by qualified persons, only using original spare
parts. This will ensure safe use.
b) Clean the device regularly to prevent stubborn
grime from accumulating.
c)
Do not run the device when empty.
d) It is forbidden to interfere with the structure of
the device in order to change its parameters or
construction.
e) The device automatically synchronizes with the
master clock’s radio signal and, if necessary,
adjusts the positions of seconds, minutes or
hours.
f)
The signal needed for synchronization may be
weakened by concrete or metal. The clock must
not be installed in concrete basements or inside
metal cages.
g)
In large concrete office buildings or blocks of flats,
the clock should be positioned in the vicinity of
a window for better radio signal reception. Avoid
installing the device near strong magnetic fields or
other devices generating a lot of electrical noise
(e.g. motors).
3. USE GUIDELINES
The product is used for continuous time measurement.
Current time can be arrived at in two ways: by automatic
synchronization (DCF77 system) or by manually setting
the time:
•
The device is radio controlled; when it receives
radio signal from a national or regional
transmitter, it automatically sets the time (the
internal antenna is a receiving antenna).
•
If the device is located in an area with no radio
signal, the time should be set manually.
The user is liable for any damage resulting from
unintended use of the device.
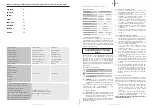
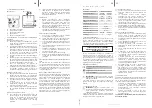
Parameter description
Parameter value
Product name
XXL
Wall Clock
Wall Clock
Model
UNI_
CLOCK_01
UNI_
CLOCK_02
Digit size [mm]
42
28
Frequency [kHz]
77.5
Band [Hz]
77±300
Battery type
1.5V AA LR6
Temperature range [°C]
-10~+55
Dimensions [cm]
Ø50x5.5
Ø30x4.5
Weight [kg]
2
0.75
DO NOT USE THE DEVICE UNLESS YOU HAVE
THOROUGHLY READ AND UNDERSTOOD THIS
USER MANUAL.
To increase the product life of the device and to ensure
trouble-free operation, use it in accordance with this
user manual and regularly perform maintenance tasks.
The technical data and specifications in this user manual
are up to date. The manufacturer reserves the right to
make changes associated with quality improvement.
1. GENERAL DESCRIPTION
The user manual is designed to assist in the safe and
trouble-free use of the device. The product is designed
and manufactured in accordance with strict technical
guidelines, using state-of-the-art technologies and
components. Additionally, it is produced in compliance
with the most stringent quality standards.
The original operation manual is written in German.
Other language versions are translations from the
German.
2. USAGE SAFETY
ATTENTION!
Read all safety warnings and all
instructions. Failure to follow the warnings and
instructions may result in serious injury or even
death.
The terms "device" or "product" are used in the
warnings and instructions to refer to < XXL Wall Clock,
Wall Clock>.


