7
6
07.04.2021
TECHNICAL DATA
U S E R M A N U A L
The terms "device" or "product" are used in the warnings
and instructions to refer to WALL CLOCK.
2.1. SAFETY IN THE WORKPLACE
a)
If there are any doubts as to the correct operation
of the device, contact the manufacturer's support
service.
b) Only the manufacturer's service point may
repair the device. Do not attempt any repairs
independently!
c) Please keep this manual available for future
reference. If this device is passed on to a third
party, the manual must be passed on with it.
d) Keep packaging elements and small assembly
parts in a place not available to children.
e) The device is not a toy. Children must be
supervised to ensure that they do not play with
the device.
2.2. SAFE DEVICE USE
a) Device repair or maintenance should be carried
out by qualified persons, only using original spare
parts. This will ensure safe use.
b) Clean the device regularly to prevent stubborn
grime from accumulating.
c)
Do not run the device when empty.
d) It is forbidden to interfere with the structure of
the device in order to change its parameters or
construction.
e) The device automatically synchronizes with the
master clock’s radio signal and, if necessary,
adjusts the positions of seconds, minutes or
hours.
f)
The signal needed for synchronization may be
weakened by concrete or metal. The clock must
not be installed in concrete basements or inside
metal cages.
g)
In large concrete office buildings or blocks of flats,
the clock should be positioned in the vicinity of
a window for better radio signal reception. Avoid
installing the device near strong magnetic fields or
other devices generating a lot of electrical noise
(e.g. motors).
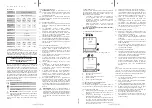
Parameter
description
Parameter value
Product name
WALL CLOCK
Model
UNI_
CLOCK_
04
UNI_
CLOCK_
06
UNI_
CLOCK_
07
UNI_
CLOCK_
09
Digit size
[mm]
20
35
20
25
Frequency
[kHz]
77,5
Band [Hz]
77±300
Battery type
1,5V AA LR6
Temperature
range [°C]
-10 ~ +55
Dimensions
[mm]
Ø200
x45
Ø350
x48
Ø300
x50
Ø300
x45
Weight [kg]
0,7
1,2
0,6
0,7
3. USE GUIDELINES
The product is used to show the current time. Current
time can be arrived at in two ways: by automatic
synchronization (DCF77 system) or by manually setting
the time:
•
The device is radio controlled; when it receives
radio signal from a national or regional
transmitter, it automatically sets the time (the
internal antenna is a receiving antenna).
•
If the device is located in an area with no radio
signal, the time should be set manually.
The user is liable for any damage resulting from
unintended use of the device.
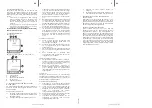
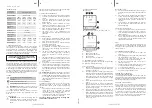
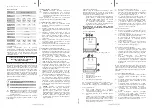
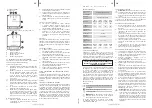
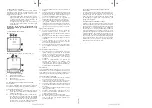
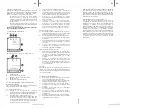
A.
Locking pin
B.
Battery compartment
C.
Reset button / Reset point
D.
„M.SET“ button
E.
Button used to force reception
3.2. PREPARING FOR USE / DEVICE USE
To avoid damaging the mechanism, remove the locking
pin (A) before inserting the battery!
Auto synchronization:
a)
Remove the locking pin (A) and insert the battery
in the battery compartment (B) according to the
markings on the device.
b)
The hands will move towards 12:00. Please note:
When the position of the seconds hand is between
11:55 and 12:00, the hand will make a full turn
before stopping at 12:00. The same happens with
the minutes hand when it is in between 11:52 and
12:00.
c)
Select the location where you want to install the
product.
d) Wait for the device to receive synchronization
signal from the master clock. It may take up to 15
minutes. Please note that the signal received is
usually stronger at night.
e) After synchronizing, the hands will begin to
approach the position indicating the correct time.
f)
When the clock does not receive a radio signal, it
will start showing incorrect time and the device
will attempt to synchronize. The clock is always
ready to receive the signal at 1:22, 3:22, 5:22, 9:22,
14:22, 17:22, 21:22.
Manual time setting:
a)
Press and hold the M.SET button (D). After approx.
3 seconds the minute and hour hands will start to
move.
b) Press and hold the M.SET button and release it
a few minutes before the desired time setting.
c)
To go to the next minute, continue pressing and
releasing the button until the desired time is
reached.
d) If the button is not pressed within 10 seconds,
the clock will start counting the time from the
indicated position.
Forcing time synchronization
a)
To force time synchronization, press and hold the
forced reception button (E) for about 3 seconds.
Then, the device will attempt to synchronize with
the master clock.
b) When synchronization succeeds, the hands will
start to move towards the correct time reading. If
synchronization fails, the hands will move to the
time previously indicated.
Reset
To reset the time reading, press the reset button (C). All
hands will move to 12:00 position and the memory will
be wiped out. The clock will attempt to synchronize with
the master clock.
3.3. CLEANING AND MAINTENANCE
a) Use only non-corrosive cleaners to clean the
surface.
b)
After cleaning the device, all parts should be dried
completely before using it again.
c) Store the unit in a dry, cool place, free from
moisture and direct exposure to sunlight.
d) Do not spray the device with a water jet or
submerge it in water.
e)
The device must be regularly inspected to check
its technical efficiency and spot any damage.
f)
Use a soft cloth for cleaning.
g)
Do not leave the battery in the device if it will not
be used for a longer period of time.
SAFE REMOVAL OF BATTERIES
AND RECHARGEABLE BATTERIES
1.5V AA batteries are installed in the devices. Remove
used batteries from the device using the same procedure
by which you installed them. Recycle batteries with the
appropriate organisation or company.
DISPOSING OF USED DEVICES
Do not dispose of this device in municipal waste
systems. Hand it over to an electric and electrical device
recycling and collection point. Check the symbol on
the product, instruction manual and packaging. The
plastics used to construct the device can be recycled
in accordance with their markings. By choosing to
recycle you are making a significant contribution to the
protection of our environment. Contact local authorities
for information on your local recycling facility.
A
B
C
E
D
E
A
B
D
C
UNI_CLOCK_06/ UNI_CLOCK _07/ UNI_CLOCK _09
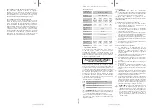
DO NOT USE THE DEVICE UNLESS YOU HAVE
THOROUGHLY READ AND UNDERSTOOD THIS
USER MANUAL.
To increase the product life of the device and to ensure
trouble-free operation, use it in accordance with this
user manual and regularly perform maintenance tasks.
The technical data and specifications in this user manual
are up to date. The manufacturer reserves the right to
make changes associated with quality improvement.
The device is designed to reduce noise emission risks to
a minimum, taking into account technological progress
and noise reduction opportunities.
LEGEND
1. GENERAL DESCRIPTION
The user manual is designed to assist in the safe and
trouble-free use of the device. The product is designed
and manufactured in accordance with strict technical
guidelines, using state-of-the-art technologies and
components. Additionally, it is produced in compliance
with the most stringent quality standards.
The product satisfies the relevant safety
standards.
Read instructions before use.
The product must be recycled.
PLEASE NOTE!
Drawings in this manual are for
illustration purposes only and in some details may
differ from the actual product.
The original operation manual is written in German.
Other language versions are translations from the
German.
2. USAGE SAFETY
ATTENTION!
Read all safety warnings and all
instructions. Failure to follow the warnings and
instructions may result in serious injury or even
death.
ATTENTION!
Despite the safe design of the device
and its protective features, and despite the use of
additional elements protecting the operator, there
is still a slight risk of accident or injury when using
the device. Stay alert and use common sense when
using the device.
3.1. DEVICE DESCRIPTION
UNI_CLOCK_04
EN
EN


