background image

2.2 Door Hinging

If you need to change the door hinging to facilitate access
into the Refrigerator proceed as follows;

1 - Remove upper hinge cover (E1).

2 - Remove upper hinge (E2).

3 - Remove freezer door (E12).

4 - Remove middle hinge (E3).

5 - Remove refrigerator door (E13).

6 - Remove console cover (E11).

7 - Remove console (E5).

Attention: before removing the console, loosen the flame
display/visor (E7).

8 - Remove lower hinge (E4).

9 - Remove the hinges slot caps - upper, middle and 

lower - from the left side and place them in the 
respective right side slots. 

10 - Fix the lower hinge (E4) on the left side of the

product.

11 - Fix the console (E5). 

Attention: do not forget to replace the display/visor (E7).

12 - Using a sharp knife, cut out the upper left corner of

the console cover to settle the lower hinge (see
cutting instructions in Fig. E).

13 - Fit the refrigerator door (E13) on the lower hinge (E4).

14 - Fit the middle hinge (E3) together with the refrigerator

door. 

15 - Fit the freezer door onto middle hinge. 

16 - Close the freezer door and check for alignment.

17 - Fix the upper hinge. 

Note: make sure the gasket sealing is Ok.
If necessary, adjust hinge adjustment.

18 - Fix upper hinge cap. 

2.3 Installing the Refrigerator

This Refrigerator must be installed in accordance with
local codes or installation must comply with:

The National Fuel Gas Code, ANS Z223.1 in the USA.

Installation Code for Propane Burning Appliances and

Equipment CAN/CGA B149 in Canada.

This Refrigerator is only designed for domestic use.

It is your total responsibility if you intend to use it in a
trailer.

02

To ensure uninterrupted operation, we recommend that
the gas supply system be fed from two gas cylinders, with
an automatic switchover device. The specified fuel is
propane and the supply pressure must be 11 inches
(280mm) water column. The Refrigerator must be
connected with copper or other acceptable tubing of
sufficient diameter to avoid a pressure drop of more than
one inch (25 mm) water gauge up to the Refrigerator inlet,
even with other gas-operated appliances (such as water
heaters, and stoves) operating from the same system.

The appliance and its individual shut off valve must be

disconnected from the gas supply piping system during
any pressure testing of that system at test pressures in
excess of 1/2 psig (3,5 kPa).

The appliance must be isolated from the gas supply

piping system by closing its individual manual shut off
valve during any pressure testing of the gas supply
piping system at test pressures equal to or less than 1/2
psig (3.5 kPa).

To install the Refrigerator:

If necessary, install a metal or wood panel over the floor

as recommended in item 2.1. (b).

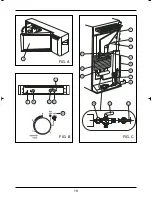
Disassemble the burner box (C8).

Place the Refrigerator in its definite position. Turn the

bolts until the Refrigerator is level. Remove it again from
its location.

Connect the gas supply to the manual shut off valve

(C12). Use a certified flexible type metal connector of
sufficient length.

Connect a pressure gauge at the plug (F5) ot the

controls.

Now check the operation:

Operate the Refrigerator according to the instructions

(E6) and allow it to work for at least 30 minutes.

During this period, check the connections for leaks, from

the gas inlet to the orifice spud, using a detergent and
water solution.

Check the reading of the pressure gauge. With no other

gas appliance operating it should not pass 11” water
gauge. With other appliances operating it should not fall
below 10”.

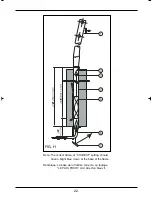
With a mirror (H7) beneath the flame tube (H4), make

sure that the flame color is blue. It should not reach the
tip of the baffle (H5), which will normally be slightly
aglow.

Turn off the gas at the control (B3) leaving the manual

shut off valve (C12) open. Replace the plug (F5).

Replace the burner box (C8).

Summary of Contents for UGP 7.8

Page 1: ...2245 Wyecroft Road 5 Oakville Ontario Canada L6L 5L7 Ph 905 827 6157 Toll Free 1 877 427 2266 Fax 905 827 2027 www PropaneFridge com ...

Page 2: ......

Page 3: ... lift the Refrigerator to its normal position Clean the Refrigerator with a damp cloth and then wipe it dry with a clean cloth If need be use a mild detergent but do not use cleaning compounds or other abrasive material Fit two ordinary 1 5 volt size D batteries in the lighting assembly fig A Check its functioning the light should go out before the door is completely closed 2 1 Where to locate you...

Page 4: ... 11 inches 280mm water column The Refrigerator must be connected with copper or other acceptable tubing of sufficient diameter to avoid a pressure drop of more than one inch 25 mm water gauge up to the Refrigerator inlet even with other gas operated appliances such as water heaters and stoves operating from the same system The appliance and its individual shut off valve must be disconnected from t...

Page 5: ...ezo igniter B5 a few times or until the flame lights The sparks can be seen through the light conductor B1 which will light up as soon as the burner goes on If there are no sparks see Trouble shooting Hold B3 depressed for another five seconds release while checking that the flame stays on If the flame goes out repeat the procedure or consult Trouble shooting Set the thermostat knob to the defrost...

Page 6: ...ature outside the Refrigerator When at room temperature the food should be placed in the main compartment of the Refrigerator to precool for a few hours Later on preferably in the evening place the food in contact with the bottom of the upper compartment 5 5 Defrosting During operation ice will begin to collect on the fins of the evaporator D1 to a point where it will reduce the efficiency of the ...

Page 7: ...on Before going into the subjects of maintenance and troubleshooting we would like to provide a brief description on the functional units of the gas equipment which will make for a better understanding of these items 6 1 The gas equipment Fig C The gas connector C13 is connected to a manual shut off valve C12 normally to be left open handle in alignment with the gas flow The valve C12 is connected...

Page 8: ...0 seconds Let the Refrigerator operate for at least 30 minutes during this time check if there is any gas leakage Check each connection from the source to the gas injector using a mixture of detergent and water Check that the flame does not touch the heat deflector the curved metal part located inside the heating pipe It s normally incandescent Check the flame comparing it with that in illustratio...

Page 9: ... them or adjust the door hinges 7 2 Cleaning the parts at the rear of the Refrigerator Move the Refrigerator away from its permanent position making sure the flexible connector does not kink Dust that gathers behind the Refrigerator may clog the burner Dust building up on the absorber C10 and condenser C1 of the cooling unit can lessen the heat transfer of these parts impairing performance Therefo...

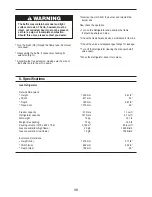
Page 10: ...r 1270 mm 50 Freezer capacity 31 liters 1 1 cu ft Refrigerator capacity 187 liters 6 7 cu ft Net weight 73 kg 161 lb Weight plus packing 75 kg 165 lb Packing volume 1470 x 652 x 762 0 730 m3 25 8 cu ft Gas consumption high flame 33 g h 1600 Btu h Gas consumption low flame 14 g h 700 Btu h Enclosure dimensions Height min 1470 mm 57 7 8 Width min 652 mm 25 2 3 Depth max 762 mm 30 Remove the cloth fr...

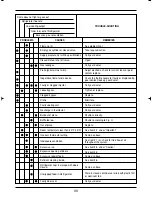
Page 11: ...e ice Excessive opening of doors Excessive load of food Deficient cleaning inside Refrigerator kept in storage with doors closed Unwrapped food in Refrigerator Faulty door seal See problem No 1 Take required action Call your dealer Open Call your dealer Adjust electrode check for current leaks or poor contact replace Check the thermocouple for faulty or displaced tip poor contact look up your deal...

Page 12: ...19 6 1 5 2 3 4 FIG A FIG B FIG C ...

Page 13: ...20 FIG D FIG G FIG F ...

Page 14: ...21 Cut out in order accommodate the lower hinge A découper pour la charnière inférieure FIG E ...

Page 15: ...22 Note The correct flame at COLDEST setting should have a bright blue crown at the base of the flame Remarque La base de la flamme correcte au réglage LE PLUS FROID doit être d un bleu vif FIG H ...

Page 16: ...24 ...

Page 17: ...Toll Free 1 877 427 2266 Fax 905 827 2027 www PropaneFridge com 326061824 17 11 2006 Manufactured by Whirlpool S A Mail Caixa Postal 267 89219 900 Joinville SC BRAZIL Head Office Estrada Dona Francisca 7200 Joinville SC Telephone 55 47 3441 4141 C N P J 59 105 999 0039 59 Made in BRAZIL ...

Reviews: