


UNIQUE
20/24/30 MODELS
OFF GRID GAS STOVE – LPG & NG CONVERTIBLE
Installation and Owners Manual
Read and Save These Instructions
The installation of the appliance must conform with local codes ANSI
Z21.1-2005, in the absence of local national Fuel Gas Code, ANSI Z233.1, and
in Canada B149.2 Propane Storage and Handling Code
Important
TO THE OWNER OF THE RANGE: Retain this owner’s manual for future reference.
TO THE INSTALLER: Leave this owner’s manual with the range.
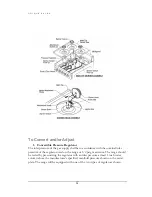
How to Obtain Service and/or Parts
When your range does not operate in accordance with the instructions in the manual,
you should contact the dealer in the immediate vicinity for service. Or, the purchaser
may contact the service organization noted on the warranty
This manual contains information for:
Important Safeguards
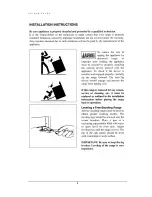
Installation
Use and Care
Certain ranges come equipped with special features. Determine from a study of
your range which of the instructions given in this booklet pertain to your range.
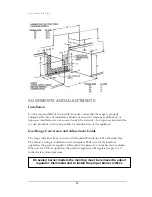
This booklet gives valuable instructions covering the installation, adjustment
and use of your range.
2009-04-08
Summary of Contents for 20
Page 12: ...U N I Q U E 2 4 3 0 9 ...
Page 33: ...U N I Q U E 2 4 3 0 30 ...
Page 34: ...U N I Q U E 2 4 3 0 31 ...


