background image

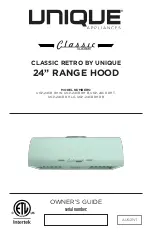
CLASSIC RETRO BY UNIQUE 

24” RANGE HOOD

OWNER’S GUIDE

serial number:

MODEL NUMBERS:


UGP-24CR RH W, UGP-24CR RH B, UGP-24CR RH T,  

UGP-24CR RH LG, UGP-24CR RH RB

AUG21V1

Summary of Contents for CLASSIC RETRO UGP-24CR RH B

Page 1: ...CLASSIC RETRO BY UNIQUE 24 RANGE HOOD OWNER S GUIDE serial number MODEL NUMBERS UGP 24CR RH W UGP 24CR RH B UGP 24CR RH T UGP 24CR RH LG UGP 24CR RH RB AUG21V1 ...

Page 2: ...ARTS INCLUDED 09 PARTS LIST 09 INSTALLATION PROCEDURE 10 OPERATING INSTRUCTIONS 15 TROUBLESHOOTING 15 MAINTENANCE 16 TECHNICAL SPECIFICATIONS 17 WIRING DIAGRAM 17 PARTS DIAGRAM AND LIST 18 WARRANTY 20 APPLIANCE INFORMATION 22 RATING LABEL 22 PRODUCT REGISTRATION 22 CONTACT US 23 ...

Page 3: ...tally activating the power If it is not possible to lock the access panel attach a highly visible label to the electrical panel 3 A qualified person should perform the installation and wiring of the electricity in accordance with all codes and all standards including fire resistance rating 4 When you use hood together with stove please do not close the window and door of the kitchen Because during...

Page 4: ...ult a qualified electrician Do not use an extension cord If the power cord is too short have a qualified electrician install an outlet near the device WARNING TO REDUCE THE RISK OF FIRE OR ELECTRIC SHOCK DO NOT USE THIS HOOD WITH EXTERNAL SOLID STATE SPEED CONTROLLERS WARNING TO REDUCE THE RISK OF FIRE USE ONLY METAL DUCTS Install this hood in accordance with all the requirements mentioned WARNING...

Page 5: ... an extinguisher only if You are sure to have a Class ABC extinguisher that you know how to use The fire is small and confined to the area where it was formed Firefighters were called You can fight against the fire with an exit behind you OPERATIVE MODE Always leave safety grills and filers in place Without the presence of these blowers could catch hair fingers or clothing The manufacturer is not ...

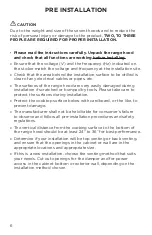
Page 6: ...ion if scratched or bumped by tools Please take care to protect the surfaces during installation Protect the cooktop surface below with cardboard or the like to prevent damage The manufacturer shall not be held liable for consumer s failure to observe and follow all pre installation procedures and safety regulations The vertical distance from the cooking surface to the bottom of the range hood sho...

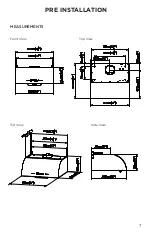
Page 7: ...7 PRE INSTALLATION Side View 3 4 View Front View Top View MEASUREMENTS ...

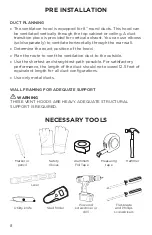
Page 8: ...the route to vent the ventilation duct to the outside Use the shortest and straightest path possible For satisfactory performance the length of the duct should not exceed 12 5 feet of equivalent length for all duct configurations Use only metal ducts WALL FRAMING FOR ADEQUATE SUPPORT WARNING THESE VENT HOODS ARE HEAVY ADEQUATE STRUCTURAL SUPPORT IS REQUIRED Aluminum Foil Tape Hammer NECESSARY TOOL...

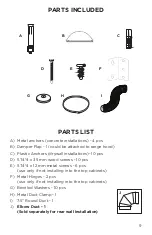
Page 9: ...stallations 10 pcs D ST4 4 x 35 mm wood screws 10 pcs E ST4 4 x 12 mm metal screws 6 pcs use only if not installing into the top cabinets F Metal Hinges 2 pcs use only if not installing into the top cabinets G Beveled Washers 10 pcs H Metal Duct Clamp 1 I 7 5 Round Duct 1 J Elbow Duct 1 Sold separately for rear wall installation A B C G H I F D E J ...

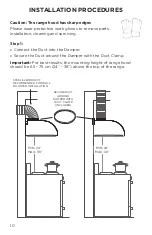
Page 10: ...tallation cleaning and servicing Step 1 Connect the Duct into the Damper Secure the Duct around the Damper with the Duct Clamp Important For best results the mounting height of range hood should be 65 75 cm 24 36 above the top of the range SECURE DUCT AROUND DAMPER WITH DUCT CLAMP INCLUDED STEEL ELBOW DUCT RECOMMENDED FOR WALL MOUNTED INSTALLATION ...

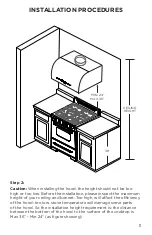
Page 11: ...inspect the maximum height of your ceiling and bonnet Too high will affect the efficiency of the hood too low stove temperature will damage some parts of the hood So the installation height requirement is the distance between the bottom of the hood to the surface of the cooktop is Max 36 Min 24 as figure showing 36 MIN 24 MAX 36 CEILING HEIGHT ...

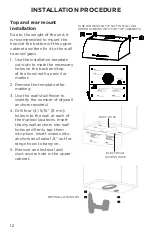
Page 12: ...E INTERSECTION OF THE WALL AND BOTTOM OF THE CABINET 2 TAPE OR HOLD IN PLACE 3 TRACE CUTOUTS 4 REMOVE THE TEMPLATE DRILL AND CUT ÉTAPES 1 PLIEZ SUR LA LIGNE POINTILLÉ ET APPUYEZ LA À L INTERSECTION DU MUR ET DU BAS DE L ARMOIRE 2 RUBAN OU TENIR EN PLACE 3 DÉCOUPES DE TRACÉ LE GABARIT 4 ENLEVEZ LE GABARIT PERÇER ET COUPER USE THIS SECTION ON THE WALL REAR UTILISEZ CETTE SECTION SUR LE MUR ARRIÈRE U...

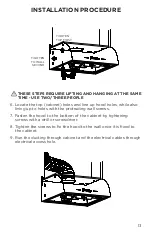
Page 13: ... also lining up to holes with the protruding wall screws 7 Fasten the hood to the bottom of the cabinet by tightening screws with a drill or screwdriver 8 Tighten the screws to fix the hood to the wall once it is fixed to the cabinet 9 Run the ducting through cabinet and the electrical cables through electrical access hole TIGHTEN TOP FIRST TIGHTEN TO WALL SECOND ...

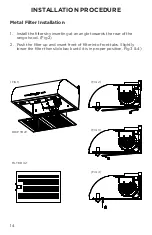
Page 14: ...he filters by inserting at an angle towards the rear of the range hood Fig 2 2 Push the filter up and insert front of filter into front tabs Slightly lower the filter then slide back until it is in proper position Fig 3 4 DRIP TRAY FILTER X2 FIG 1 FIG 2 FIG 3 FIG 4 ...

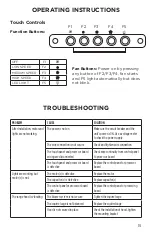
Page 15: ...heck and tighten wire connection The touch panel and processor board wiring are disconnected Check wire continuity from control panel to processor board The touch panel and processor board is defective Replace the control panel or processor board Lights are working but motor s is not The motor s is defective Replace the motor The capacitor s is defective Replace capacitor s The control panel or pr...

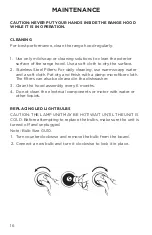
Page 16: ...nd a soft cloth Pat dry and finish with a damp microfiber cloth The filters can also be cleaned in the dishwasher 3 Clean the hood assembly every 6 months 4 Do not clean the electrical components or motor with water or other liquids REPLACING LED LIGHT BULBS CAUTION THE LAMP UNIT MAY BE HOT WAIT UNTIL THE UNIT IS COLD Before attempting to replace the bulbs make sure the unit is turned off and unpl...

Page 17: ...ED POWER 500 CFM CONTROLS 3 speed power control NOISE LEVEL Below 65 dbA LIGHTS 1 5W LED Lamps x 2 CLEANING Dishwasher safe stainless steel baffle filters DIMENSIONS 10 H x 24 25 W x 22 D WEIGHT UNBOXED 31 lbs 14 kg POWER RATING 110V 60Hz CERTIFICATION ETL Certified Made in China ...

Page 18: ...18 PARTS DIAGRAM AND LIST 20 19 17 16 15 18 1 2 3 4 6 7 8 9 10 12 13 14 ...

Page 19: ...3 LG Control Panel Summer Mint Green for UGP 24CR RH UGP SNG23 RB Control Panel Robin Egg Blue for UGP 24CR RH UGP SNG23 T Control Panel Turquoise for UGP 24CR RH UGP SNG23 W Control Panel White for UGP 24CR RH UGP SNG23 B Control Panel Black for UGP 24CR RH 12 UGP SNG24 Junction Box for UGP 24CR RH 13 UGP SNG25 Junction Box Base for UGP 24CR RH 14 UGP SNG26 110V 60Hz 270W Electric Motor for UGP 2...

Page 20: ... owner must provide proof of purchase Model and Serial Number to the selling dealer or Unique Appliances This warranty is LIMITED STRICTLY to the terms indicated herein and no other expressed warranties or remedies thereunder shall be binding on Unique Purchaser s Responsibilities The purchaser will be responsible for the costs of any service calls requested to demonstrate or confirm the proper op...

Page 21: ... or low room temperature 5 Use for commercial or industrial purposes ie If the appliance is not installed in a domestic residence 6 Fire water damage theft war riot hostility acts of God such as hurricanes floods etc 7 Service calls resulting in customer education 8 Improper Installation ie Building in of a free standing appliance or using an appliance outdoors that is not approved for outdoor app...

Page 22: ...riel info UniqueAppliances com www UniqueAppliances com 135 50mm CONFORMSTO UL STD 507 CERTIFIEDTO CSA STD C22 2 NO 113 EN CONFORMITÉ AVEC UL STD 507 CERTIFIÉS CSA STD C22 2 NO 113 Rated Power 500 CFM RatedVoltage 110 120V Rated Frequency 60HZ Rated Current 240W Lights 1 5W LED Lamps x 2 Weight 31 lbs 14 kg Noise Level Below 65 dbA Capacité Nominale 500 pi min Tension Nominale 110 120V Fréquence N...

Page 23: ... Website www UniqueAppliances com Email info UniqueAppliances com CONTACT US For general information or questions related to the operation safety or the purchase of your range hood please contact our customer service department Please visit our website for more quality Unique products www UniqueAppliances com ...

Page 24: ... 2021 Unique Appliances Ltd 2245 Wyecroft Road Oakville Ontario Canada L6L 5L7 www uniqueappliances com ...

Reviews: