Step B: Alarm Activation Step C: Removal and Installation
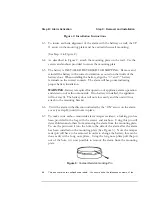
6.3 To insure aesthetic alignment of the alarm with the hallway or wall, the UP
arrow on the mounting plate must be vertical when wall mounting:
(See Step A in Figure 2 )
6.4 As described in Figure 2, attach the mounting plate on the wall. Use the
screws and anchors provided to secure the mounting plate.
6.5 The battery is INSTALLED REVERSED FOR SHIPPING. Remove and
reinstall the battery in the correct orientation as noted on the inside of the
battery door. When installing the battery, align the “+” and “-“ battery
terminals on the correct contacts. The alarm will beep once indicating
proper battery installation.
WARNING
: Battery is required for operation of appliance, alarm operation
and detection of carbon monoxide. If no battery is installed, the appliance
will not stay lit. The battery door will not close easily and the unit will not
attach to the mounting bracket.
6.6 Twist the alarm in the direction indicated by the “ON” arrow on the alarm
cover (see step D) until it locks in place.
6.7 To make your carbon monoxide alarm tamper resistant, a locking pin has
been provided in the bag with the screws and anchors. Using this pin will
deter children and others from removing the alarm from the mounting plate.
To use the pin insert it into the hole in the side of the alarm after the alarm
has been installed on the mounting plate (See Figure 3). Note the tamper
resist pin will have to be removed in order to change the battery; this can be
done easily with a long nose pliers. Using the long nose pliers pull the pin
out of the hole, it is now possible to remove the alarm from the mounting
plate.
Figure 3: Tamper Resistant Locking Pin
6.8
This box contains two self-adhesive labels. You should write the telephone numbers of the
Figure 2: Installation Instructions
Summary of Contents for LGP 18
Page 39: ...Parts Diagram and List Chapter 9 ...
Page 40: ......
Page 41: ......
Page 42: ...Burner Train Assembly ...

