background image


M A N U F A C T U R E D   A N D   C E R T I F I E D   B Y  

Unique Gas Products Ltd 

2245 Wyecroft Road 

Oakville, Ontario Canada L6L 5L7 

Ph: 905-827-6154  Toll Free: 1-877-427-2266  Fax: 905-827-2027 

www.UniqueOffGrid.com 

E-mail: info@uniqueoffgrid.com 


P

P

P

e

e

e

r

r

r

s

s

s

o

o

o

n

n

n

a

a

a

l

l

l


S

S

S

e

e

e

r

r

r

v

v

v

i

i

i

c

c

c

e

e

e

&

&

&

K

K

K

n

n

n

o

o

o

w

w

w

l

l

l

e

e

e

d

d

d

g

g

g

e

e

e

m

m

m

a

a

a

k

k

k

e

e

e

s

s

s

u

u

u

s

s

s

U

U

U

n

n

n

i

i

i

q

q

q

u

u

u

e

e

e


Summary of Contents for UGP 13

Page 1: ...Propane Refrigerator OWNER S GUIDE serial number UGP 13 April 2018 379 L 13 4 cu ft ...

Page 2: ...Installation and Owner s Manual April 2018 The installation of the appliance must conform with local codes or in the absence of local codes to the national Fuel Gas Code ANSI Z233 1 and in Canada B149 2 Propane Storage and Handling Code ...

Page 3: ... sound and the refrigerator will be shut off WARNING Actuation of this device indicates the presence of unsafe levels of carbon monoxide CO which can KILL YOU If alarm signal sounds a Immediately move to fresh air outdoors or by an open door or window Check that all persons are accounted for Do not re enter the premises or move away from the open door window until the emergency services responders...

Page 4: ... Canada L6L 5L7 Ph 905 827 6154 Toll Free 1 877 427 2266 Fax 905 827 2027 www UniqueOffGrid com E mail info uniqueoffgrid com P P Pe e er r rs s so o on n na a al ll S S Se e er r rv v vi iic c ce e e K K Kn n no o ow w wl lle e ed d dg g ge e e m m ma a ak k ke e es s s u u us s s U U Un n ni iiq q qu u ue e e ...

Page 5: ...ng Instructions 3 How To Use The Refrigerator 3 Maintenance Service 4 Troubleshooting Suggested Spares 5 Door Removal and Reversal 6 Temperature Controls Food Storage and Cleaning 7 Parts Warranty 8 Carbon Monoxide Instructions CM Model Instructions are located inside CO detector packaging that comes with your fridge ...

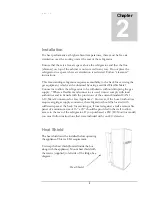
Page 6: ...ducts We hope you will consider us for future purchases PLEASE READ AND SAVE THESE INSTRUCTIONS This manual provides specific operating instructions for your model Use your refrigerator only as instructed in this manual These instructions are not meant to cover every possible condition and situation that may occur Common sense and caution must be practiced when installing operating and maintaining...

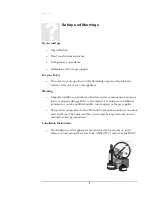
Page 7: ...ion service or maintenance can cause injury or property damage Refer to this manual For assistance or additional information consult a qualified installer service agency or the gas supplier This product can produce Carbon Monoxide Carbon Monoxide has no odour and can kill you The burner and flue system must be kept clean See owner s manual for cleaning instructions Installation Instructions The in...

Page 8: ...ere a flexible metal connector is used it must comply with local authorities and in Canada with the provisions of the current Standard CAN 1 6 10 Metal Connectors for Gas Appliances However if the Local Authorities require a rigid gas supply connector the refrigerator should be located with sufficient space at the back for servicing or if located against a wall a removable panel of a minimum size ...

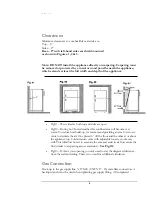
Page 9: ...ery warm To reduce heat build up we recommend providing an area for two air vents to circulate the air One placed 6 off the floor and the other at or above the appliance top Cold air return vents with adjustable louvers works very well This will allow hot air to evacuate the area and assist in air flow across the fins similar to air passing across a radiator See Fig 4 Fig 3 If this is your opening...

Page 10: ...e the refrigerator and any other high BTU appliances on your line are turned on when checking the gas pressure The appliance and its individual shut off valve must be disconnected from the gas supply piping system during any pressure testing of that system at pressures in excess of psig In case detailed instructions on the installation and connection of the gas supply are required contact your dea...

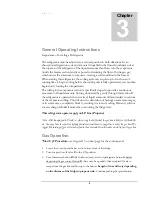
Page 11: ... the evaporator tubing This will slow the circulation of hydrogen and ammonia gas or in severe cases completely block it resulting in a loss of cooling Warranty will not cover recharge rebuild if caused by not running the fridge level This refrigerator operates only on LP Gas Propane Note After changing an LP tank or after a long shut off period the gas line is likely to be filled with air You may...

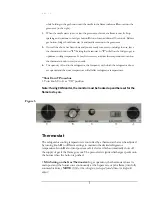
Page 12: ...ency with which the refrigerator doors are opened and the room temperature will all affect refrigerator temperatures Shut Down Procedure 1 Turn knob C to Gas Off position Note If using CO Monitor the monitor must be hooked up and be reset for the flame to stay on Thermostat The refrigerator cooling temperature is controlled by a thermostat that can be adjusted by turning knob B to different settin...

Page 13: ...pper door shelves This should be considered when placing different types of food in the refrigerator FROZEN FOOD STORAGE COMPARTMENT Quick freeze soft fruits and ice cream should be placed in the coldest part of the compartment which is at the bottom of the aluminum liner Frozen vegetables may be stored in any part of the compartment This compartment is not designed for deep or quick freezing of f...

Page 14: ...lt up on the cooling fins creating a lot of defrost water Beware your water reservoir may overflow we suggest you inspect reservoir before after cycle FREEZER SECTION This area must be wiped down with cloths to remove water after defrosting there is no drain for this compartment Note When all frost has melted in the freezer compartment interior of the refrigerator it should be wiped up with a clea...

Page 15: ...atteries operate the interior light the battery compartment is located on the exterior back of the fridge Shut Down Procedure A Turn gas valve knob C to the off position B If the refrigerator will not be in operation for a period of weeks it should be emptied defrosted cleaned and the doors left open The ice tray should also be dried and kept outside the cabinet also turn off gas at gas control th...

Page 16: ... the gas supply Disconnect the gas line at the rear of the refrigerator Always use a backup wrench when loosening and tightening this connection Cap the gas supply line and remove refrigerator Replacement is the reverse of removal Check all connections for gas leaks Refer to Chapter 2 Installation To keep your refrigerator operating effectively and safely periodic inspection and cleaning of severa...

Page 17: ...t the flue baffle it should be clean and free of soot Any soot formation indicates improper functioning of the burner The flue and burner both require cleaning in the following manner o Remove cover from the burner housing o Disconnect the wire from the spark electrode o Remove the burner o Remove the wire and flue baffle from the top of flue tube Clean the flue from the top using a flue brush be ...

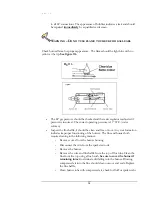
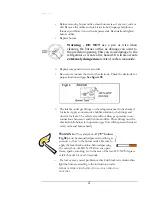
Page 18: ...gas fittings on the refrigerator need to be checked for leaks Apply a noncorrosive bubble solution to the fittings and observe for leaks The safety valve will not allow gas pressure to any connections between it and the burner orifice These fittings must be checked while burner is in operation gas flow will be present between safety valve and burner head WARNING The safety shut off C button Fig 4 ...

Page 19: ...nserted properly in flue tube 6 Improperly set thermostat See paragraph on the thermostat In hot weather or heavy use the setting should be closer to Max than usual 7 Burner dirty Clean See Section MAINTENANCE SERVICE CHAPTER 4 PERIODIC MAINTENANCE 8 LP gas pressure low at the burner Regulator pressure must not drop below 11 inches W C water column on high fire CHAPTER 2 GAS CONNECTION 9 Burner no...

Page 20: ... which are available Burner orifice Burner Electrode Thermocouple Safety valve Thermostat Piezo Igniter push button Baffle Contact your dealer or an authorized service center for parts and repairs as needed Quote Model Serial See CSA rating serial plate on inside left wall ...

Page 21: ...verse the opening direction please follow these instructions Remove the hinge cover on the right top of the cabinet Remove the 3 bolts that hold the top hinge in place using a ratchet tool with an 8mm socket or a Philips screwdriver Lift the top hinge straight up to free the pin from the socket on the top of the door Remove the hinge pin bushing from the top right side of the freezer door and move...

Page 22: ...nge pin and place on a padded surface to prevent scratching Remove the hinge pin bushing from the top of the fridge door same as you did with the freezer door and move it over to the left side Pop off the two plugs and one cap that are located on the left side of the fridge cabinet The cap covers one screw that will be moved over to the right hand side then place that cap over the screw take the t...

Page 23: ...tool with an 8 mm socket or a Philips screwdriver Pop out the four caps that cover the hinge holes from the bottom left side of the fridge Move these over to the right where you just removed the bottom hinge from Remove cap and plugs Remove screw and transfer to right hand side of cabinet Remove four bolts ...

Page 24: ...e of the cabinet with the four bolts straighten and tighten all four bolts Take the hinge clips and metal securing clip provided and install them to the bottom of the fridge and freezer door as shown in the image below Mount hinge then tighten all bolts Hinge bung ...

Page 25: ...re proper alignment The middle hinge is universal and can be inverted to be used on the opposite side Tighten Now take the freezer door and place on top of the middle hinge pin close the door the magnet in the door gasket will hold it in place Find the top hinge and place it on top of the freezer door align the hinge with the 3 holes at the top of the cabinet Begin to secure all 3 bolts leaving th...

Page 26: ...e same spacing from left to right Once you have everything aligned tighten the 3 top bolts then proceed to tighten the middle hinge screws Replace the top hinge cover one screw Should the gasket not adhere to the casing of the appliance perfectly it might have to be heated by means of a hair dryer or heat gun this will allow the gasket to expand and meet the cabinet where the gaskets magnet will h...

Page 27: ...allowing the temperature to stabilize For colder interior temperatures turn the knob clockwise For warmer interior temperatures turn the knob counter clockwise Adjusting the refrigerator control will change temperatures in both compartments Remember there is no fan to circulate the air in the refrigerator and freezer compartments as in an electric fridge For good circulation do not block the inter...

Page 28: ...GETABLES Storage in the crisper drawers traps moisture to help preserve the fruit and vegetable quality for longer time periods MEAT Raw meat and poultry should be wrapped securely so leakage and contamination of other foods or surfaces does not occur FROZEN FOOD STORAGE The freezer compartment should be kept at 8 6 F 13 C at a 77 F 25 C room ambient A freezer operates most efficiently when it is ...

Page 29: ...utions on any surface Do not wash any removable parts in a dishwasher When moving the refrigerator pull straight out if required You must turn gas off at the source or have adequate flex line to move the refrigerator Do not shift the refrigerator from side to side as this may tear or gouge the floor covering and damage the gas supply line Damp objects stick to cold metal surfaces Do not touch refr...

Page 30: ...U G P 1 3 25 Parts Diagram and List Interior of Fridge Chapter 8 ...

Page 31: ...U G P 1 3 26 Burner Train Assembly 32 33 34 ...

Page 32: ... 08 ELECTRODE WITH WIRE 9 UGP13 09 THERMOCOUPLE LEAD 10 UGP13 10 3 8 GAS INLET FITTING 11 UGP13 11 1 INLET GAS TUBE 12 UGP13 12 1 INLET FITTING 13 UGP13 13 1 THERMOSTAT 14 UGP13 40 ON OFF VALVE 15 UGP13 15 1 THERMOSTAT KNOB 16 UGP13 39 FLAME INDICATOR 17 UGP13 17 SINGLE PRONG INTERRUPTER BODY NOT REQUIRED FOR CO MONITORED MODELS 17B UGP13 17B GAS VALVE 18 UGP13 43 1 HINGE COVER RIGHT 19 UGP13 44 1...

Page 33: ...ERIOR LIGHT 29 UGP13 54 1 MIDDLE HINGE 30 UGP UNV PREMIUM CHIMNEY BRUSH FOR ALL PRODUCTS 31 UGP13 55 FLUE BAFFLE 32 QMA 9RVSSO C CO DETECTOR 9RV SSO C 33 QMP INTERRUPTER BLOCK INTERRUPTER BLOCK FOR CO MONITORED FRIDGES 34 QMP MOSFET C MOSFET ASSY 35 UGP13 66 TOP HINGE RIGHT 35 UGP13 67 TOP HINGE LEFT 37 UGP13 68 BOTTOM HINGE RIGHT 37 UGP13 69 BOTTOM HINGE LEFT 38 UGP13 70 HINGE COVER LEFT NOT SHOW...

Page 34: ...ique Gas Products Ltd and the Seller labour and transportation charges will be the responsibility of the owner Coils replaced during the initial five year period will be warranted only for the remaining portion The Seller will have no obligation under this warranty with respect to conditions unrelated to the material or workmanship of this refrigerator Such unrelated conditions include without lim...

Page 35: ...stallation of the Product or any other incidental costs of removal and or installation of the Product or any other incidental costs which may arise as a result of any defect in material or workmanship and e upon discovery of defect Buyer shall immediately cease use of and notify Unique UNIQUE MAKES NO OTHER WARRANTIES EXPRESS OR IMPLIED EXCEPT AS REQUIRED BY LAW AND IN NO CASE FOR A DURATION LONGE...

Page 36: ... 2018 Unique Gas Products Ltd 2245 Wyecroft Road 5 Oakville Ontario Canada L6L 5L7 www uniqueoffgrid com ...

Reviews: