283
You need to configure the B/W list before using the B/W alarm linkage. For details, see 3.7.7.2 B/W List.
⚫
Regular: System activates alarm when any car plate is detected.
⚫
Blacklist: System activates alarm only when plates in the black list is detected.
⚫
Whitelist: System activates alarm only when plates in the white list is detected.
Step 5 Configure the parameters.
Step 6 Click OK to save the configuration.
4.11.3.7.2
B/W List
It is to set the blacklist and the whitelist. It includes adding, deleting, importing and exporting blacklist and
whitelist.
After setting the blacklist and whitelist, in the plate snapshot list on the preview interface, the blacklist
plate number is red, the whitelist plate number is green and the regular plate number is white.
Adding B/W List
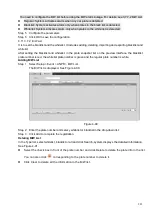
Step 1 Select Setup > Event > ANPR > B/W List.
The B/W list is diaplayed. See Figure 4-90.
Figure 4-90
Step 2 Enter the plate number and selecy whitelist or blacklist in the drop-down list.
Step 3 Click Add to complete the registration.
Deleting B/W List
In the Type list, select whitelist, blacklist or all and click Search, system displays the detailed information.
⚫
Select the check box in front of the plate number and click Delete to delete the plate info in the list.
You can also click
corresponding to the plate number to delete it.
⚫
Click Clear to delete all the information in the B/W list.
Summary of Contents for EmPower NVR
Page 1: ...EmPower NVR User s Manual V4 4 3...
Page 36: ...23 Figure 3 16 Step 2 Click device display edit interface See Figure 3 17...
Page 97: ...84 Figure 3 91 Figure 3 92...
Page 120: ...107 Figure 3 110 Figure 3 111 Figure 3 112...
Page 131: ...118 Figure 3 123 Figure 3 124...
Page 133: ...120 Figure 3 126 Click draw button to draw the zone See Figure 3 127...
Page 137: ...124 Figure 3 130 Click Draw button to draw a zone See Figure 3 131 Figure 3 131...
Page 142: ...129 Figure 3 136 Click draw button to draw the zone See Figure 3 137...
Page 155: ...142 Figure 3 149 Figure 3 150...
Page 156: ...143 Figure 3 151 Figure 3 152...
Page 174: ...161 Figure 3 172 Figure 3 173...
Page 277: ...264 Figure 4 61 Figure 4 62 Figure 4 63...
Page 303: ...290 Figure 4 101 Figure 4 102...
Page 327: ...314 Figure 4 136 Note For admin you can change the email information See Figure 4 137...

