background image


1.


SBALLAGGIO E INSTALLAZIONE 


Verificate  che  l’imballo  sia  integro  e  che  l’apparecchio  non  abbia  subito 

danni evidenti durante il trasporto. Nel caso doveste riscontrare anomalie, 

vi  raccomandiamo  di  consultare  il  vostro  Rivenditore  prima  di  mettere  in 

funzione l’unità. 

Rimuovete con cura il lettore CD e tutti gli accessori dall’imballo.  


IMPORTANTE ! 

Una volta che l’apparecchio è stato tolto dall’imballo, vi consigliamo di  

attendere  alcune  ore  prima  di  effettuarne  la  connessione  alla  rete 

elettrica  per  evitare  che  la  presenza  eventuale  di  condensa  possa 

provocare danni all’ apparecchio. 

Tale  condensa  potrebbe  formarsi  anche  spostando  l’unità  da  un 

ambiente freddo ad uno caldo: anche in questo caso occorre attendere 

alcune  ore  in  modo  che  l’apparecchio  possa  adattarsi  alla  nuova 

temperatura prima di metterlo in funzione. 


Conservate l’imballo intatto: vi servirà nel caso in cui doveste riutilizzarlo, 

e contribuirete così alla tutela dell'ambiente. 


L’

Unico CDPrimo

 deve sempre essere sistemato in un luogo sicuro, fuori 

dalla portata dei bambini.  

E necessario lasciare uno spazio sufficiente sopra ed ai lati del dispositivo 

al fine di assicurargli un’adeguata ventilazione.  

Vi raccomandiamo anche di prevedere lo spazio necessario a consentire ai 

cavi di connessione di curvare senza forzature, e sconsigliamo vivamente di 

posizionare  l’

Unico  CDPrimo

  direttamente  sopra  un  amplificatore  di 

potenza o, più in generale, in prossimità di sorgenti di calore.


2.


COLLEGAMENTO ALLA RETE 


Prima  di  accendere  l’apparecchio,  controllate  che  la  tensione  di 

alimentazione indicata sul retro corrisponda a quella locale di rete. 


ATTENZIONE! Non collegare mai l’

Unico CDPrimo

 ad una tensione di 

rete diversa da quella indicata! 


I fusibili di rete si trovano nel portafusibile incorporato nella presa IEC. Il 

loro valore corretto è indicato sul retro dell’apparecchio e tra le specifiche 

tecniche riportate alla fine di questo manuale. 

Sostituire i fusibili sempre con altri dello stesso tipo e valore! 

Summary of Contents for Unico CD Primo

Page 1: ...HIGH END ELECTRONICS BORN IN ITALY...

Page 2: ...2...

Page 3: ...are pezzi esclusivi di grande valore in cui la tradizionale abilit artigiana si unisce e si integra con un alta tecnologia elettronica Ogni nostro prodotto viene realizzato con materiali e componenti...

Page 4: ...riutilizzarlo e contribuirete cos alla tutela dell ambiente L Unico CDPrimo deve sempre essere sistemato in un luogo sicuro fuori dalla portata dei bambini E necessario lasciare uno spazio sufficiente...

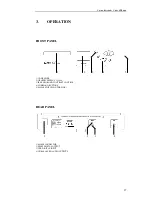
Page 5: ...O INSERIMENTO CD 2 DISPLAY GRAFICO 128x64 3 SENSORE TELECOMANDO E CONTROLLO CONTRASTO 4 PULSANTI DI COMANDO 5 INTERRUTTORE DI ACCENSIONE SUL FIANCO PANNELLO POSTERIORE 1 PRESA DI RETE 2 USCITA DIGITAL...

Page 6: ...zzato accanto alle cifre del conteggio segnala la possibilit di comandare l apertura e la chiusura del cassetto utilizzando il pulsante EJECT da telecomando o da pannello frontale Al termine del conte...

Page 7: ...ione passa alla traccia successiva SCANSIONE VELOCE IN AVANTI Tenendo premuto lo stesso tasto il lettore CD avanza velocemente a partire dalla posizione corrente e la scritta FF appare sul display Al...

Page 8: ...nello frontale o del tasto STOP da telecomando causa l interruzione della riproduzione della traccia corrente il display visualizza la scritta STOP ed il CD si riposiziona all inizio della traccia All...

Page 9: ...e in sequenza a partire da quella selezionata Al termine dell ultima traccia del CD la riproduzione si interrompe e l Unico CDPrimo ritorna nella condizione iniziale ACCESSO DIRETTO ALLE TRACCE L Unic...

Page 10: ...el telecomando seguendo le indicazioni visualizzate di volta in volta Nella prima fase si richiede la selezione dell apparecchio sul quale si desidera intervenire possibile in questo modo operare con...

Page 11: ...le attivare lo spegnimento automatico della retro illuminazione del display quando il lettore in modalit PLAY il passaggio ad altre modalit di funzionamento o alla modalit men riattiva automaticamente...

Page 12: ...le digitale in uno analogico utilizzando il DAC ed il circuito di preamplificazione dell Unico CDPrimo ottenendo in questo modo una scheda audio esterna con prestazione hi fi Dopo aver collegato l ing...

Page 13: ...na nella presa a muro assicurateVi che l interruttore sia nella posizione OFF Sostituire le valvole esclusivamente con altre dello stesso tipo selezionate a coppie L apparecchio utilizza una valvola d...

Page 14: ...nMicro WM8524 Conversione 24bit 96kHz Ingresso Digitale 32 44 1 48kHz USB 1 1 Uscita Digitale 44 1kHz S PDIF Standard AES3 IEC60958 S PDIF and EIAJ CP 1201 Stadio di amplificazione Singolo Triodo Valv...

Page 15: ...lso express our passion for building unique and valuable pieces of audio equipment in which traditional craftsmanship and advanced electronics join together in harmony Our products are built using the...

Page 16: ...ayer should be positioned in a safe place on a plane surface Adequate clearance must be left above and around the CD player to guarantee a correct ventilation We also suggest to leave enough free spac...

Page 17: ...FRONT PANEL 1 CD DRAWER 2 GRAPHIC DISPLAY 128x64 3 IR SENSOR AND CONTRAST CONTROL 4 COMMAND BUTTONS 5 MAINS SWITCH ON THE SIDE REAR PANEL 1 MAINS CONNECTOR 2 SPDIF DIGITAL OUTPUT 3 USB DIGITAL INPUT...

Page 18: ...of the drawer mechanism using the EJECT button on the remote handset or on the front panel After the warm up process the CD eventually loaded is immediately ready to be played LOADING A DISC In case n...

Page 19: ...ge FF is displayed When the button is released the music starts playing from the reached position PREVIOUS TRACK Correspondingly when pushing the PREVIOUS button on the front panel the message PREV is...

Page 20: ...ton for one second or the STOP button on the remote handset causes the Unico CDE to reset to the initial condition in which the message STOP the total number of the tracks and the total time are displ...

Page 21: ...er through the dedicate numeric keypad on the remote handset When the first digit of the number is selected it is displayed followed by the character _ From this moment on the Unico CDPrimo lets about...

Page 22: ...llow the information displayed The first step the user is requested to choose which device intervene on This way even if other devices shares the same interface there s no risk for unwanted interferen...

Page 23: ...ff automatically when the device is in PLAY mode switching to other working mode or to the menu mode will cause the LEDs to turn on again The auto turn off function can be disabled any time following...

Page 24: ...gnal through the Unico CDPrimo DAC and preamplification circuit thus offering the customer a hi fi level external sound card After the connection between UnicoCDPrimo and master device has been establ...

Page 25: ...iod of time we strongly recommend you unplug from the mains at the wall socket Valve replacement should be carried out using only valves of the same type and matched in pairs The Unico CDPrimo uses on...

Page 26: ...fsonMicro WM8524 Conversion 24bit 96kHz Digital Input 32 44 1 48kHz USB 1 1 Digital Output 44 1kHz S PDIF Standard AES3 IEC60958 S PDIF and EIAJ CP 1201 Gain Stage Single Triode Valve complement 1 x E...

Page 27: ...za e manutenzione pag 13 5 Caratteristiche tecniche pag 14 User Manual pag 15 1 Unpacking and Installation pag 16 2 Connection to the mains pag 16 3 Operation pag 17 4 Safety and maintenance precautio...

Page 28: ...measurement of radio disturbance characteristics of broadcast receivers and associated equipment EN 61000 3 2 1995 and subsequent modifications Electromagnetic compatibility Part3 Limits Section 2 Lim...

Page 29: ...zredukowania u ycia niebezpiecznych substancji w sprz cie elektrycznym oraz elektronicznym a tak e utylizacji odpad w Produkty lub opakowania oznaczone symbolem przekre lonego kosza maj by segregowan...

Page 30: ...eller emballasjer merket med et overkrysset produktsymbol skal kastes separat fra annen s ppel Forbrukeren skal enten sende produktet til avfallsortering p egent sted for denne typen spesialavfall ell...

Page 31: ...m don t rt n elt vol t sa b ntet elj r st vonhat maga ut n 2002 95 CE 2002 96 CE 2003 108 CE 0 Bruger information I overensstemmelse med EU direktiver 2002 95 CE og 2003 96 CE vedr rende reduction af...

Reviews: