background image

Page 6 

                                                              eVscope eQquinox V1.1 

5.  Remove the dust cap from the top of the tube. 


6.  Connection to the smartphone: 


o

  Download the Unistellar app from the  Google 

Play Store or Apple Store. 

o

  Turn 

on your smartphone’s Wi-Fi. 

o

  Check available Wi-Fi networks. 

o

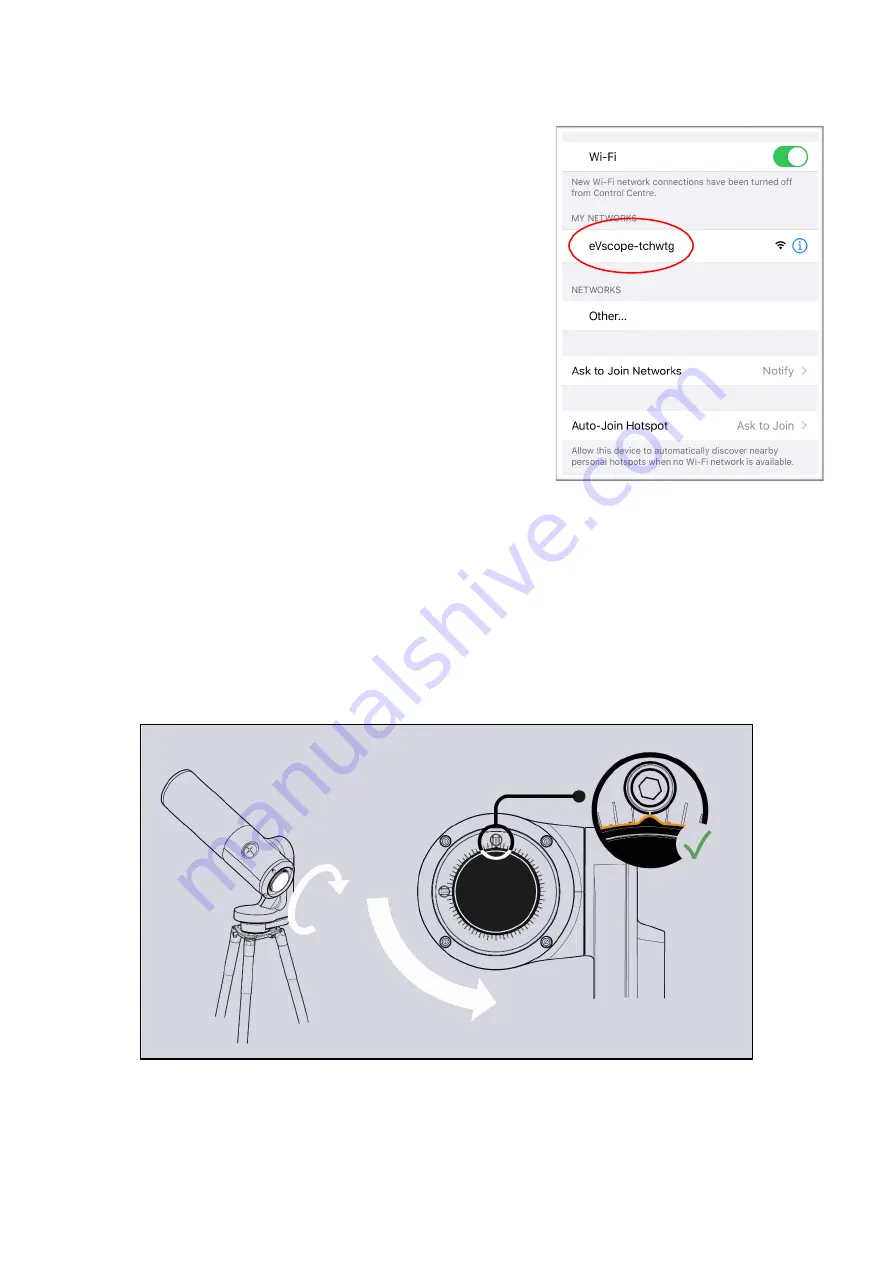
  Connect  your  smartphone  to  the  eVscope 

eQuinox’s Wi-Fi network named eVscope-
xxxxxx 

(the  network’s  name  consists  of 

eVscope and six random characters). 

o

  Launch 

the 

Unistellar 

app 

on 

your 

smartphone 

o


Warning: 

the  connection  between  your 

eVscope 

and 

your 

smartphone 

may 

sometimes be lost, in this case please restart 
your  application.  If  you  encounter  broken 
connections,  we  advise you  to  disable Auto-
Lock. 


7.  Focus: 


o

  Using the in-app joystick, lower the telescope to around 45°. 

o


Basic focus: 

Adjust the focusing wheel at the bottom of your eVscope to align the visual 

cue with the top screw. 
 
Note: To get a perfect focus, the visual cue might not be exactly aligned with the top screw 
to have the perfect focus. You can focus "by eye" or focus precisely using the Bahtinov mask 
(recommended for excellent results). 


Summary of Contents for eVscope eQuinox

Page 1: ...P a g eVscope eQquinox V1 1 eVscope eQuinox User Guide Prepare to Be Amazed...

Page 2: ...eVscope eQquinox V1 1...

Page 3: ...e eVscope eQuinox 5 Removing the dust cap 6 Connecting the eVscope eQuinox to your smartphone 7 Focus 8 Observation 9 Park mode 10 Improve your observations 11 Mirror alignment 12 Charge discharge 13...

Page 4: ...eVscope eQuinox on stable ground that does not vibrate when you walk near it Use the eVscope eQuinox under a clear sky Locate the eVscope eQuinox away from direct streetlight For best results avoid a...

Page 5: ...your eVscope vertically on the tripod and tighten the screws Be careful not to tighten it too hard 4 Start the eVscope by pressing the ON button for 2 seconds When you see a red light the eVscope is...

Page 6: ...pp on your smartphone o Warning the connection between your eVscope and your smartphone may sometimes be lost in this case please restart your application If you encounter broken connections we advise...

Page 7: ...e the Auto mode Put the mask on top of the tube This will create a specific diffraction pattern for that bright star with a central line and two spikes forming an X If the central line is positioned e...

Page 8: ...hanism see Mirror Alignment on next page 8 Observation o Check the Quick Start Guide for detailed explanations on how to use your eVscope 9 Park o When you are done observing use the Park my eVscope f...

Page 9: ...charge level in the User tab o Share your observations with the community by sending us your data Download data then Upload my data o Enjoy the multi user experience o Contribute to science by joinin...

Page 10: ...de o Fully rotate the large focus wheel clockwise without forcing You should see this Bad alignment the cross is not centered Good alignment the cross is centered o If the dark cross is not centered a...

Page 11: ...oy The image should look better now 11 Charge Discharge o The eVscope eQuinox can be used while charging o It can take from 7 to 8 hours to fully charge it o When the eVscope is charging you will see...

Page 12: ...c partners Safety instructions Your eVscope eQuinox and its accessories are not toys Do not allow small children to play with them because children could hurt themselves or others or damage your devic...

Page 13: ...val and cleaning o The mirror can be removed by removing the 4 screws on the back of the adjustment mechanism as in the picture o Gloves must be used to manipulate the mirror o Once the back removed t...

Page 14: ...003 standards The full text of the declarations of conformity is available at the following internet address unistellar com Contains FCC ID 2ABCB RPI3AP Contains IC 20953 RPI3A For Canadian users A s...

Reviews: