background image

C

ONTENTS

Instructions 

1. Tripod installation 

2. Adjusting level bubble 

3. eVscope installation 

4. Starting the eVscope 

5. Connecting the eVscope to your smartphone 

6. Focus 

7. Observation 

8. Park mode 

9. Improve your observations 

10. Mirror alignment 

11. Charge/discharge 

12. Data 

Safety instructions 

Maintenance 

Specifications 


Declarations 

Summary of Contents for eVscope v1.0

Page 1: ...eVscope User Guide Prepare to Be Amazed V 2...

Page 2: ...rreversible damage to your product Do not point the telescope at or near the Sun Children should always have adult supervision while observing Never charge an eVscope if the temperature is under 10 Ce...

Page 3: ...bble 3 eVscope installation 4 Starting the eVscope 5 Connecting the eVscope to your smartphone 6 Focus 7 Observation 8 Park mode 9 Improve your observations 10 Mirror alignment 11 Charge discharge 12...

Page 4: ...round that doesn t vibrate when you walk near the eVscope Use the eVscope under a clear sky Locate the eVscope away from direct streetlight For best results avoid a full moon In order to use your eVsc...

Page 5: ...ope vertically on the tripod and tighten the screws Be careful not to tighten it too hard 4 Start the eVscope by pressing the On button for 2 seconds When you see a red light the eVscope is on and rea...

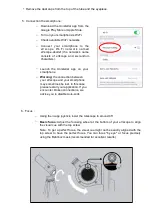
Page 6: ...artphone o Warning the connection between your eVscope and your smartphone may sometimes be lost in this case please restart your application If you encounter broken connections we advise you to disab...

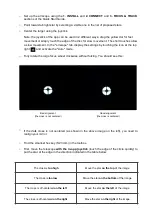
Page 7: ...on top of the tube This will create a specific diffraction pattern for that bright star with a central line and two spikes forming an X which you can see in the eyepiece If the central line is positi...

Page 8: ...r Alignment on next page 7 Observation o Check the Quick Start Guide for detailed explanations on how to use your eVscope 8 Park o When you re done observing use the Park my eVscope function so it aut...

Page 9: ...re your observations with the community by sending us your data Download data then Upload my data o Enjoy the multi user experience o Contribute to science by joining eVscope observing campaigns o Che...

Page 10: ...te the large focus wheel clockwise without forcing You should see this o If the dark cross is not centered as shown in the above image on the left you need to realign your mirror o Find the smallest h...

Page 11: ...ashes to none Flashes decrease as the battery gets more charged o We strongly advise not to recharge your eVscope below 10 C o When the battery is low the performance of the eVscope can be compromised...

Page 12: ...its scientific partners Your eVscope and its accessories are not toys Do not allow small children to play with them because children could hurt themselves or others or damage your device Keep your de...

Page 13: ...or can be removed by removing the 4 screws on the back of the adjustment mechanism as in the picture o Gloves must be used in order to manipulate the mirror o Once the back removed the mirror can be c...

Page 14: ...stellar SAS declares that the radio equipment type eVscope V1 0 is in compliance with Directive 2014 53 EU the FCC 47 CFR Part 15 and the ICES 003 NMB 003 standards The full text of the declarations o...

Reviews: