


Description of the instrument.
Soleplate
Which is made of stainless steel material, it can be heated up and be used to iron the garment.
Spraying nozzle
When pressing spraying water button instantly, water is sprayed from this outlet.
Water tank inlet
Filling water into water tank from it, make sure water should not exceed the Max level (250ml) as
indicated on water tank.
Steam shot button
Pressing the button instantly provides a powerful shot of steam to eliminate stubborn wrinkles.
Variable steam button
Move the button to select the desired steam output for each garment, if selecting the “off” position, it
indicates ironing without steam.
360
0
Cord bushing
Cord bushing allows free movement of power cord in any direction with great maneuverability when
ironing.
Indicator light
When indicator light is illuminated, it indicates that the iron is heating; it will goes out when it has
reached selected temperature.
Temperature dial
Turning the dial to set ironing temperature that is different with the garment changed.
Using of steam iron.
Before first use
1.
Remove all the protective stickers from the soleplate.
2.
Heat up the iron to maximum temperature and iron a piece of damp cloth, to remove any
residual adhesive from the sole.
Note: When you first use the iron may emit an unpleasant odor, it will disappear with time.
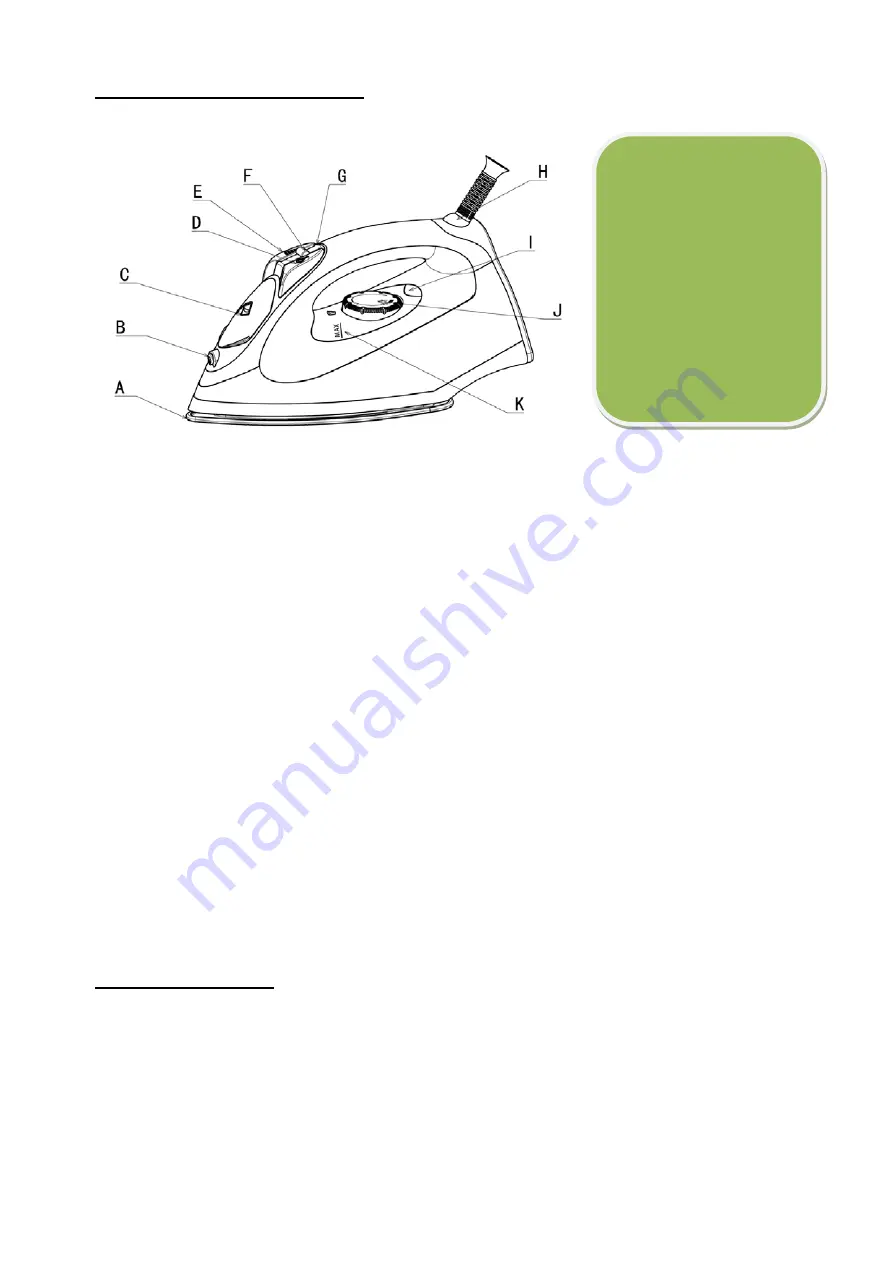
A.
Soleplate
B.
Spraying Water Outlet
C.
Water Tank Inlet
D.
Steam Shot Button
E.
Spraying Water Button
F.
Variable Steam Button
G.
Self Cleaning Button
H.
Cord Brushing
I.
Indicator Light
J.
Temperature Dial
K.
MAX. Water Level
1
Summary of Contents for USI-192
Page 6: ...Unit USI 192 1 2 3 4 5 6 7 8 9 10 11...
Page 7: ...12 250 Off 1 2 A B C D E F G H I J K 1...
Page 8: ...1 1 2 3 2 1 2 4 Off 3 4 3 4 5 2...
Page 9: ...6 7 8 9 1 2 3 4 1 2 Off 4 3 3 4 Anti Calc Anti Calc 60 40 3...
Page 10: ...X X V X X V V V V V USI 192 230 50 2200 1180 131 3905 8 5 80 0 MAX 4...


