English
6
SAFETY NOTICE
• This product is intended for private, i.e. non-com-
mercial, use only.
• Ensure the main device is protected against mois-
ture. The outdoor sensor (transmitter) is splash-
water protected; it is not watertight.
• The device must not be operated in the immediate
vicinity of heaters, other heat sources or in direct
sunlight.
• Avoid using the device in the proximity of electro-
magnetic fields.
• Servicing, maintenance and repair work may only
be performed by a qualified professional.
• Alternations to the product are prohibited. The
warranty shall expire if the product is modified or
disassembled in any way.
• This device and its batteries are not a toy and
should be kept out of the reach of children.
• When handling batteries that have leaked it is es-
sential that you wear safety glasses and protective
gloves that are resistant to chemicals.
• If you have any questions not covered by these
operating instructions, please contact our technical
service department.
• The manufacturer shall assume no liability for any
incorrect information displayed or any inaccurate
measurements or weather forecasts. The same
applies to any consequences relating thereto.
BATTERY INSTALLATION
Home Receiver:
Lift off the battery cover
at the back, install 2 pcs
AA batteries according to the polarity indicated, close
the battery cover
.
Remote Sensor:
Lift off the bracket stand
, loose the 4 screws
with a small screwdriver, insert 2 pcs AAA batteries
according to the polarity indicated. Replace the cover
and tighten the 4 screws
.
Attention:
Only batteries of the same type and
charging capacity may be used.
Low battery indication:
If low battery indicator
“
”
(F)
appears on the remote sensor’s display,
the RF transmission range will drop and it may fail
to connect with the main unit. Replace the batteries
if necessary to ensure successful RF connection.
Follow the setup procedure in this instruction manual.
SETTING UP THE WIRELESS THERMOMETER:
• For the first installation, always insert batteries to
the home unit and then the remote sensor. Your new
RF Thermometer is build with random security code
technology, the home unit will learn the random code
of the first remote sensor and log in as Channel 1 (B).
• When replacing batteries for the remote sensor,
remember to clear the corresponding channel of
the home unit by removing the batteries
• When replacing batteries for the home receiver,
please remove batteries of the remote sensor.
• Press the Tx
9
button on the back of remote sen-
sor to verify the RF reception, hold the button
9
3 sec to reset.
°C/°F SELECTION
By holding „SET”
1
3 seconds, enter the setting
mode to select C and F.
CLOCK & CALENDAR SETTING
(SET, CLK/CAL
button)
Hold „SET“
1
button for 3 seconds to enter clock set.
Using „+
2
, -
3
“ to adjust and „SET”
1
to confirm,
the following values can be set in sequence: 12/ 24 hr >
C/F > Yr > Month > Date > Language > Hour > Minutes
> Time Zone (Switzerland „1”) > Confirm
1
& Exit.
LANGUAGE
GE = German
En = English
FR = French
IT = Italian
SP = Spanish
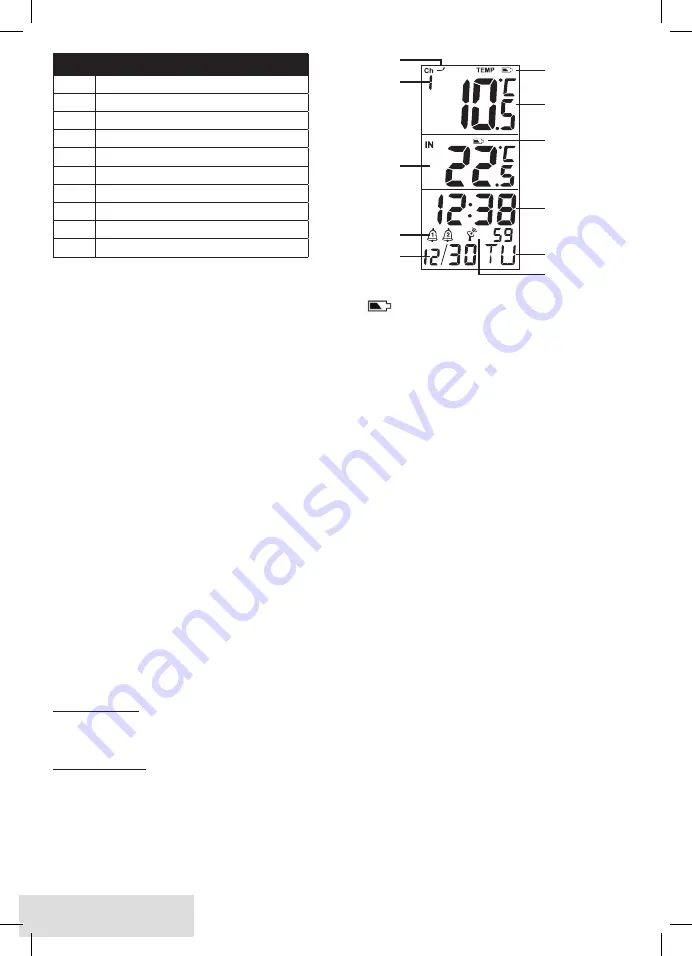
Descriptions of display-functions
A
Trend / tendency display
B
Channel number
C
Indoor temperature
D
Clock alarm
E
Day / month display
F
Low battery indicator
G
Outdoor temperature
H
Clock display
I
Radio controlled clock
J
Day of the week
B
C
D
E
A
F
F
G
H
I
J
313501.00_Manual_160630.indd 6
04.07.16 16:22


