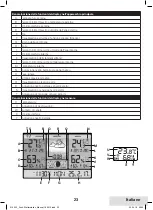
12
English
INSERTING THE BATTERIES
Main device:
Main power source: For basic duty and for operation
of continuous background lighting a 4.5 V adaptor
can be plugged into the socket
8
on the back of the
device. Additional power supply: Open the battery
compartment
, insert 3 AA/LR6 batteries the right
way round as indicated and close the battery com-
partment
again.
Outdoor sensor:
Open the battery compartment cover
by sliding it
in the direction of the arrow and insert 2 AAA/LR03
batteries, making sure they are the right way round.
Close the battery compartment cover
again by
sliding it in the opposite direction.
Warning:
Only use batteries of the same type and
with the same charge capacity.
SETTING UP THE OUTDOOR SENSOR
1. When putting into operation for the first time, always
switch on the main device first and then the remote
sensor.
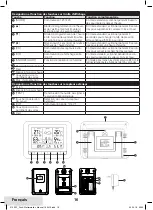
2. Use slide switch
to select channel 1 for the first
remote sensor.
3. Use slide switch
to select channel 2 for the
second remote sensor.
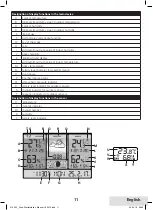
4. When a sensor has been detected, the display of the
station will show the channel number
(S)
, outdoor
temperature
(A)
and outdoor humidity
(C)
.
5. With the
„CH“
button you can call up the
sensors one after the other in the sequence
CH1
CH2
CH3
10-second interval
.
Note:
Place the main device and sensors at a dis-
tance from metals and sources of interference, e.g.
mobile phones, television sets and other electrical
appliances.
Note:
When batteries have been inserted, the
weather station and outdoor sensors are in detection
mode for 3 minutes. During that period the recep-
tion indicator
(T)
flashes. If no outdoor sensor is
detected within that period, detection mode switches
off after 3 minutes.
Note:
To obtain relatively accurate temperature
values the sensor must be placed in a shady location
outdoors.
SETTING UP THE OUTDOOR SENSOR MANUALLY
The battery level
(R)
of the current outdoor sensor
is indicated on the display. If the battery level is low or
the link fails, the sensor has to be detected manually.
1. Press the
„CH“
button
5
for more than 3 seconds
until you hear a beep and the
icon
(T)
starts flas-
hing.
2. Press the
„TEST“
button
on the outdoor sensor
to force signal transmission.
3. If the signal is detected successfully, temperature
(A)
and humidity
(C)
appear in the outdoor panel of the
display.
4. The search function switches off automatically after
3 minutes and the station returns to standard mode.
Note:
LL.L ºC
or
HH.H ºC
is shown on the outdoor
display if the link to the outdoor sensors fails or if the
sensors are outside the range of reception.
SETTING THE TIME OF DAY, DATE AND
INDICATOR
1. Press the
„MODE“
button
1
for more than 3
seconds until you hear a beep and the hour indicator
starts flashing on the time display
(E)
.
2. Use
„
“
2
and
„
“
3
to set the hour.
3. Press the
„MODE“
button
1
.
4. Use
„
“
2
and
„
“
3
to set the minute.
5. Press the
„MODE“
button
1
.
6. Use
„
“
2
and
„
“
3
to set the year.
7. Press the
„MODE“
button
1
.
8. Use
„
“
2
and
„
“
3
to set the month.
9. Press the
„MODE“
button
1
.
10. Use
„
“
2
and
„
“
3
to set the day.
11. Press the
„MODE“
button
1
.
12. Use
„
“
2
and
„
“
3
to set the language for the
day-of-the-week indicator.
13. Press the
„MODE“
button
1
.
14. Use
„
“
2
and
„
“
3
to set the time zone (Swit-
zerland 1).
15. Press the
„MODE“
button
1
) to complete the
programming procedure.
Note:
The days of the week can be displayed in
French (FRE), Italian (ITA), Spanish (SPA), German
(GER) and English (ENG).
SETTING AN ALARM TIME
1. Press the
„
“
button
4
for more than 3 seconds
until you hear a beep and the hour indicator starts
flashing on the time display
(E)
.
2. Use
„
“
2
and
„
“
3
to set the hour.
3. Press the
„
“
button
4
.
4. Use
„
“
2
and
„
“
3
to set the minute.
5. Press the
„
“
button
4
to complete the alarm
programming procedure.
Note:
If an alarm time is programmed, the alarm is
activated automatically.
Note:
Pressing the
„
“
button
4
once in standard
mode displays the programmed alarm time on the
time indicator
(E)
for 20 seconds. Pressing the
„
“
button
4
twice in standard mode activates or deacti-
vates the alarm, as applicable.
313532__Funk-Wetterstation_Manual_180410.indd 12
24.04.18 09:25


