background image


Chapter


4


Data Communication 


Introduction 

The Unitech HT682 allows users to link to a host computer via RS-232 / USB, Bluetooth, or 
Wireless connection for data communication. 

This chapter provides an overview of the communication of the HT682. The following 
subchapters cover these topics: 


“Series or USB or Modem” communication via cable or docking station 


“RF Communication” for details about wireless communication between the HT682 and 

host computers 


“Microsoft ActiveSync” for details about serial communication via USB port


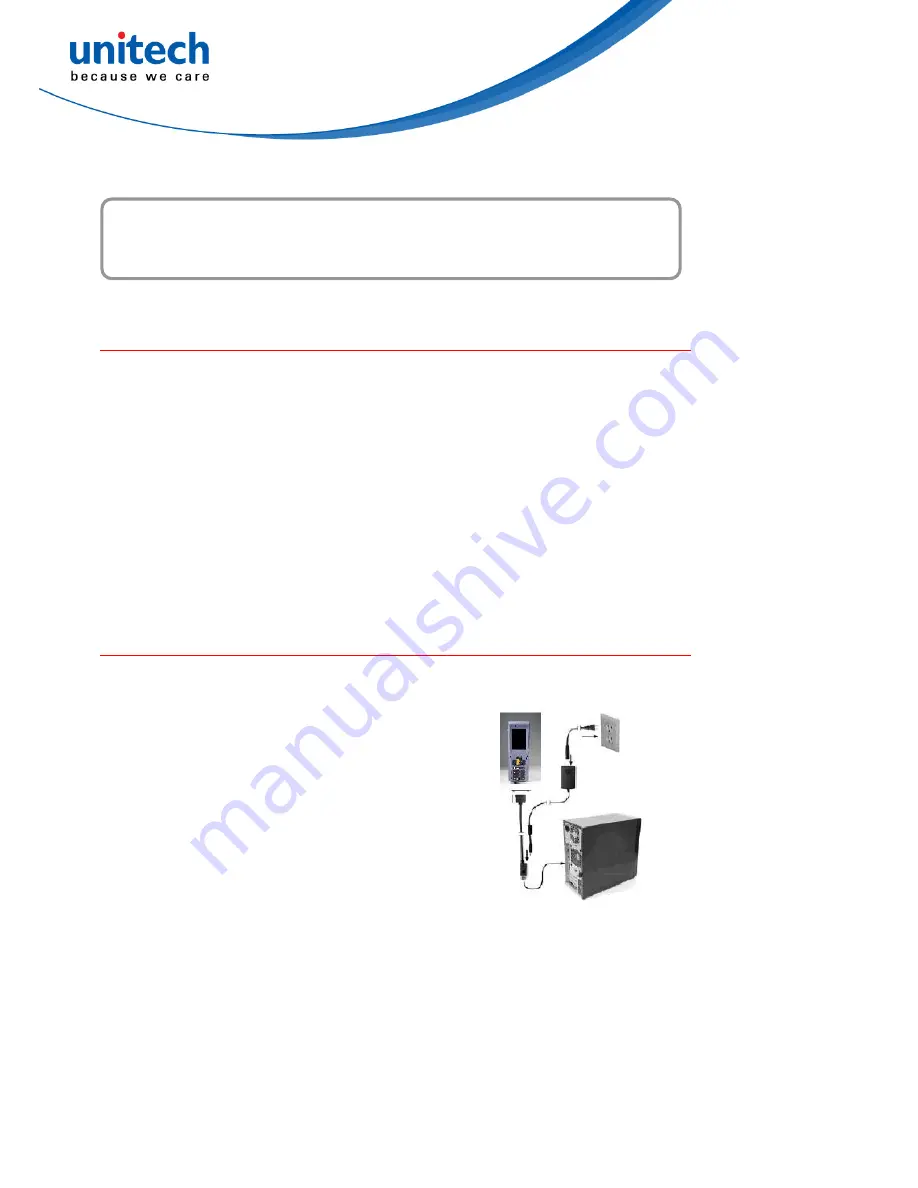
Connecting 

Serial or USB Cable 

Plug the USB end of the HT682 communication 
cable into your PC's USB port, and the other 
end into the HT682's communication port. To 
simultaneously charge the HT682, plug the AC 
power adaptor into the power receptacle on the 
USB plug. 


23 


Summary of Contents for HT682

Page 1: ...PDA Scanner HT682 User s Manual 400974G Version 0 2...

Page 2: ......

Page 3: ...trieval systems The material in this manual is subject to change without notice Copyright 2013 Unitech Electronics Co Ltd All rights reserved Unitech global website address http www unitech adc com Bl...

Page 4: ...iving antenna Increase the separation between the equipment and receiver Connect the equipment into an outlet on a circuit different from that to which the receiver is connected Consult the dealer or...

Page 5: ...ts all requirements of the Canadian Interference Causing Equipment Regulations Cet appareil numerique de la classe B respecte les exigences du Reglement sur le material broilleur du Canada European Co...

Page 6: ...he user Battery Notices The HT682 is equipped with a Lithium Ion battery pack and backup battery Both batteries will discharge after an extended period of not being used When both batteries are discha...

Page 7: ...l room temperature or in a slightly cooler environment It is essential that batteries are charged within the stated range of 10 C to 45 C Charging batteries outside of the specified range could damage...

Page 8: ...ranges It is recommended to store batteries within normal room temperature ranges Warranty The following items covered under Unitech Limited Warranty are free from defects during normal use HT682 1 y...

Page 9: ...an Compliance Statement iii European Conformity Statement iii RoHS Statement iii Taiwan NCC Warning Statement iii Laser Information iv Battery Notices iv Battery charge notice v Storage and safety not...

Page 10: ...th HT682 7 Install the Battery Pack 7 Switch On Backup Battery 8 Supply Power to the HT682 8 First Time to Charge the Main Battery Backup Battery 9 Protective Screen Film 9 First Time Use of the HT682...

Page 11: ...dication 18 Backup Battery Low Icon 18 Charging the Lithium Ion Battery Pack 18 Storage and Safety Precautions 19 Backlight Setting 20 Warm Boot Cold Boot 20 Warm Boot 20 Warm Boot via Software 21 War...

Page 12: ...27 WiFi Connection 28 Bluetooth Connection 31 Chapter 5 Useful Utilities 39 Introduction 39 Scanner Setting 39 Scan2Key 42 Chapter 6 Device Setting 43 Introduction 43 Info 43 Funckey 44 IO 44 Server 4...

Page 13: ...ith your HT682 For programming your HT682 please refer to our SKD and programming manual Notice 1 This unit is equipped with a battery pack and backup battery It is possible that the Unitech HT682 may...

Page 14: ...ent parts and accessories PDA Scanner is covered by 1 year limit warranty Docking Station is covered by 1 year limit warranty Cable is covered by 1 year limit warranty Battery is covered by 6 month wa...

Page 15: ...an optional serial cable connects the HT682 PDA Scanner directly to a peripheral device for communication and a power source for charging Universal Adaptor This power supplier adaptor plugs the PDA Sc...

Page 16: ...HT682 Product Introduction Accessory Kit HT682 PDA Scanner Manual CD Communication Cable Battery Adaptor 4 Plugs Communication Cradle...

Page 17: ...HT682 Front View LED Indicator Touch Screen Display Trigger 5 Note The LED indicators are defined as follows according to the colors of LED Green Alpha Function I O Port Power...

Page 18: ...HT682 Rear View Bar Code Scanner Stylus Speaker Battery Cover 6...

Page 19: ...oss may occur if the HT682 s backup battery is not adequately charged Before charging the main battery make sure the backup battery switch is ON Install the Battery Pack 1 Remove the battery cover 2 M...

Page 20: ...side the battery compartment on the left hand side Please ensure that it is in the ON position before charging the main battery Supply Power to the HT682 Before using the power adapter please follow t...

Page 21: ...e allow at least 16 hours While charging the main battery the backup battery should also be charged Please make sure the backup battery has been switched ON this cannot be emphasized enough CAUTION Th...

Page 22: ...creen brightness the backlight setting will be required Please refer to page 20 for the new setting procedure Setting Time Zone Date Before using the HT682 please take a few minutes to set the time an...

Page 23: ...ylight saving please tick on it Setting Date Time Tap the Left or Right arrows to scroll the year and month you desire Or directly tap location of year or month to change the year or month setting To...

Page 24: ...12...

Page 25: ...ey is used in conjunction with specific number keys to operate as Hotkeys see next page ESC The escape key returns the user to a previous page Cursor The cursor key moves the cursor around the screen...

Page 26: ...to suit the user s preferences To modify hotkeys please follow the path below Path My computer Windows RegFuncKey exe Software Keyboard Windows CE Keyboard Besides its hardware keypad the HT682 provid...

Page 27: ...ecial European character and symbol input To enter these characters tap the key on the touch screen keyboard to display the available characters Bar Code Scanner The HT682 has an integrated 1D laser a...

Page 28: ...16...

Page 29: ...y is not adequately charged therefore it is imperative to ensure that the backup battery switch is in the ON position before charging for the first time A properly charged backup battery can store dat...

Page 30: ...er applied Pressing the power button will return the HT682 to the same point at the time of automatic shutdown Do not leave the PDA Scanner for a long time in the charging cradle and do not charge the...

Page 31: ...d Safety Precautions Batteries should be stored in an open environment and placed where there is no risk of accidental shorting or other damage Although charged Li Ion batteries may be left unused for...

Page 32: ...the backlight automatically turns off Turn on Backlight Select this option if you want the backlight to turn on when the button is pressed or the touch screen is tapped Warm Boot Cold Boot Warm Boot W...

Page 33: ...e front of the HT682 above the keypad warm boot pinhole Cold Boot A Cold Boot is used to reset the operating system restore the PDA Scanner back to factory default and reset the PDA Scanner after a bo...

Page 34: ...AM memory You will need to recalibrate the screen and reset the date and time Cold Boot via Hardware 1 Remove the Main Battery 2 Switch OFF the Backup Battery 3 Switch the Backup Battery back ON 4 Ins...

Page 35: ...or USB or Modem communication via cable or docking station RF Communication for details about wireless communication between the HT682 and host computers Microsoft ActiveSync for details about serial...

Page 36: ...ync Using Microsoft ActiveSync you can synchronize and transfer information between your desktop computer and PDA Scanner The most current version of ActiveSync can be downloaded from www microsoft co...

Page 37: ...tallation Follow the installation procedure below to install Microsoft ActiveSync connect your HT682 to your desktop computer and establish a partnership for synchronization if required In order to ex...

Page 38: ...omatically click Start Programs Microsoft ActiveSync NOTE If a message appears indicating that it is unable to detect a connection click the Cancel button and manually configure the communication sett...

Page 39: ...s are available for Microsoft ActiveSync to connect to the HT682 Other programs cannot use them while the HT682 and your desktop computer are connected Set your baud rate on the HT682 the desktop comp...

Page 40: ...rk access point is detected or by manually entering setting data Before following these instructions make sure if authentication information is needed Here you can use for example the Summit Client Ut...

Page 41: ...3 Enter the Admin Password Default pass word SUMMIT Scan Available AP 1 Under Profile tab tap Scan for available AP 2 You may select a desired AP to create a new profile Tap Configure 29...

Page 42: ...3 Tap Yes to create the new profile 4 Enter the WEP key or network key Tap OK Commit and Activate 1 Tap Commit to activate the setting 30...

Page 43: ...ility Tap Disable Radio you can disconnect the AP Under Status tab you can see the IP address signal strength and quality If you want to learn more detailed settings of the SUMMIT utility please visit...

Page 44: ...Service tab six icons About Power OFF ON FTP ActiveSync and Modem are arranged About To show you the software version and BT module MAC address Power OFF ON To enable ON or OFF the BT module FTP To t...

Page 45: ...the Bluetooth module Tap the Scan Device tab to scan Bluetooth devices around Tap Scan Device Scanned Bluetooth devices around are listed Later you may double tap a desired device and check Trusted a...

Page 46: ...r On the Scan Device tab for example select and double tap a desired PC Tap Trusted Tap Yes Enter a PIN code on the PDA Scanner and tap OK Then an Enter PIN dialog box pops up and enter the PIN code s...

Page 47: ...ync Then HT682 will synchronize with the desired PC by means of Bluetooth File Transfer Protocol FTP via Bluetooth to and receive files from a PC or PDA Scanner and pair the PC or PDA Scanner for file...

Page 48: ...are provided with the FTP function Select a device and tap OK An Authentication Request box pops up Then input a PIN code and tap OK Choose a desired PC or PDA Scanner to or from which you want to tr...

Page 49: ...ns in the zone are defined below Shared Files List Refresh Upload Download End and Exit Move to subdirectory Move to upper directory Modem You may surf on Internet by connecting HT682 to a mobile phon...

Page 50: ...anned Bluetooth mobile phones around are listed Later you may double tap a desired phone and check Trusted and then Active Then HT682 is successfully connect to and paired with the phone as the modem...

Page 51: ...lt symbology place delimiter characters behind scanned data and save the settings Run this program from Start Setting Control Panel Scanner Setting exe and Scanner Control Panel will be displayed Barc...

Page 52: ...ES Transmit Code ID Field separator EAN 13 YES YES EAN 8 YES YES Not suppress first or last digit data length Interleaved 2 of 5 YES YES YES Fixed Length Not suppress first or last digit data length L...

Page 53: ...sable Char Check Digit verification Transmit Check Char digit Leading Digit Transmit Others Aztec YES Runes data length Codablock F YES data length Code 49 YES data length Data Matrix YES data length...

Page 54: ...keyboard buffer with the result that all scanned data will be treated as if they were input from the keypad With this router scanned data can be directly input into generic applications like MS Pocke...

Page 55: ...ch as Function Key I O Server and so on The following description will guide you through completion of all device setting items 1 Left click Control Panel in My Device 2 Double click Device Setting In...

Page 56: ...select a file Tap Set 3 Press Func key and 6 key Func6 will call the application that the users specified 4 You can repeat the steps for Func7 Func8 and Func9 By default Func6 Task Manager Func7 Scann...

Page 57: ...NTLM Windows NT LAN Manager users FTP users and telnet users Account Manager NTLM 1 Tap Server tab 2 Tap NTLM Tap Add to add a new user 3 Key in the user name and password Tap OK 4 To modify a user s...

Page 58: ...box Do you want to delete the user X Tap Yes Telnet 1 Under Telnet tab tap Add Add the telnet user from NTLM 2 Select the user and tap Add 3 To delete telnet user select the user and tap Delete You wi...

Page 59: ...haracters output as alpha keys 4 Uncheck Enable Virtual Keys Applet Tap Set Tap OK 5 Press alpha key and press numeric key The characters output as non alpha keys 6 In Virtual keys enter the time dela...

Page 60: ...device you want to ping to 2 Check Constant Ping so that your PDA Scanner will continuously ping to the remote device 3 Tap Start The PDA Scanner will search for the remote computer with the IP addre...

Page 61: ...started Note that Restore button is grey out if the registry setting was not saved before Battery This tool allows you to charge the battery in the Smart Charge mode as soon as the power of battery d...

Page 62: ...50...

Page 63: ...tive For complete contact information please visit the Web sites listed below Region Web Site Global Operation Center http www ute com Unitech Taiwan http tw ute com http apac ute com http india ute c...

Reviews: