background image

6

Customer/Technical Service
Pneumatic Division
Richland, MI 49083

Tel:  (269) 629-2550
Fax:  (269) 629-2475

wilKerson warrantY

Wilkerson products are warranted to be free from defects in material 

and  workmanship,  under  proper  use,  installation,  application  and 

maintenance in accordance with Wilkerson's written recommendations 

and specification for a period of one year from the date of shipment from 

the factory (refrigerated dryers are warranted for 2 years). Wilkerson's 

obligation under this warranty is limited to, and the sole remedy for any 

such defect shall be, the repair or replacement (at Wilkerson's option) 

of unaltered products returned to Wilkerson and proven to have such 

defect,  provided  such  defect  is  promptly  reported  to Wilkerson  within 

said one-year period.  

This is the only authorized Wilkerson Warranty and is in lieu of all 

other express or implied warranties or representations, including 

any  implied  warranties  of  merchantability  or  fitness,  or  of  any 

other obligations on the part of Wilkerson.

Warranty  claims  must  be  submitted  and  shall  be  processed  in 

accordance  with  Wilkerson's  established  warranty  claim  procedure. 

In no event will Wilkerson be liable for business interruptions, loss of 

profits, personal injury, costs of delay or for any other special, indirect, 

incidental or consequential losses, cost or damages. 

WARNING: USE LIMITATIONS

Wilkerson's  warranties  are  void,  and  Wilkerson  assumes  no 

responsibility for any resulting cost, loss, injury or any other damages 

whatsoever,  with  respect  to  any  plastic  bowl  unit  for  which  a  bowl 

guard is standard equipment if the unit is placed in service without the 

bowl guard and, except as otherwise specified in writing by Wilkerson, 

with  respect  to  any Wilkerson  products  which  are  used  in  other  than 

compressed  air  service.  Specific  warnings  with  respect  to  these  and 

other use limitations appear elsewhere in this catalog.

Wilkerson  maintains  a  policy  of  ongoing  product  development 

and  improvement.  We  therefore  reserve  the  right  to  change 

dimensions specification and design without notice.

do not place plastic bowl unit in service 

without bowl guard installed

Plastic  bowl  units  are  sold  only  with  bowl  guards  with  the  exception 

to miniature units (C04, F00, L00, and M00). To minimize the danger 

of flying fragments in the event of plastic bowl failure, the bowl guards 

should not be removed. If the unit is in service without the bowl guard 

installed,  manufacturer's  warranties  are  void,  and  the  manufacturer 

assumes no responsibility for any resulting loss.

If the unit has been in service and does not have a bowl guard, 

order one and install before placing back in service.

CAUTION

Certain  compressor  oils,  chemicals,  household  cleaners,  solvents, 

paints and fumes will attack plastic bowls and can cause bowl failure. 

Do  not  use  near  these  materials. When  bowl  becomes  dirty  replace 

bowl or wipe only with a clean, dry cloth. Reinstall  bowl guard or buy 

and  install  a  bowl  guard.  Immediately  replace  any  crazed,  cracked, 

damaged or deteriorated plastic bowl with a bowl or a new plastic bowl 

and bowl guard.

CAUTION

Except  as  otherwise  specified  by  the  manufacturer,  this  product  is 

specifically  designed  for  compressed  air  service,  and  use  with  any 

other fluid (liquid or gas) is a misapplication. For example, use with or 

injection of certain hazardous liquids or gases in the system (such as 

alcohol or liquid petroleum gas) could be harmful to the unit or result 

in a combustible condition or hazardous external leakage. Before using 

with  fluids  other  than  air,  or  for  non-industrial  applications,  or  for  life 

support systems, consult Wilkerson Corporation for written approval.

SOME OF THE MATERIALS THAT WILL ATTACk 

POLYCARBONATE PLASTIC BOWLS.


Acetaldehyde 

Chlorobenzene 

Methylene chloride

  Acetic acid (conc.) 

Chloroform 

Methylene salicylate

  Acetone 

Cresol 

Milk of lime (CaOH)

  Acrylonitrile 

Cyclohexanol 

Nitric acid (conc.)

  Ammonia 

Cyclohexanone 

Nitrobenzene

  Ammonium fluoride 

Cyclohexene 

Nitrocellulose lacquer

  Ammonium hydroxide   Dimethyl formamide 

Phenol

  Ammonium sulfide 

Diozane 

Phosphorous hydroxy  

  Anaerobic adhesives 

Ethgane tetrachloride  

  chloride

    and sealants 

Ethyl acetate 

Phosphorous trichloride

  Antifreeze 

Ethyl ether 

Propionic acid

  Benzene 

Ethylamine 

Pyridine

  Benzoic acid 

Ethylene chlorohydrin 

Sodium hydroxide

  Benzyl alcohol 

Ethylene dichloride 

Sodium sulfide

  Brake fluids 

Ethylene glycol 

Styrene

  Bromobenzene 

Formic acid (conc.) 

Sulfuric acid (conc.)

  Butyric acid 

Freon (refrig. & Propell.)  Sulphural chloride

  Carbolic acid 

Gasoline (high aromatic)  Tetrahydronaphthalene

  Carbon disulfide 

Hydrazine 

Tiophene

  Carbon tetrachloride 

Hydrochloric acid (conc.)  Toluene

  Caustic potash solution  Lacquer thinner 

Turpentine

  Caustic soda solution 

Methyl alcohol 

Xylene 


  Perchlorethylene 


  & Others

TRADE NAMES OF SOME COMPRESSOR OILS, RUBBER 

COMPOUNDS AND OTHER MATERIALS THAT WILL ATTACk 

POLYCARBONATE PLASTIC BOWLS.


Atlas “Perma-Guard” 

National Compound #N11

  Buna N 

“Nylock” VC-3

  Cellulube #150 and #220 

Parco #1306 Neoprene

  Crylex #5 cement 

*Permabond 910

  *Eastman 910 

Petron PD287

  Garlock #98403 (polyurethane) 

Prestone

  Haskel #568-023 

Pydraul AC

  Hilgard Co.'s hil phene 

Sears Regular Motor Oil

  Houghton & Co. oil #1120,  

Sinclair oil “Lily White” 

   #1130 & #1055 

Stauffer Chemical FYRQUEL #150

  Houtosafe 1000 

Stillman #SR 269-75 (polyurethane)

  Kano Kroil 

Stillman #SR 513-70 (neoprene)

  Keystone penetrating oil #2 

Tannergas

  *Loctite 271 

Telar

  *Loctite 290 

Tenneco anderol #495 & #500 oils

  *Loctite 601 

Titon

  *Loctite Teflon-Sealant 

*Vibra-tite

  Marvel Mystery Oil 

Zerex

  Minn. Rubber 366Y 

     *When in raw liquid form. 

We cannot possibly list all harmful substances, so check with 

Mobay or the General Electric office for further information on 

polycarbonate plastic.  


The trade names “EconOmist” and “Flow-Guide”

 are registered at the United States Patent Office. 

“Auto-Fill”, “Dial-Air”, “Flex-Drain”, “Mainliner” and 

“Whirl-Flo” are trade names of the Wilkerson Corporation.

WILkERSON PRODUCTS ARE PROTECTED BY THE 
FOLLOWING U.S. PATENT AND PATENTS IN OTHER 

COUNTRIES, ADDITIONAL PATENTS ARE PENDING.

  3,631,878 

3,667,493 

3,762,224 

4,215,790

  4,215,790 

3,793,803 

4,718,245 

3,793,803

  3,858,403 

D-292-310 

D-229-629 

4,215,790

  4,289,335 

4,352,511 

4,559,065 

4,631,073

  4,689,969 

4,696,320 

3,889,484 

3,945,465

  4,631.073 

D-234-848

4

Summary of Contents for STANDPIPE-PAC SSS-101

Page 1: ..._____________________________ Date of Installation ____________Date of Commissioning ___________ UNITED Fire Systems Division of UNITED Fire Protection Corporation 1 Mark Road Kenilworth NJ USA 07033...

Page 2: ...THIS SURFACE DELIBERATELY LEFT BLANK...

Page 3: ...mining Proper STANDPIPE PAC To Use 5 2 4 Example 1 6 2 5 Example 2 7 2 6 Options 8 2 6 1 Additional Audible Signals 8 2 6 2 Off Site Signaling Via Dialer 8 3 INSTALLATION 3 1 Unpacking 9 3 2 Location...

Page 4: ...32 4 4 5 To Refill Standpipe With Air Pressure After Fire Department Use 33 4 4 6 To Test Standpipe with Water Pressure 34 5 MAINTENANCE 36 5 1 Weekly 37 5 2 Monthly 37 5 3 Quarterly 38 APPENDICES App...

Page 5: ...formation is provided for the safety of installers operators and users of the UNITED Fire Systems STANDPIPE PAC equipment Carefully read understand and follow instructions identified by these symbols...

Page 6: ...ate at the time of publication but the data is published and presented without any guarantee or warranty whatsoever UNITED Fire Systems disclaims any liability for any use that may be made of the data...

Page 7: ...STANDPIPE PAC without instructions from UNITED Fire Systems the STANDPIPE PAC is not covered If you break tamper seals applied by UNITED Fire Systems the sealed parts are not covered Any problem that...

Page 8: ...air dryer dries the compressed air before entry into the standpipe as required by Boston FD TCM3 51725 3 Low limit pressure sensing switch This switch senses when the pressure in the standpipe drops b...

Page 9: ...side the location of the STANDPIPE PAC and wire the device in accordance with the instructions in this manual 17 An auxiliary condensate drain device This device permits manual draining of water in th...

Page 10: ...2 00 P N 10 540101 001 Page 3 INSTRUCTION NAMEPLATE 15 MANUAL AIR RELEASE BLEED VALVE CAP AND CHAIN Figure 2 Manual Air Release Bleed Valve Figure 4 Auxiliary Condensate Drain Device 17 AUXILIARY COND...

Page 11: ...determined by multiplying the length of each pipe by size by the internal volume per foot in gallons Nominal Pipe Size Pipe Length in Feet Gallons per Foot Gallons 1 1 2 X 0 106 2 X 0 174 2 1 2 X 0 2...

Page 12: ...the desired fill time at the bottom of the graph 2 3 2 Find the standpipe internal volume at the left of the graph 2 3 3 Determine the intersection of the lines from these two values 2 3 4 Choose the...

Page 13: ...101 001 Page 6 2 4 Example 1 Nominal Pipe Size Pipe Length in Feet Gallons per Foot Gallons 6 750 X 1 500 1125 TOTAL 1125 gallons Required work can be performed in 1 2 hour 30 minutes so a fill time o...

Page 14: ...e 2 Nominal Pipe Size Pipe Length in Feet Gallons per Foot Gallons 2 80 X 0 174 14 6 100 X 1 500 150 8 550 X 2 600 1430 TOTAL 1594 gallons Fill time of 1 hour 60 minutes required Figure 7 Design Examp...

Page 15: ...his manual for further information See Paragraph 3 3 5 5 for installation instructions 2 6 2 Off Site Signaling Via Dialer The STANDPIPE PAC control unit is equipped with a built in dialer for off sit...

Page 16: ...3 2 1 Temperature Ensure that the STANDPIPE PAC unit is installed in a location that will not drop below 32 F 0 C at any time This may be accomplished by Choosing a location that will be supplied wit...

Page 17: ...t least 3 feet of clearance for personnel to access equipment for maintenance 3 3 Installation 3 3 1 Mounting See Figure 8 Mount the STANDPIPE PAC in the chosen mounting location It is strongly recomm...

Page 18: ...regular basis permitting any water accumulation or pooled water from testing to drain Dry standpipes installed with supervisory systems shall be installed per Figure 9 above The diagram indicates sev...

Page 19: ...and discard plastic plug from device inlet Valve 1 3 See Figure 10 Attach a inch close pipe nipple and the bull of a inch pipe tee to device inlet Valve 1 4 Install a convenient length of inch thread...

Page 20: ...1 60 3 4 10 6 0 7 11 3 3 3 5 3 Power Wiring See Table 3 Choose minimum conductor sizes and overcurrent protective device based on total current shown in table Connect power in junction box provided fo...

Page 21: ...NDPIPE PAC MODEL SSS 101 DESIGN INSTALLATION OPERATION AND MAINTENANCE MANUAL REVISION 2 00 P N 10 540101 001 Page 14 3 3 5 4 Battery Wiring See Figure 11 DO NOT connect battery until commissioning Fi...

Page 22: ...5 5 4 Optional Signaling Devices If additional audible devices are desired connect these devices to the notification appliance circuit serving the signal horn on the STANDPIPE PAC unit See Appendix D...

Page 23: ...9 optional signal horns Maximum Current Draw FOR ALL external Signal Horns INCLUDING required external audible visual device NOT including factory installed signal horn 1 0 A Maximum Length Of Notific...

Page 24: ...rn assembly on STANDPIPE PAC En End of Line Resistor 3 See Figure 13 2 Visually inspect Signal Horn base plate connections Locate positive and negative terminals on base plate NOTE RED wire connects t...

Page 25: ...all raceway from factory installed Signal Horn back box to additional Signal Horn NOTE See Table 4 for distance limitations 8 See Figure 13 6 Run 14 AWG Solid wires from additional Signal Horn through...

Page 26: ...Connect wires at additional Signal Horns IMPORTANT Do not branch Signal Horn circuit Run circuit from the first Signal Horn to the second Signal Horn then the second Signal Horn to the third and so on...

Page 27: ...ent capacity of the circuit when adding additional horns to the STANDPIPE PAC Each additional horn adjusted to FULL VOLUME draws 0 047 amps As noted on page 1 the current for all external devices incl...

Page 28: ...and 18 PSIG should be adequate for supervising the standpipe and providing prompt signaling if a valve is opened or a portion of the standpipe is removed Setting the HIGH pressure signal at 23 PSIG 2...

Page 29: ...ON 10 Press RESET button on control unit AC POWER indicator should be ON 11 ALARM indicator should be ON Signal horn should be sounding 12 Press SILENCE switch to acknowledge alarm Press SILENCE switc...

Page 30: ...lear and ALARM indicator should be OFF 12 When pressure gauge needle reaches approximately 18 PSIG compressor should automatically shut off HIGH LIMIT PRESSURE SENSING SWITCH TEST 13 Verify that compr...

Page 31: ...115 VAC not properly connected in junction box Properly connect power in junction box 3 3 5 3 STANDPIPE PAC does not build sufficient pressure in standpipe less than 7 PSIG One or more outlet valves o...

Page 32: ...nstalled in area where temperature cannot go below 32 degrees F Color of beads in air dryer has changed Air dryer beads have absorbed water to their capacity Compare color of beads to decal on side of...

Page 33: ...unit outlet lockable shutoff valve OPEN Has the battery been connected to the control unit Has 115 VAC power been turned ON Has the control unit RESET button been operated and is the control unit AC P...

Page 34: ...device been operated and is the pressure gauge needle moving UP When the pressure gauge needle reaches approximately 23 PSIG does the control unit ALARM indicator come ON and do the signals operate Ha...

Page 35: ...toff valve Is the control unit door locked Have the control unit keys lockable shutoff valve key s and UFS Manual P N 10 540101 001 been given to the responsible individual at the job site If the cont...

Page 36: ...s a yellow LED visible with unit door closed or open indicating trouble with the backup battery 4 1 3 5 Visual Indicator SYSTEM TRBL This is a yellow LED visible with unit door closed or open indicati...

Page 37: ...ON INDICATOR or CONTROL ITEM STATUS Visual Indicator Pressure Gauge Indicating between 13 and 18 PSIG Visual Indicator AC POWER ON Visual Indicator ACTIVE Off Visual Indicator COMM FAIL Off Visual Ind...

Page 38: ...ignal Operation High Pressure In Standpipe If pressure increases in standpipe above 25 PSIG the following will be indicated HIGH PRESSURE IN STANDPIPE INDICATOR or CONTROL ITEM STATUS Visual Indicator...

Page 39: ...sor Disconnect Switch ON Control Test Service Device Not Operated 4 4 2 To Silence Piezo Sounder Press ACKNOWLEDGE SILENCE HOLD 2 SEC pushbutton once 4 4 3 To Silence Signal Horns Press ACKNOWLEDGE SI...

Page 40: ...ating less than 7 PSIG Visual Indicator AC POWER ON Visual Indicator ACTIVE ON Visual Indicator COMM FAIL Off Visual Indicator BATT FAULT Off Visual Indicator SYSTEM TRBL Off Visual Indicator SUPERVIS...

Page 41: ...points or traps without drains CLOSE Lockable Shutoff Valve BEFORE testing standpipe with water pressure Perform pressure test Use main drain and all drainage valves at low points to drain all water f...

Page 42: ...ry Condensate Drain Device to drain all water from piping in the vicinity of the STANDPIPE PAC It may take time for water to migrate from upper floors Allow sufficient time with drains open for all wa...

Page 43: ...PAC pressure gauge are APPROXIMATE Variation from nominal values can be expected IMPORTANT The STANDPIPE PAC unit including control unit has been pre wired and programmed at the factory for proper ope...

Page 44: ...in intact and connected to valve Valve OPEN Cap Disconnected or Missing If valve is OPEN CLOSE valve tightly If cap is disconnected re connect If cap is missing contact service provider for replacemen...

Page 45: ...For this reason it is recommended that the dryer desiccant be replaced quarterly NOTE Refer to Figure 15 1 Have Qty 1 UFS P N 21 100000 100 Replacement Desiccant available 2 Notify local personnel tha...

Page 46: ...se Qty 1 UFS P N 21 100000 100 13 Carefully align and insert desiccant bowl back into assembly until it is flush against air dryer cap 14 Depress tab marked PUSH and turn connecting ring until connect...

Page 47: ...compressor disconnect switch to OFF 3 Use 5 32 hex key to remove 2 hex screws holding black filter housing in place 4 Remove filter housing 5 Remove and discard existing foam filter element 6 Replace...

Page 48: ...ew filter 7 Monthly Has the Auxiliary Condensate Drain Device been properly used to remove water from the piping in the vicinity of the STANDPIPE PAC 8 Quarterly Has the HIGH PRESSURE signal been chec...

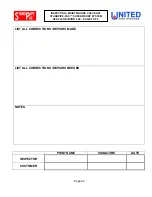
Page 49: ...LL CORRECTIONS REPAIRS MADE LIST ALL CORRECTIONS REPAIRS NEEDED NOTES PRINT NAME SIGNATURE DATE INSPECTOR CUSTOMER INSPECTION MAINTENANCE CHECKLIST STANDPIPE PAC SUPERVISORY SYSTEM UFS 236 REVISION 2...

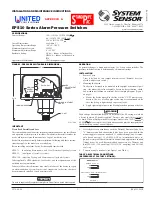
Page 50: ...N 1 Remove Cover Cover is held on by two tamper resistant screws Removal key is en closed with pressure switch 2 Mounting the Switch The device is designed to be mounted in the upright or horizontal p...

Page 51: ...D770 08 00 2 I56 0551 009R System Sensor 2014 System Sensor warrants its enclosed pressure switch to be free from defects in materials and workmanship under normal use and service for a period of thr...

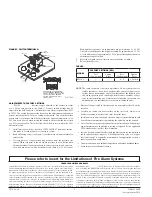
Page 52: ...to be mounted in the upright position side mounting is also acceptable Locate it where vibration shock and mechanical loading are minimal Refer to piping diagram above Fig 2 and 3 a Mount the device...

Page 53: ...W TRIP POINT SW1 SW2 MODELS EPS40 2 EPS120 2 SWITCHES AT HIGH TRIP POINT SW1 SW2 B COM A B COM A B COM A A COM B A COM B A COM B DUAL SWITCH MODEL EPS40 2 AND EPS120 2 1 Install pressure switch as sta...

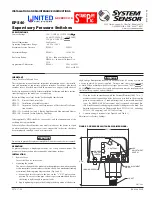
Page 54: ...tion Perform pre ventive maintenance and periodic testing as required by the applicable NFPA standards but not less than bimonthly Install a back up control for all critical applications where control...

Page 55: ...THIS SURFACE DELIBERATELY LEFT BLANK...

Page 56: ...d the life of the coalescing element Specifications X06 X03 Plastic Bowl X03 Metal Bowl X04 X25 Metal Bowl Maximum Pressure 150 psig 10 3 bar 150 psig 10 3 bar 150 psig 10 3 bar 150 psig 10 3 bar 150...

Page 57: ...ge meaning dry to dark green meaning wet 3 By installing two or more units in parallel higher dry airflows can be achieved Maintenance 1 The only servicing required for silica gel units is when the de...

Page 58: ...95 623 1 8 Clamp Ring GRP 96 404 1 GRP 96 404 1 NNR Not normally replaced The moisture indicator contains a weep orifice to provide an air sample to the moisture indicating paper Air leakage from thi...

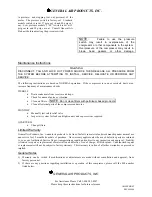
Page 59: ...rated plastic bowl with a bowl or a new plastic bowl and bowl guard CAUTION Except as otherwise specified by the manufacturer this product is specifically designed for compressed air service and use w...

Page 60: ...ould be settled directly with the freight company WARNING Do not operate this compressor if damaged during shipment handling or use Damage may result in bursting and cause injury or property damage Lo...

Page 61: ...ed electrician wire the compressor to ensure that the supply line has the same characteristics voltage frequency and phasing as the motor Wiring must comply with all local and national codes CAUTION I...

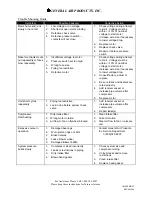
Page 62: ...RCE THEN RELEASE ALL PRESSURE FROM THE SYSTEM BEFORE ATTEMPTING TO INSTALL SERVICE RELOCATE OR PERFORM ANY SERVICE The following instructions are based on NORMAL operation If the compressor is in an e...

Page 63: ...voltage to start motor Increase wire size if necessary to lower voltage drop 2 Consult factory adjust or replace 3 Be sure fuses and heaters are rated properly 4 Add receiver vessel or increase pipe...

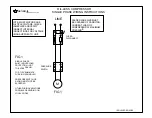
Page 64: ...NGLE PHASE WIRING INSTRUCTIONS OIL LESS COMPRESSOR NOTE MOST MOTORS ARE MULTIPLE VOLTAGE CHECK NAMEPLATE AND VERIFY CORRECT INTERNAL CONNECTIONS FOR VOLTAGE BEING SUPPLIED TO UNIT FEEDER WIRE SIZE MUS...

Page 65: ...THIS SURFACE DELIBERATELY LEFT BLANK...

Page 66: ...THIS SURFACE DELIBERATELY LEFT BLANK...

Page 67: ..._____________________________ Date of Installation ____________Date of Commissioning ___________ UNITED Fire Systems Division of UNITED Fire Protection Corporation 1 Mark Road Kenilworth NJ USA 07033...

Reviews: