background image

9

INSTALLATION 

CONTINUED

1.

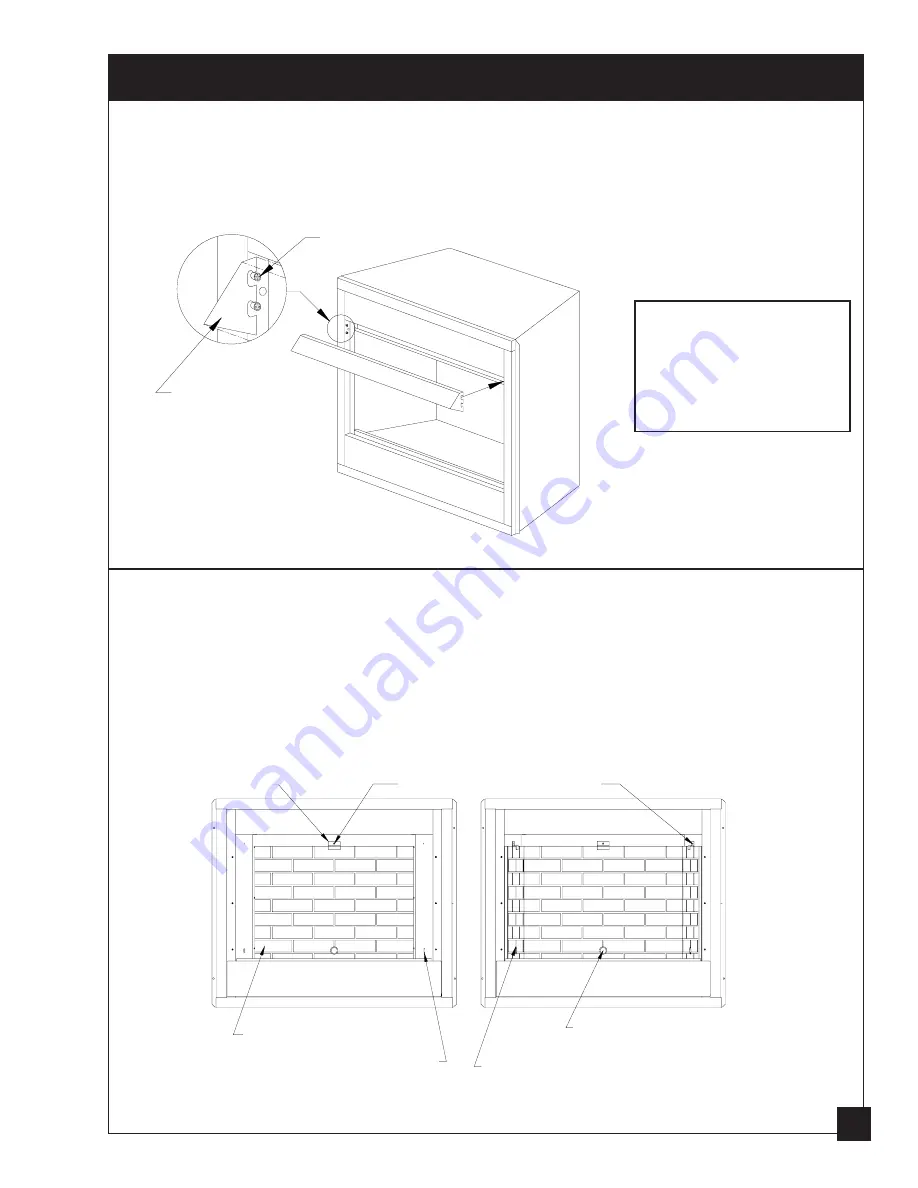
Slide the Hood over the shoulder screws and gentle press down until secure.  NOTE:
There are (2) shoulder screws on each side of the firebox opening directly below the
top plate.  These shoulder screws should line up with the notches on the sides of the
Fireplace Hood.  (See Figure 4)

Installing the Fireplace Hood.

Figure 5b

Figure 5a

Firebox shown with some parts missing for clarity.

Figure 4 - Installing the Fireplace Hood.

1.

Before installing the firebrick panels you must first remove the brick brackets.
A 5/16" nut driver  will be required. (See Figure 5a & b, below for location)

2.

Carefully remove the firebrick panels from their box.

3.

Decide which side of the firebox you want the gas line to enter and knock out the
appropriate holes in the cabinet, firebox, and the firebrick panel.

4.

Place the back firebrick panel in the firebox, as shown in Figure 5a.

5.

Place the side firebrick panels in the firebox, as shown in Figure 5b.

6.

You can now replace the brick brackets using a 5/16" nut  driver.

Installing the Firebrick Panels into the firebox.

ATTACH BRACKET W/SCREW

BACK FIREBRICK PANEL

(OPTIONAL) SIDE KNOCK-OUT
HOLE FOR GAS LINE

SIDE FIREBRICK PANEL

(OPTIONAL) KNOCK-OUT HOLE
IN FIREBRICK FOR GAS LINE

BRICK BRACKET

SHOULDER SCREW

HOOD CUT-AWAY

TO SHOW

UNDERSIDE

IMPORTANT:

The Firebox Hood must not

be replaced with a hood/

canopy which may be

provided with the decorative

type unvented room heater.

Summary of Contents for VFZC36

Page 1: ...re or explosion may result causing property damage personal injury or loss of life Carefully review the instructions supplied with the decorative type unvented room heater for the minimum fireplace si...

Page 2: ...rebox must be electrically grounded in accordance with local codes or in the absence of local codes with the National Electrical Code ANSI NFPA 70 Available from American National Standards Institute...

Page 3: ...afts that alter burner flame patterns Ceiling fans can create drafts that alter burner flame patterns Altered burner patterns can cause sooting 7 Do not use a blower insert heat exchanger insert or ot...

Page 4: ...4 VFZC36 SPECIFICATIONS FIREBOX TOP VIEW ELECTRICAL ACCESS GAS LINE ACCESS NAILING FLANGE FIREBOX SIDE VIEW FIREBOX FRONT VIEW INSIDE FIREBOX...

Page 5: ...5 VFZC42 SPECIFICATIONS FIREBOX TOP VIEW NAILING FLANGE ELECTRICAL ACCESS GAS LINE ACCESS FIREBOX SIDE VIEW FIREBOX FRONT VIEW INSIDE FIREBOX...

Page 6: ...ON Provisions for adequate combustion and ventilation air must be made before installation of this unit Please Refer to manual accompanying log set INSTALLATION NOTICE A qualified service person must...

Page 7: ...ATION CLEARANCES Carefully follow the instructions below This will ensure safe installation Minimum Wall and Ceiling Clearances see Figure 1 below A Clearances from the side of the firebox opening to...

Page 8: ...the top of the screen NOTE Before placing the last ring over the rod slide the tinnerman clip included in the parts bag onto the rod and then slide the last ring over the rod See Figure 3 2 Insert the...

Page 9: ...ly remove the firebrick panels from their box 3 Decide which side of the firebox you want the gas line to enter and knock out the appropriate holes in the cabinet firebox and the firebrick panel 4 Pla...

Page 10: ...nd circulation of the heat throughout the heating area NOTE Install blower assembly per instruction sheet included in Blower Kit IMPORTANT The blower when installed must be electrically grounded in ac...

Page 11: ...e installation instructions for VFUN36FM VFUN42FM Face Mantel accessory 1 Assemble cabinet mantel hearth base optional and trim accessories Assembly instructions are included with each accessory 2 If...

Page 12: ...Header Wood Screws Right Leg Knock out plug in cabinet and firebox and run Flexible Gas Line into firebox 3 Prong power supply cord not included 5 Center the unit on the Hearth Base Run the Gas Line i...

Page 13: ...1 VFZC42 35 35 1 4 45 3 8 45 1 2 20 3 8 21 Built in installation of this firebox involves installing the firebox into a framed in enclosure This makes the front flush with the wall If installing a man...

Page 14: ...installation instructions included with blower 5 Attach flexible gas line to log set See Connecting to Gas Supply in log set owner s manual 6 Carefully insert firebox into rough opening 7 Attach fire...

Page 15: ...PARTS DIAGRAM Models VFZC36 VFZC42 15...

Page 16: ...1 9 CABINET RIGHT SIDE 24623 1 24623 1 10 INNER TOP 24624 1 24644 1 INSULATION 24649 1 24672 1 11 CABINET TOP 24625 1 24636 1 12 LEFT SIDE TRIM 24626 1 24626 1 13 RIGHT SIDE TRIM 24627 1 24627 1 14 T...

Page 17: ...purposes only Actual product may very in appearance CABINET MANTEL Two versions are available Golden Oak Stained Mantel Model VFGO36M for use with VFZC36 Model VFGO42M for use with VFZC42 Unfinished...

Page 18: ...use with VFZC36 Firebox Model VF42BH for use with VFZC42 Firebox BLOWER ACCESSORY Model VFZCB Blower Kit The variable blower allows you to select the desired speed The blower circulates heated air fr...

Page 19: ...ber which is on the nameplate attached to the firebox When ordering repair parts or options always give the following information as shown in this list 1 The PART NUMBER 2 The PART DESCRIPTION 3 The M...

Page 20: ...STATESSTOVE C S S U KeepingAmericaWarmSince1869 United States Stove Company 227 Industrial Park Road P O Box 151 South Pittsburg TN 37380 423 837 2100 Save this manual for future reference VFZC36 VFZC...

Reviews: