


10
OPERATING INSTRUCTIONS
CAUTIONS: HOUSE FIRE HAZARDS
•
DO NOT STORE WOOD ON FLOOR PROTECTOR,
UNDERNEATH STOVEPIPE(S) IF APPLICABLE,
OR ANYWHERE WITHIN CLEARANCES TO
COMBUSTIBLE SURFACES SPECIFIED FOR THIS
APPLIANCE.
•
NEVER OPERATE WITH SECONDARY TUBES,
FIBER BOARD, OR INSULATION REMOVED.
OPERATING SAFETY PRECAUTIONS
•
NEVER OVERFIRE THIS APPLIANCE BY BUILDING
EXCESSIVELY HOT FIRES AS A HOUSE/BUILDING
FIRE MAY RESULT. YOU ARE OVERFIRING THE
APPLIANCE IF IT BEGINS TO GLOW OR TURN
RED.
• NEVER BUILD EXCESSIVELY LARGE FIRES IN
THIS TYPE OF APPLIANCE AS DAMAGE TO THE
FIREBOX OR SMOKE LEAKAGE MAY RESULT.
• DO NOT BUILD FIRE TOO CLOSE TO GLASS.
• HOT WHILE IN OPERATION. KEEP CHILDREN,
CLOTHING, AND FURNITURE AWAY. CONTACT
MAY CAUSE SKINS BURNS. DO NOT TOUCH THE
APPLIANCE UNTIL IT HAS COOLED.
• PROVIDE ADEQUATE AIR FOR COMBUSTION
TO THE ROOM WHERE THE APPLIANCE IS
INSTALLED.
• INSPECT CHIMNEY LINER EVERY 60 DAYS.
REPLACE LINER IMMEDIATELY IF IT IS RUSTING
OR LEAKING SMOKE INTO THE ROOM.
•
ATTEMPTS TO ACHIEVE HEAT OUTPUT
RATES THAT EXCEED HEATER DESIGN
SPECIFICATIONS CAN RESULT IN PERMANENT
DAMAGE TO THE HEATER.
WARNING: EXPLOSION HAZARD
•
NEVER USE CHEMICALS, GASOLINE, GASOLINE-
TYPE LANTERN FUEL, KEROSENE, CHARCOAL
LIGHTER FLUID, OR SIMILAR FLAMMABLE
LIQUIDS TO START OR “FRESHEN UP” A FIRE IN
THE APPLIANCE.
• KEEP ALL FLAMMABLE LIQUIDS, ESPECIALLY
GASOLINE, OUT OF THE VICINITY OF THE
APPLIANCE - WHETHER IN USE OR IN STORAGE.
NOTICE: USE SOLID WOOD FUEL ONLY! DO
NOT BURN GARBAGE , OR FLAMMABLE
FLUIDS. DO NOT USE COAL. THIS APPLIANCE
IS NOT DESIGNED TO ACCOMMODATE THE
AIR FLOW (DRAFT) REQUIRED TO PROPERLY
BURN COAL OR COAL PRODUCTS. DO NOT
ELEVATE THE FIRE USING GRATES OR IRONS.
BUILD THE FIRE DIRECTLY ON THE FIREBRICK.
TESTING YOUR WOOD
When the stove is thoroughly warmed, place one piece of split
wood (about five inches in diameter) parallel to the door on the
bed of red embers.
Keep the air control full open and close the door. If ignition of
the piece is accomplished within 90 seconds from the time it
was placed in the stove, your wood is correctly dried. If ignition
takes longer, your wood is damp.
If your wood hisses and water or vapor escapes at the ends of
the piece, your wood is soaked or freshly cut (green). Do not
use this wood in your stove. Large amounts of creosote could
be deposited in your chimney, creating potential conditions for
a chimney fire.
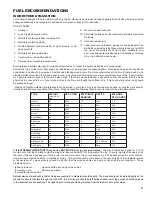
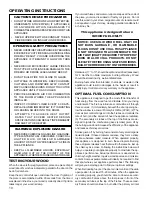
This appliance is designed to burn
WOOD FUEL ONLY!
Hardwood, 17” to 19”, should be split and air dried (seasoned)
for 6 months to obtain maximum burning efficiency. Wood
should be stored in a dry, well ventilated area.
Burning fuels other than intended, chemicals, or waste in this
appliance could result in damages to the heater or result in
bodily injury. It will also void any warranty on the appliance.
OPTIMAL FUEL CONSUMPTION
This appliance is designed to get the most efficient transfer of
heat energy from the wood fuel and radiate it into your living
environment. The fire box introduces combustion air through
three sources; (1) Immediately beneath the door opening be
-
low the window is a Lower Primary Air Orifice (LPAO), (2) The
door air inlet control brings air into the firebox and controls the
rate of burn (and the amount of heat the appliance radiates),
(3) The secondary air tubes at the top of the firebox are de
-
signed to ignite the combustion gases (smoke) given off by
the burning wood and increases the efficiency of the appliance
and reduces chimney emissions.
Smoke given off by burning fuel consists of very small organic
liquid droplets. If these droplets condense, they form a sticky
tar-like substance called creosote. When operated properly,
this appliance is designed to burn these droplets. Burning
these droplets releases heat that would otherwise be lost up
the chimney as smoke. Following the instructions below will
help you operate your appliance properly to maximize the ap-
pliance’s performance. Actual performance is dependent on
chimney height, weather, log size, wood species, and moisture
content. Some experimentation will initially be required to find
that spot where your appliance performs best. The following
will give you a starting point to find your optimum settings.
When first loading fuel, set the door air inlet control at the wide
open position for at least 15–20 minutes. When the appliance
is working properly, you should be able to observe second-
ary combustion flames above the fuel pieces in front of the
secondary air tubes at the top of the firebox. These second
-
ary flames should continue to burn after the primary air inlet
Summary of Contents for Country Hearth 2200IE
Page 17: ...17 NOTES...


