


11
OPERATING INSTRUCTIONS
CAUTION:
DO NOT OVERFIRE APPLIANCE. YOU ARE
OVERFIRING IF ANY PART OF THE APPLIANCE
GLOWS RED. CLOSE THE DOOR AND SHUT
DAMPER IMMEDIATELY TO REDUCE THE AIR
SUPPLY AND SLOW DOWN THE FIRE.
is reset from wide open to the desired operating setting. If the
flames do not continue to burn, open the air control to re-es
-
tablish the secondary flames then slowly reset the air control
to the desired setting. Initially it may take several attempts to
figure your appliance out. But once you find the efficient oper
-
ating spot and the correct mix of procedures to get there, only
minor adjustments will be necessary.
The best indicator of a properly operating appliance is to look
for smoke coming out of the chimney. You may see steam
emissions that will quickly dissipate. Smoke will thin but contin
-
ue to drift without totally disappearing. If you do detect smoke
emissions, open the air control a little bit, let the appliance ad-
just for 10–15 minutes and re-check your chimney. Remember
– visible smoke represents lost heat.
TAMPER WARNING
This wood heater has a manufacturer-set minimum low burn
rate that must not be altered. It is against federal regulations
to alter this setting or otherwise operate this wood heater in a
manner inconsistent with operating instructions in this manual.
EFFICIENCY
Efficiencies can be based on either the lower heating value
(LHV) or the higher heating value (HHV) of the fuel. The lower
heating value is when water leaves the combustion process as
a vapor, in the case of woodstoves the moisture in the wood
being burned leaves the stove as a vapor. The higher heat-
ing value is when water leaves the combustion process com-
pletely condensed. In the case of woodstoves this would as-
sume the exhaust gases are room temperature when leaving
the system, and therefore calculations using this heating value
consider the heat going up the chimney as lost energy. There-
fore, efficiency calculated using the lower heating value of
wood will be higher than efficiency calculated using the higher
heating value. In the United States all woodstove efficiencies
should be calculated using the higher heating value.
The best way to achieve optimum efficiencies is to learn the
burn characteristic of you appliance and burn well-seasoned
wood. Higher burn rates are not always the best heating burn
rates; after a good fire is established a lower burn rate may be
a better option for efficient heating. A lower burn rate slows the
flow of usable heat out of the home through the chimney, and
it also consumes less wood.
NOTICE - INITIAL BURNS TO CURE PAINT
BECAUSE OF THE HIGH OPERATING TEM-
PERATURES, THIS APPLIANCE IS COATED
WITH A SPECIAL HIGH TEMP PAINT WHICH
REQUIRES A SERIES OF LOW TO MEDIUM
BURNS TO FULLY CURE FOR DURABILITY
AND A LIFETIME OF SERVICE.
Proper curing of the high-temp paint requires a series of three
initial burns. The appliance should be allowed to cool off be-
tween each burn. The first two burns should be small fires and
low temperatures (250 degrees F) for a duration of 20 minutes
each. The third fire should be at a temperature of approxi
-
mately 500 F for 20 minutes. Provide adequate cross ventila
-
tion to clear any smoke or odor caused by initial firings.
STARTING A FIRE
DO NOT LEAVE APPLIANCE UNATTENDED WITH DOOR
OPEN! The top down method of fire building is recommended
for this appliance. After making sure that the stove air intake
controls are fully open (completely pull-out towards you),
Place the largest pieces of wood on the bottom, laid in parallel
and close together. Smaller pieces are placed in a second lay-
er, crossways to the first. A third layer of still smaller pieces is
laid crossways to the second, this time with some spaces be-
tween. Then a fourth layer of loose, small kindling and twisted
newspaper sheets tops off the pile. Add large pieces of wood
as the fire progresses being careful not to overload. (Do not
fill firebox beyond firebrick area.) An ideal ember bed of 1 – 2”
should be established to achieve optimum performance. This
unit is designed to function most effectively when air is allowed
to circulate to all areas of the firebox. TIP: If ash or embers
remain in the appliance, make sure to clear them away from
the Lower Primary Air Orifice (LPAO) and rake a slight (1-to-2
inch wide) trough down the center of the embers from front
to back prior to loading the fuel. Once fuel has been loaded,
close the door and leave the air inlet control fully open until fire
is well established (at least 15–20 minutes) being careful not to
over fire (if any of the exterior parts of the appliance or chimney
connections begin to glow you are over firing the appliance).
Re-adjust the door air inlet control to desired burn rate. (If ex-
cessive smoke fills the firebox, open air inlet control slightly
until flames resume and wood is sufficiently ignited.) The basic
rule of thumb is “closed - low,” “half way open - medium” and
“fully open - high.”
VISIBLE SMOKE
The amount of visible smoke being produced can be an ef-
fective method of determining how efficiently the combustion
process is taking place at the given settings. Visible smoke
consist of unburned fuel and moisture leaving your stove.
Learn to adjust the air settings of your specific unit to produce
the smallest amount of visible smoke. Wood that has not been
seasoned properly and has a high wood moisture content will
produce excess visible smoke and burn poorly.
ADDING FUEL
If the embers are not hot and glowing, rake the embers to the
front of the appliance, close the door and adjust the air inlet
control to the wide open position. Let the embers re-heat for
10–15 minutes. When hot and glowing, spread them out and
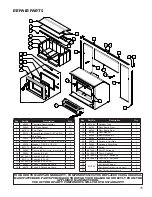
Summary of Contents for Country Hearth 2200IE
Page 17: ...17 NOTES...


