


2
You’ve purchased a heater from North America’s oldest manufacturer of wood burning products. By heating with wood you’re help-
ing to CONSERVE ENERGY! Wood is our only Renewable Energy Resource. Please do your part to preserve our wood supply.
Plant at least one tree each year. Future generations will thank you. The instructions pertaining to the installation of your wood
stove comply with UL-1482 and ULC-S628 standards.
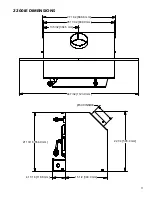
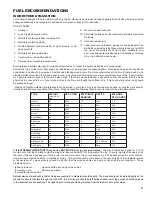
This manual describes the installation and operation of the Country Hearth, 2200IE wood heater. This heater meets the 2015 U.S.
Environmental Protection Agency’s crib wood emission limits for wood heaters sold after May 15, 2015. Under specific test condi
-
tions this heater has been shown to deliver heat at rates ranging from 11,335 to 21,170 Btu/hr.
Note: The BTU ratings mentioned above are based on the EPA test protocol burning dimensional Douglas Fir lumber. Our adver-
tised BTU’s are based on the first hour of operation at high burn rate burning cordwood.
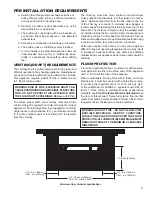
1. The installation of this appliance must comply with your local
building code rulings.
2. DO NOT INSTALL THIS APPLIANCE IN A MOBILE HOME,
MANUFACTURED HOME, TRAILER OR TENT (NO EXCEP-
TIONS PER HUD FEDERAL STANDARD: 24 CFR CH.XX).
3.
Verify that the appliance is properly installed before firing for
the first time. This appliance should be installed by a quali
-
fied installer to insure a correct and safe installation.
NEVER
use temporary or makeshift compromises during the
installation.
4. If there are any missing or damaged components of the appli-
ance, contact your dealer immediately.
DO NOT OPERATE
THIS APPLIANCE WITH MISSING OR DAMAGED PARTS.
5. WARNING: RISK OF FIRE.
Observe the minimum clear-
ances to combustibles stated in this manual and on the labels
attached to the appliance.
DO NOT store wood, any type
of flammable vapors or liquids, place furniture, rugs,
carpet, clothing or other combustible objects within the
clearance area.
6. DO NOT
connect this appliance to any air distribution duct
or system.
7. DO NOT
tamper with the combustion air control of this unit
beyond normal adjustment range.
8.
Provide adequate combustion air to the room where the ap
-
pliance is installed. Restricting combustion air will result in a
lazy fire which causes soot or creosote buildup and greatly
reduces efficiency.
9. Always connect this appliance to a chimney that vents to the
outside. Never vent into another room, crawl space, attic,
or inside a building.
DO NOT CONNECT THIS UNIT TO A
CHIMNEY FLUE SERVING ANOTHER APPLIANCE.
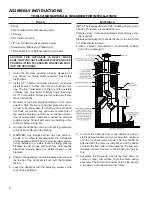
10. DO NOT
connect a wood burning appliance to an aluminum
Type B gas vent. This is not safe. Use approved masonry
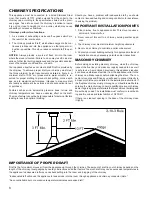
or a UL 103 HT (U.S.) Listed Residential Type and Building
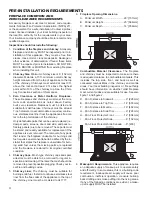
Heating Appliance Chimney. Use a 6” diameter chimney, that
is high enough to create sufficient draft.
11. Be sure your chimney is safely constructed and in good re-
pair. Have the chimney inspected by the fire department or a
qualified inspector. Your insurance company should be able
to recommend a qualified inspector.
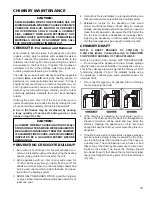
12. 12. Creosote or soot may build up in the chimney liner or
chimney and cause a house/building fire. Inspect the chimney
and chimney liner twice monthly during the heating season
and clean if necessary.
13.
In the event of a chimney fire, turn the air controls to the closed
position, leave the building and
CALL THE FIRE DEPART-
MENT IMMEDIATELY!
14. To prevent injury, do not allow anyone to use this appliance
that is not familiar with its correct operation. Do not operate
this appliance while under the influence of alcohol or drugs.
15. CAUTION: HOT SURFACES. KEEP CHILDREN AWAY.
DO NOT TOUCH WHILE IN OPERATION. CONTACT MAY
CAUSE SKIN BURNS
.
16. Children should be alerted to the hazards from high surface
temperatures. Never leave small children unsupervised
when they are in the same room as the appliance during
operation. To prevent burns, always wear protective clothing,
leather hearth gloves, and eye protection when refueling or
fire maintenance. Always be aware of heated surfaces. Heat
radiating from the appliance can potentially discolor, melt, or
even ignite combustible materials.
KEEP ALL COMBUSTIBLE
MATERIALS WELL AWAY FROM THE HEATER!
17. WARNING: RISK OF FIRE.
Keep the feed door tightly closed
at all times except when tending the fire.
18. DO NOT
overfire this appliance. Overfiring will occur if the feed
door is left open during operation. If any part of the appliance
glows, you are overfiring. Adjust air controls to a lower setting
to slow down the fire.
19. DO NOT ELEVATE THE FIRE!
Build the fire directly on the
firebrick. This appliance has not been tested with the use of
any means to elevate the fire and it should not be attempted.
20. Ashes should not be allowed to accumulate more than two
to three inches in the firebox.
21. The paint on your appliance is durable but will not stand rough
handling or abuse. The paint used may give off smoke and/or
an odor during the first few fires. This will occur until the paint
has cured. Animals / people with lung problems should not be
present during the curing process. Build small fires at first to
help this process and open windows and doors as needed to
clear the smoke and odor. If the appliance is overfired, the paint
will discolor. When installing your unit, take care in handling.
Clean with soap and water when the appliance is not in use.
Do not use any acids, abrasive cleaners or scouring soap as
these solvents wear and dull the finish.
22. DO NOT ROUTE THE BLOWER POWER SUPPLY CORD
NEAR OR ACROSS HOT SURFACES!
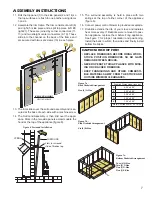
23.
Canada Installations requires that this fireplace must be
installed with a continuous chimney liner of 6 inch diameter
extending from the fireplace insert to the top of the chimney.
The chimney liner must conform to the Class 3 requirements
of CAN/ULC-S635, Standard for Lining Systems for Exist-
ing Masonry or Factory-Built Chimneys and Vents, or CAN/
ULC-S640, Standard for Lining Systems for New Masonry
Chimneys.
24. Permanently seal any opening between the masonry of the
fireplace and the facing masonry.
25. Fireplace insert surround panels may be removed to inspect
fireplace insert and fireplace.
26.
U.S. Stove Company requires installing smoke detectors in
the same room as the heater if not already installed. Smoke
expelled from the unit by either paint curing, opening the fuel
loading door, or a negative pressure inside the home could
trigger the smoke detectors.
27. For further information on using your heater safely, obtain
a copy of the National Fire Protection Association (NFPA)
publication “Using Coal and Wood Stoves Safely” NFPA No.
HS-10-1978. The address of the NFPA is 1 Battery March
Park, Quincy, MA. 02269.
Summary of Contents for Country Hearth 2200IE
Page 17: ...17 NOTES...


