background image

 -3-

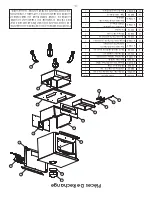
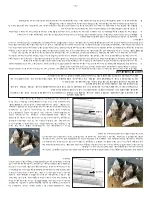
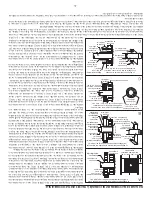
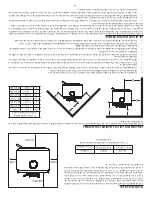
INSTRUCTIONS DESTINÉES À L'ASSEMBLAGE DE LA SOUFFLANTE

L'ENSEMBLE  DE 

LA  SOUFFLANTE 

DOIT  ÊTRE 

DÉCONNECTÉ  DE 

LA  SOURCE 

D'ALIMENTATION 

ÉLECTRIQUE AVANT LE DÉMARRAGE DE L'INSTALLATION.
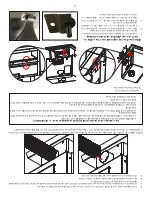
Étape 1.

Fixez l'ensemble au dos du poêle à l'aide des quatre vis fournies.

L'ENSEMBLE DE 

LA SOUFFLANTE 

EST PRÉVU 

POUR ÊTRE 

UTILISÉ UNIQUEMENT 

AVEC UN 

POÊLE MARQUÉ TEL QU'INDIQUÉ POUR CET USAGE.

N'ACHEMINEZ PAS 

LE CORDON 

D'ALIMENTATION À 

PROXIMITÉ OU 

SUR DES 

SURFACES 

CHAUDES !

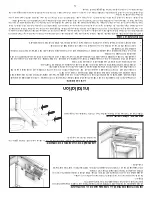
ASSEMBLÉE DE CASSEROLE DE CENDRE 

Retirez le 

cendrier du 

foyer. Sous 

le foyer, 

il y 

a deux 

supports; Faites 

glisser le 

cendrier dans ces supports.

Installation

AVIS DE SÉCURITÉ:

• 

L'INSTALLATION INCORRECTE 

DE CE 

POÊLE POURRAIT 

ENTRAÎNER L'INCENDIE 

DU DOMICILE. 

AFIN DE 

RÉDUIRE LE 

RISQUE 

D'INCENDIE, RESPECTEZ 

LES INSTRUCTIONS 

D'INSTALLATION. NE 

PAS RESPECTER 

LES INSTRUCTIONS 

PEUT ENTRAÎNER 

DES 

DOMMAGES MATÉRIELS, DES BLESSURES PERSONNELLES VOIRE LA MORT !

• 

CONSULTEZ LES 

FONCTIONNAIRES 

MUNICIPAUX DE 

CONSTRUCTION OU 

DE LUTTE 

CONTRE LES 

INCENDIES AFIN 

DE 

CONNAÎTRE LES LIMITATIONS ET LES EXIGENCES D'INSTALLATION DE VOTRE RÉGION.

• 

UTILISEZ DES DÉTECTEURS DE FUMÉE DANS LA PIÈCE DANS LAQUELLE LE POÊLE EST INSTALLÉ.

• 

MAINTENEZ LE MOBILIER ET LES RIDEAUX ÉLOIGNÉS DU POÊLE.

• 

N'UTILISEZ PAS 

D'ESSENCE, DE 

COMBUSTIBLE POUR 

LANTERNE 

À ESSENCE, 

DE KÉROSÈNE, 

DE LIQUIDE 

D'ALLUMAGE DE 

CHARBON OU 

DE LIQUIDES 

SIMILAIRES POUR 

DÉMARRER OU 

« RAVIVER 

» UN 

FEU DANS 

CE POÊLE. 

MAINTENEZ TOUS 

CES 

LIQUIDES ÉLOIGNÉS DU POÊLE.

• 

EN CAS 

D'INCENDIE DE 

CHEMINÉE, FERMEZ 

COMPLÈTEMENT LA 

COMMANDE D'AIR 

AFIN DE 

PRIVER LE 

FEU D'OXYGÈNE. 

APPELEZ LES POMPIERS.

• 

NE CONNECTEZ PAS LE POÊLE À UN CONDUIT OU CIRCUIT DE DISTRIBUTION D'AIR.

• 

UNE SOURCE D'AIR FRAIS DANS LA PIÈCE OU L'ESPACE CHAUFFÉ DEVRA ÊTRE FOURNIE SI NÉCESSAIRE.

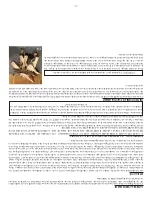
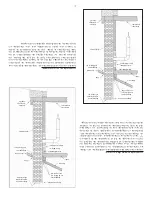
POSITIONNER LE POÊLE

Il est 

très important 

de positionner 

le poêle 

à bois 

aussi près 

que possible 

de la 

cheminée, et 

dans une 

zone qui 

favorisera la 

distribution de 

chaleur la 

plus efficace 

possible au 

sein du 

domicile. Le 

poêle doit 

par conséquent 

être installé 

dans la 

pièce 

où vous 

passez le 

plus de 

temps, et 

dans la 

pièce la 

plus spacieuse 

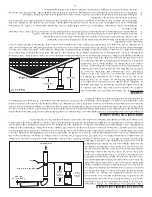
possible. Rappelez-vous 

que les 

poêles à 

bois produisent 

une chaleur 

rayonnante, la 

chaleur que 

nous sentons 

lorsque nous 

sommes à 

proximité d'un 

poêle à 

bois. Un 

poêle à 

bois 

fonctionne aussi 

par convection, 

grâce au 

déplacement de 

l'air chaud 

accéléré vers 

le haut 

et son 

remplacement par 

de 

l'air plus frais. Si nécessaire, la distribution d'air chaud à partir du poêle peut être facilitée par l'installation d'une soufflante.

Le poêle 

à bois 

ne doit 

pas être 

raccordé à 

un système 

de distribution 

d'air chaud 

car une 

accumulation excessive 

de 

chaleur pourrait avoir lieu.

Un poêle 

à bois 

ne doit 

jamais être 

installé dans 

un couloir 

ou près 

d'un escalier, 

car cela 

pourrait bloquer 

le passage 

en cas 

d'incendie ou ne pas respecter les dégagements requis.

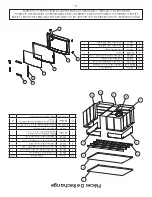
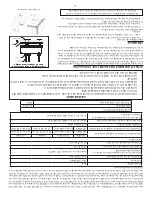
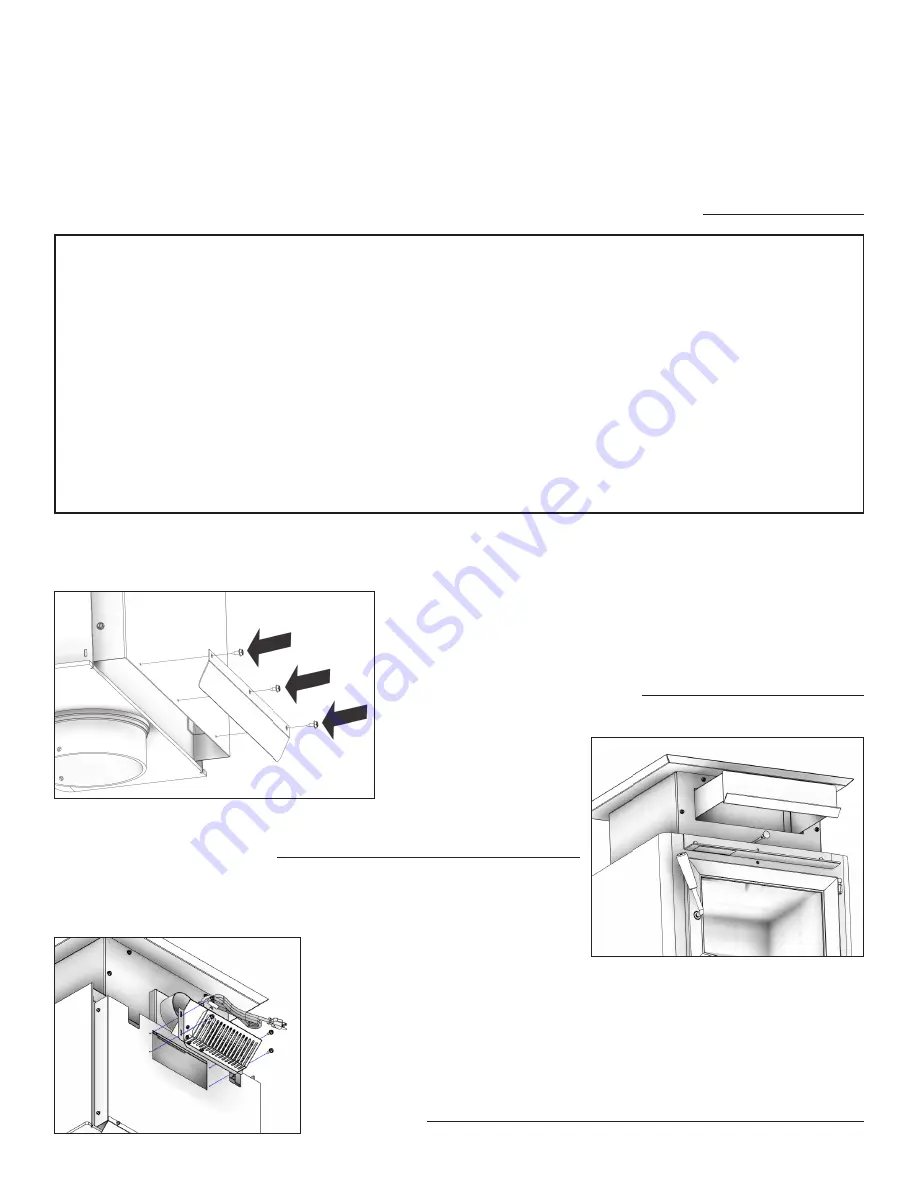
ENSEMBLE DÉFLECTEUR D’AIR

Utilisez les vis fournies pour fixer le déflecteur d’air à l’arrière de l’appareil.

Summary of Contents for Magnolia II

Page 1: ...ave These Instructions This manual will help you to obtain efficient dependable service from the heater and enable you to order repair parts correctly Keep in a safe place for future reference This ma...

Page 2: ...operation of the Magnolia II US2500E wood heater This heater meets the 2020 U S Environmental Protection Agency s cordwood emission limits for wood heaters sold after May 15 2020 Under specific test...

Page 3: ...1 1 2 bolts 3 washers and 3 weld tabs provided in the parts box FIREBRICK CONFIGURATION Replace the Firebrick as shown in the illustration 5 16 18 x 1 1 2 BOLT WASHER HEATER TOP GASKET WELD TAB TOOLS...

Page 4: ...SHEN UP A FIRE IN THIS HEATER KEEP ALL SUCH LIQUIDS WELL AWAY FROM THE HEATER WHILE IT IS IN USE IN THE EVENT OF A CHIMNEY FIRE PUSH THE AIR CONTROL FULL CLOSED TO DEPRIVE THE FIRE OF OXYGEN CALL THE...

Page 5: ...D 30 29 762 737 E 10 10 254 254 F 20 20 508 508 OUTSIDE COMBUSTION AIR Your wood stove is approved to be installed with an outside air intake 4FAK which is necessary for a mobile home This type of ins...

Page 6: ...MUST BE ATTACHED TO THE STRUCTURE OF THE MOBILE HOME SECURING APPLIANCE S ON A PEDESTAL TO THE FLOOR Use the designated holes to secure the unit to the floor SECURING APPLIANCE S WITH LEGS TO THE FLOO...

Page 7: ...o the room through appliance and chimney connector joints An uncontrollable burn or excessive temperature indicates an excessive draft CHIMNEY Your wood stove may be hooked up with a 6 factory built o...

Page 8: ...as recommended by the manufacturer The chimney must be the required height above the roof or other obstructions for safety and proper draft operation MASONRY CHIMNEY Ensure that a masonry chimney meet...

Page 9: ...h has two air channels of 1 25 4 mm each construct a wall pass through There shall be a minimum 6 152 4 mm separation area containing fiberglass insulation from the outer surface of the wall thimble t...

Page 10: ...ns Under extreme conditions it may rot instead of drying This point cannot be over stressed the vast majority of the problems related to the operation of a wood stove is caused by the fact that the wo...

Page 11: ...burn manufactured logs made of wax impregnated sawdust or logs with any chemical additives Manufactured logs made of 100 compressed sawdust can be burned but be careful burning too much of these logs...

Page 12: ...TED WITH A SPECIAL HIGH TEMP PAINT WHICH REQUIRES A SERIES OF LOW TO MEDIUM BURNS TO FULLY CURE FOR DURABILITY AND A LIFETIME OF SERVICE Proper curing of the high temp paint requires a series of three...

Page 13: ...or overfire the appliance When adding fuel be careful not to smother the fire Do not build fires against glass and make sure the embers do not obstruct the air inlet Do not allow logs to roll and stri...

Page 14: ...n Make sure the blades do not have build up CAUTION Do not overfire appliance You are overfiring if any part of the appliance glows red Close the door and shut damper immediately to reduce the air sup...

Page 15: ...GLASS CARE Inspect and clean the glass regularly to detect any cracks If you spot one turn the stove off immediately Do not abuse the glass door by striking or slamming shut Do not use the stove if th...

Page 16: ...e Collar 1 2 88042 1 4 Rope Gasket 1 3 25845 Air Deflector 1 4 891492 Blower Assembly B36 1 5 26060 Rear Shield 1 6 610926 Rear Ashpan US2500E BP 1 7 29243 Pedestal US2500E BP 1 8 29065 Pedestal Front...

Page 17: ...4 29247 Right Brick Panel 5 86645 Secondary Air Tube 7 32 2 6 29248 Left Brick Panel 1 7 24103A Half Firebrick Pumice 4 1 2 X 4 1 2 1 8 40561 Ash Plug 1 9 891530A Firebrick 4 5 X 7 5 X 1 25 1 10 89066...

Page 18: ...07 Date _____________________ Engineer Name ________________________________ License No ____________________________________ Company _____________________________________ Telephone No _______________...

Page 19: ...ECHANGE VEUILLEZ CONSERVER CE GUIDE DANS UN ENDROIT S R DES FINS DE R F RENCE LORSQUE VOUS NOUS CRIVEZ VEUILLEZ INDIQUER LE NUM RO COMPLET DU MOD LE QUI FIGURE SUR LA PLAQUE SIGNAL TIQUE DE L APPAREIL...

Page 20: ...____________________________ Service de 07 Date _____________________ Nom de l ing nieur ____________________________ N de licence _________________________________ Compagnie _________________________...

Page 21: ...ique droit 5 86645 Tube air secondaire 7 32 2 6 29248 Panneau de brique gauche 1 7 24103A Demi pierre ponce brique r fractaire 4 1 2 x 4 1 2 1 8 40561 Bouchon de cendre 1 9 891530A Brique r fractaire...

Page 22: ...in e de 6 po 1 2 88042 Joint de corde 1 4 po 1 3 25845 D flecteur d air 1 4 891492 Ensemble ventilateur B36 1 5 26060 Bouclier arri re 1 6 610926 Cendrier arri re US2500E BP 1 7 29243 Pi destal US2500...

Page 23: ...t et qu ils scellent correctement vitant les expositions ind sirables Il est recommand que vous utilisiez des d tecteurs de fum e et de CO dans les zones o se trouve un potentiel de g n ration de CO E...

Page 24: ...Les feux de chemin e br lent extr mement chaud et peuvent enflammer les mat riaux combustibles environnants En cas d incendie de chemin e appelez imm diatement le service d incendie FORMATION DE CR O...

Page 25: ...charge de bois approximativement quivalente la hauteur des briques r fractaires Il est important de noter que la combustion du bois consomme de l oxyg ne ambiant dans la pi ce En cas de pression n gat...

Page 26: ...NTURE SP CIALE CON UE POUR LES HAUTES TEMP RATURES ELLE EXIGE UNE S RIE DE FEUX INTENSIT BASSE ET MOYENNE POUR S CHER ENTI REMENT ET AINSI GARANTIR LA DURABILIT ET LA VIE DE SERVICE Le s chage correct...

Page 27: ...que la temp rature ne d passe jamais 246 C 475 F sur un thermom tre magn tique pour une installation sur des tuyaux de po le paroi simple ou 482 C 900 F sur sonde thermom trique pour l installation s...

Page 28: ...m me pourrir au lieu de s cher On ne saurait trop soulign que la vaste majorit des probl mes li s au fonctionnement d un insert bois est caus e par le fait que le bois utilis tait trop humide ou avai...

Page 29: ...bustible Commencez avec une partie de chemin e Solid Pak fabriqu e en usine agr e d au moins 12 po 304 mm de diam tre int rieur avec une isolation de 1 po 25 4 mm ou plus et un raccord de chemin e de...

Page 30: ...de protection contre les incendies NFPA en la faisant inspecter par un professionnel Assurez vous qu il n y ait pas de fissures de mortiers perdus ou d autres signes de d t rioration et de blocage Fai...

Page 31: ...p rature excessive indique un tirage excessif Pente de po par pied Partie m le vers le bas 3 vis Vers l appareil Installer l extr mit sertie vers le po le Direction de la circulation des gaz de condui...

Page 32: ...CONS QUENT ELLE DOIT TRE DE TYPE HT 2100 F UTILISEZ UN PARE TINCELLES Illustration Fixation du r chauffeur au plancher Utilis pour xer les appareils avec les pattes au sol Pour une utilisation de mais...

Page 33: ...confin s similaires un plancher ou un plafond Dans une installation canadienne dans laquelle un passage travers un mur ou une partie de construction combustible est souhait e l installation doit tre...

Page 34: ...ARRER OU RAVIVER UN FEU DANS CE PO LE MAINTENEZ TOUS CES LIQUIDES LOIGN S DU PO LE EN CAS D INCENDIE DE CHEMIN E FERMEZ COMPL TEMENT LA COMMANDE D AIR AFIN DE PRIVER LE FEU D OXYG NE APPELEZ LES POMPI...

Page 35: ...NTS N CESSAIRES POUR L INSTALLATION Vous aurez besoin d une perceuse quip e d un foret de 1 8 po afin d installer les vis t le dans le raccord de conduite Une cl douille ou tournevis de 5 16 po afin d...

Page 36: ...ifornie comme causant le cancer et des malformations cong nitales ou autres dommages au f tus Pour obtenir plus de renseignements veuillez consulter le site www P65warnings ca gov Conservez ces instru...

Reviews: