background image

8

© 2021 United States Stove Company

INSTALLATION

will be no problem with the draft. The stovepipe must be 

made of aluminized or cold roll steel and have a minimum 

thickness of 0.021” or 0.53 mm. It is strictly forbidden 

to use galvanized steel. The smoke pipe should be 

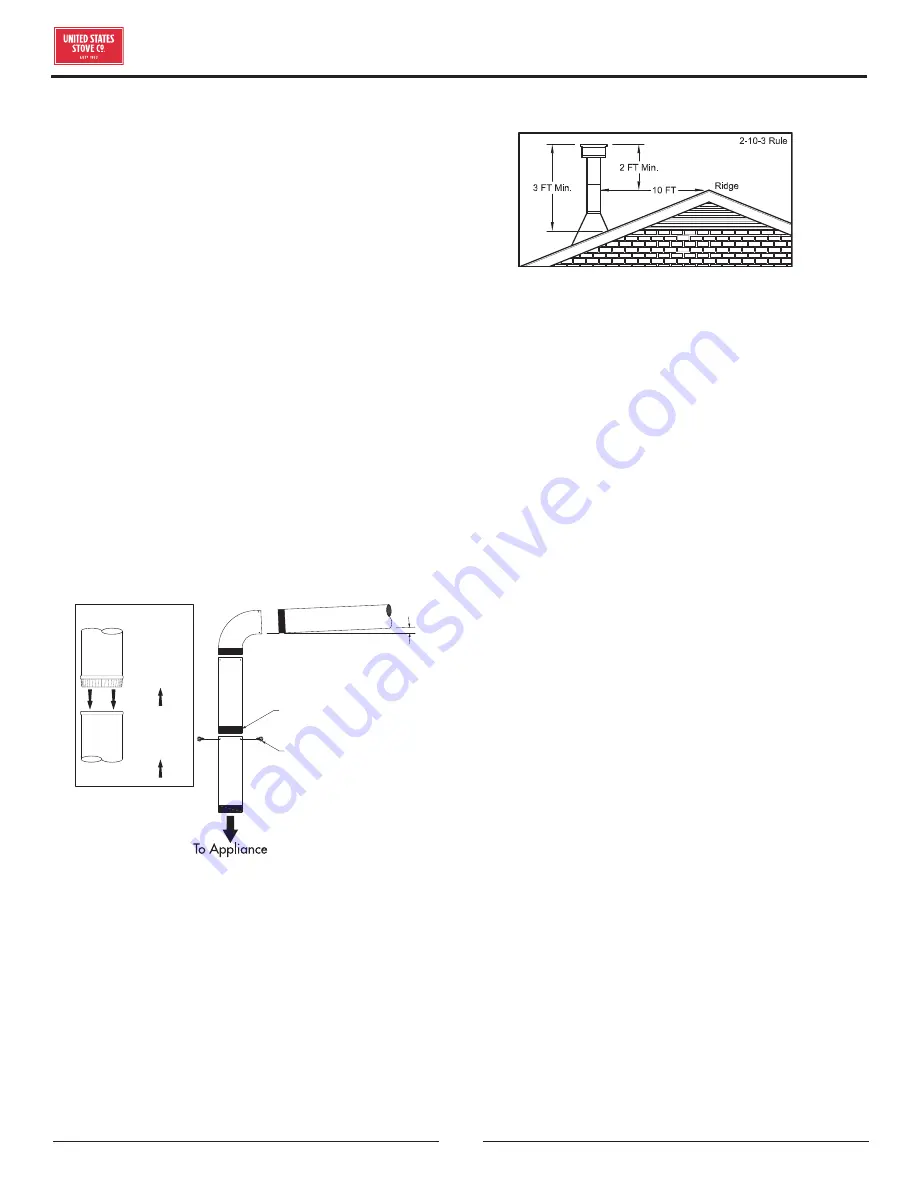
assembled to promote the male section (crimped end) of 

the pipe to be faced down. Attach each section to another 

with three metal screws spaced an equal distance apart. 

The pipe must be short and straight. All sections installed 

horizontally must slope at least 1/4 inch per foot, with 

the upper end of the section toward the chimney. Any 

installation with a horizontal run of chimney pipe must 

conform to NFPA 211. To ensure a good draft, the total 

length of the coupling pipe should never exceed 8’ to 10’ 

(2.4m to 3.04m). Except for cases of vertical installation, 

in a cathedral-roof style where the smoke exhaust 

system can be much longer and connected without 

problem to the chimney at the ceiling of the room. There 

should never be more than two 90 degrees elbows in the 

smoke exhaust system. The installation of a “barometric 

draft stabilizer” (fireplace register) on a smoke exhaust 

system is prohibited. Furthermore, the installation of 

a draft damper is not recommended. With a controlled 

combustion wood stove, the draft is regulated upon 

intake of the combustion air in the stove and not at the 

exhaust.

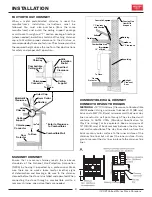
3 screws

Flow

Direction

of Flue

Gases

Install 

crimped 

end

towards 

stove.

Male Part Downwards

1/4” slope per foot

IMPORTANCE OF PROPER DRAFT

Draft is a force that moves air from the appliance up 

through the chimney. The amount of draft in your chimney 

depends on the length of the chimney, local geography, 

nearby obstructions and other factors. Too much draft 

may cause excessive temperatures in the appliance. An 

inadequate draft may cause back-puffing into the room 

and “plugging” of the chimney. An inadequate draft 

will cause the appliance to leak smoke into the room 

through appliance and chimney connector joints. An 

uncontrollable burn or excessive temperature indicates 

an excessive draft.

CHIMNEY

Your wood stove may be hooked up with a 6” factory-

built or masonry chimney. If you are using a factory-

built chimney, it must comply with UL 103 or CSA-B365 

standard; therefore it must be a Type HT (2100°F). 

It must be installed according to the manufacturer’s 

specifications. Take into account the chimney’s location 

to ensure it is not too close to neighbors or in a valley which 

may cause unhealthy or nuisance conditions. If you are 

using a masonry chimney, it must be built in compliance 

with the specifications of the National Building Code. 

It must be lined with fire clay bricks, metal or clay tiles 

sealed together with fire cement. Round flues are the 

most efficient. The interior diameter of the chimney flue 

must be identical to the stove smoke exhaust. A flue 

which is too small may cause draft problems, while a large 

flue favors rapid cooling of the gas, and hence the build-

up of creosote and the risk of chimney fires. Note that it 

is the chimney and not the stove which creates the draft 

effect; your stove’s performance is directly dependent on 

an adequate draft from your chimney.

 Do not connect 

this unit to a chimney flue serving another appliance. 

The following recommendations may be useful for the 

installation of your chimney:
1.  It must rise above the roof at least 3’ (0.9m) from the 

uppermost point of contact.

2.  The chimney must exceed any part of the building or 

other obstruction within a 10’ (3.04m) distance by a 

height of 2’ (0.6m).

3.  The installation of an interior chimney is always 

preferable to an exterior chimney.  Indeed, the interior 

chimney will, by definition, be hotter than an exterior 

chimney, being heated up by the ambient air in the 

house. Therefore the gas which circulates will cool 

more slowly, thus reducing the build-up of creosote 

and the risk of chimney fires.

4.  The draft caused by the tendency for hot air to rise 

will be increased with an interior chimney.

5.  Using a fire screen at the extremity of the chimney 

requires regular inspection to ensure that it is not 

obstructed thus blocking the draft, and it should be 

cleaned when used regularly.

Summary of Contents for US1100E-P

Page 1: ...e shift compromises during the installation of this heater Contact local building or fire officials about permits restrictions and installation requirements in your area NEVER OPERATE THIS PRODUCT WHI...
Page 2: ...ght US1100E Leg 21 3 542 mm 24 5 623 mm 30 9 785 mm US1100E Pedestal 21 1 536 mm 22 5 572 mm 31 7 806 mm Combustion Chamber Width x Depth 18 25 x 11 5 464 mm X 293 mm Firebox Volume Cubic Feet 1 31 cu...

Page 3: ..._________________________________________ If no Date of inspection of the existing chimney system ___________________________________________________________ COMMISSIONING Confirm Hearth Pad Installat...

Page 4: ...BLOWER ASSEMBLY The blower assembly must be disconnected from the source of electrical supply before attempting the installation The blower assembly is intended for use only with a stove that is marke...

Page 5: ...SOURCE OF FRESH AIR INTO THE ROOM OR SPACE HEATED SHALL BE PROVIDED WHEN REQUIRED US Stove highly recommends your stove be installed by a qualified NFI US or WETT Canada technician To find the nearest...

Page 6: ...on of combustible construction is desired the installation must conform to CAN CSA B365 A flue pipe crossing a combustible wall must have a minimum clearance of 18 457 2 mm To reduce flue clearances f...

Page 7: ...ed for your specific flooring 3 Install one bracket per leg or consult your local authority having jurisdiction to determine how many points of attachment are required In addition to the previously de...

Page 8: ...ctor joints An uncontrollable burn or excessive temperature indicates an excessive draft CHIMNEY Your wood stove may be hooked up with a 6 factory built or masonry chimney If you are using a factory b...

Page 9: ...ction Association NFPA by having it inspected by a professional Make sure there are no cracks loose mortar or other signs of deterioration and blockage Be sure to the chimney cleaned before the stove...

Page 10: ...nd cover its opening with a 24 gage minimum sheet metal support Maintain the 6 152 4 mm space There should also be a support sized to fit and hold the metal chimney connector See that the supports are...

Page 11: ...ific varieties have better energy yields than others Higher efficiencies and lower emissions generally result when burning air dried seasoned hardwoods as compared to softwoods or too green or freshly...

Page 12: ...ced in the stove your wood is correctly dried If ignition takes longer your wood is damp If your wood hisses and water or vapor escapes at the ends of the piece your wood is soaked or freshly cut gree...

Page 13: ...f wood during start up and a high burn rate to increase the stove temperature 3 5 4 lbs Pull the air control out fully in the HI position Light the newspaper and leave the door slightly open for about...

Page 14: ...rly and has a high wood moisture content will produce excess visible smoke and burn poorly AIR TUBES The air tubes assembled in this unit are designed to provide an accurate mix of secondary air to en...

Page 15: ...Leave the air control fully open for about 5 min every time you reload the stove to bring it back to proper operating temperatures The secondary combustion can only take place if the firebox is hot e...

Page 16: ...r uses a 1 diameter rope gasket It is recommended that you change the door gasket which makes your stove door air tight once a year in order to ensure good control over the combustion maximum efficien...

Page 17: ...D TAILS TECHNIQUES 120VAC 60 Hz CA 0 55AMP BLACK NOIR BLACK NOIR NOTICE DO NOT ALLOW THE POWER CORD TO TOUCH HOT SURFACES KEEP THE POWER CORD AT LEAST 12 30 5CM FROM THE STOVE OR PIPE SURFACES DANGER...

Page 18: ...E BL 4 IN ORDER TO MAINTAIN WARRANTY COMPONENTS MUST BE REPLACED USING ORIGINAL MANUFACTURERS PARTS PURCHASED THROUGH YOUR DEALER OR DIRECTLY FROM THE APPLIANCE MANUFACTURER USE OF THIRD PARTY COMPONE...

Page 19: ...ption Qty 1 893241 US Complete Door Handle 1 2 40887 Medium Arched Door 1 3 88324 1 Rope Gasket 1 4 893159 Clear Glass 1 5 29229 Glass Retainer Sides 2 6 29227 Glass Retainer Top 1 7 29230 Gasket Clam...

Page 20: ...____________________ Engineer Name _____________________________________ License No _________________________________________ Company ___________________________________________ Telephone No _________...

Page 21: ...____________________ Service de 07 Date ______________________ Nom de l ing nieur _________________________________ N de licence ______________________________________ Compagnie ______________________...

Page 22: ...secondaire 1 6 891414 Demi brique r fractaire 4 7 89066 Brique r fractaire 4 1 2 X 9 4 8 891095 Brique r fractaire 6 X 8 1 4 3 9 23783 Brique r fractaire 1 1 4 X 2 9 16 X 9 4 10 86903 Tube secondaire...

Page 23: ...8 Soudure d amortisseur 1 8 86709 Tige amortisseur 1 9 891987 Bouton en plastique 1 10 610918 Panneau d acc s US1100E BP 1 11 610944 Soudure de logement en cendrier US1100E BL 1 12 40566 Pied en fonte...

Page 24: ...R BLACK NOIR AVIS NE PERMETTEZ PAS AU CORDON D ALIMENTATION DE TOUCHER LES SURFACES CHAUDES GARDER LE CORDON D ALIMENTATION AU MOINS 12 po 30 5CM DES SURFACES DU PO LE OU DU TUYAU DANGER RISQUE D LECT...

Page 25: ...cet appareil utilise un joint de corde de 1 po de diam tre Il est recommand de changer le joint de porte qui rend la porte de votre po le tanche l air une fois par an afin d assurer un bon contr le d...

Page 26: ...contr le d air compl tement ouvert pendant environ 5 min chaque fois que vous rechargez le po le pour le ramener des temp ratures de fonctionnement appropri es La combustion secondaire ne peut avoir...

Page 27: ...air assembl s dans cette unit sont con us pour offrir un m lange pr cis d air secondaire et assurer une plus grande efficacit Tout dommage ou d t rioration de ces conduits peuvent r duire l efficacit...

Page 28: ...et un taux de combustion lev pour augmenter la temp rature du po le 3 5 4 lbs Tirez compl tement la commande d air en position HI Allumez le journal et laissez la porte l g rement ouverte pendant envi...

Page 29: ...xtr mit s de la pi ce votre bois est tremp ou fra chement coup vert N utilisez pas ce bois dans votre po le De grandes quantit s de cr osote pourraient se d poser dans votre chemin e cr ant des condit...

Page 30: ...ts nerg tiques que d autres Des rendements plus lev s et des missions plus faibles r sultent g n ralement de la combustion de bois durs s ch s l air par rapport aux r sineux ou aux feuillus trop verts...

Page 31: ...ord de chemin e m tallique V rifiez que les supports soient fix s de fa on s re aux surfaces de la paroi sur tous les c t s Assurez vous que les l ments de fixation utilis s pour maintenir le raccord...

Page 32: ...as de fissures de mortiers perdus ou d autres signes de d t rioration et de blocage Faites nettoyer la chemin e avant d installer et de faire fonctionner le po le Lors du raccordement du po le travers...

Page 33: ...nad quat causera des fuites de fum e par l appareil dans la pi ce s infiltrant par l appareil et les joints du conduit de raccordement Un br lage incontr lable ou une temp rature excessive indique un...

Page 34: ...n de nivellement ins r dans le pied 2 Une fois l appareil nivel positionnez le support et fixez le au sol l aide du mat riel appropri n cessaire pour votre rev tement de sol sp cifique 3 Installez un...

Page 35: ...lations canadiennes o le passage travers un mur ou une cloison de construction combustible est souhait l installation doit tre conforme la norme CAN CSA B365 Un conduit de fum e traversant un mur comb...

Page 36: ...SI N CESSAIRE US Stove recommande fortement que votre po le soit install par un technicien qualifi NFI US ou WETT Canada Pour trouver l installateur qualifi le plus proche acc dez https nficertified o...

Page 37: ...urce d alimentation lectrique avant de tenter l installation L ensemble sou eur est destin tre utilis uniquement avec un po le qui est marqu pour indiquer une telle utilisation Ne faites pas passer le...

Page 38: ...ion du syst me de chemin e existant ____________________________________________________________________ MISE EN SERVICE Confirmer l installation du tapis de foyer conform ment aux instructions d inst...

Page 39: ...po 785 mm US1100E pi destal 21 1 po 536 mm 22 5 po 572 mm 31 7 po 806 mm Chambre de combustion Largeur x profondeur 18 25 po X 11 5 po 464 mm X 293 mm Volume Firebox Pieds cubes 1 31 pieds cubes Ouve...

Page 40: ...S UTILISER CE PRODUIT SANS SURVEILLANCE MISE EN GARDE Veuillez lire l int gralit de ce manuel avant d installer ou d utiliser votre nouveau radiateur Le non respect des instructions peut entra ner des...

Reviews: