
© 2021 U
nited S
tat
es Sto
ve C
ompany
5
INSTALL
ATION
AVIS DE SÉ
CURITÉ
:
•
SI CE POÊLE N'E
ST P
AS INS
TALLÉ C
ORRECTEMENT
,
UN INCENDIE PEUT EN RÉSUL
TER. P
OUR
RÉDUIRE
LES
RISQ
UES
D'INCENDIE, SUIVEZ
LES
INSTR
UCTIONS D'INS
TALL
ATION.
•
CONS
ULTEZ V
OTRE DÉP
ARTEMENT MUNICIP
AL
DU B
ÂTIMENT O
U LES A
GENTS DE
S INCENDIES A
U
SU
JET DES PERMIS, RE
STRIC
TIONS ET EXIGENCES
D'INSTALL
ATION D
ANS VO
TRE RÉGION.
•
UTILISEZ DES DÉTE
CTEUR
S DE FUMÉE DANS L
A
PIÈCE O V
OTRE P
OÊLE EST INS
TALLÉ.
•
GARDEZ LES MEUBLE
S ET LES DR
APS BIEN
ÉLOIGNÉ
S DU P
OÊLE.
•
NE JAMAIS UTILISER D'E
SSENCE, DE C
ARBUR
ANT
DE LANTERNE DE
TYPE ES
SENCE, DE
KÉRO
SÈNE,
DE LIQUIDE P
OUR BRIQ
UET AU CHARB
ON OU
DE LIQUIDE
S SIMILAIRE
S PO
UR ALLUMER O
U
«RAFR
AÎCHIR»
UN FEU
DANS
CE CHA
UFFAGE.
GARDER TO
US CE
S LIQUIDE
S BIEN ÉLOIGNÉ D
U
CHAUFF
AGE PEND
ANT SON UTILIS
ATION.
•
EN CA
S D'INCENDIE DE CHEMINÉE, METTEZ LE
S
CONTR
ÔLES D'AIR EN P
OSITION FERMÉE, Q
UITTEZ
LE BÂTIMENT ET APPELEZ IMMÉDIA
TEMENT LE
SERVICE DE
S INCENDIES!
•
NE BRANCHEZ A
UCUN C
ONDUIT O
U SYS
TÈME DE
DISTRIB
UTION D'AIR.
•
UNE SO
URCE
D'AIR FR
AIS D
ANS LA
PIÈCE
OU
L'ESP
ACE CHA
UFFÉ SERA F
OURNIE EN C
AS DE
BESOIN.
•
N'INSTALLEZ P
AS CET APP
AREIL DANS UNE MAIS
ON
MOBILE, UNE MAISON MANUF
ACTURÉE, UNE
REMORQ
UE O
U UNE
TENTE (A
UCUNE
EXCEP
TION
PAR HUD NORME FÉDÉR
ALE: 2
4 CFR CH.X
X).
ATTENTION:
NE PA
S R
ACC
ORDER UN
APPAREIL
DE BR
ÛLA
GE A
U BOIS
À UN ÉVENT À GAZ EN AL
UMINIUM DE TYPE B. CE N'E
ST
PAS
SÛR
. UTILISER DE L
A MAÇONNERIE
APPRO
UVÉE
OU UNE CHEMINÉE D'APP
AREIL DE CHAUFF
AGE DE
BÂTIMENT
HOMOLOG
UÉE UL
103
HT (É.-U.).
UTILISEZ
UNE CHEMINÉE
DE 6
”DE DIAMÈTRE,
ASSEZ
ÉLEVÉE
PO
UR CRÉER UN TIRA
GE SUFFIS
ANT.
ATTENTION:
FO
URNISSEZ DE L'AIR DE C
OMBU
STION ADÉ
QUA
T À LA
PIÈCE O L'APP
AREIL EST INS
TALLÉ. L
A RESTRIC
TION
DE L'AIR DE COMB
USTION ENTR
AÎNERA UN FEU
PAR
AÎTRE QUI C
AU
SE UNE ACC
UMULATION DE S
UIE OU
DE CRÉO
SO
TE ET RÉDUIT GR
ANDEMENT L'EFFICACITÉ.
ATTENTION:
VÉRIFIEZ Q
UE L'APP
AREIL EST C
ORRECTEMENT
INSTALLÉ A
VANT DE TIRER P
OUR L
A PREMIÈRE
FOIS. CET APP
AREIL DOIT ÊTRE INSTALLÉ P
AR UN
INSTALL
ATEUR Q
UALIFIÉ P
OUR A
SSURER UNE
INSTALL
ATION C
ORRECTE ET S
ÛRE. N'UTILISEZ
JAMAIS DE C
OMPROMIS TEMP
ORAIRE
S OU DE
CHANGEMENT PENDANT L'INS
TALL
ATION.
US S
tov
e rec
ommande for
temen
t que votr
e poêle soit ins
tallé
par un technicien qualifié NFI (
US) ou WET
T (Canada
). Pour
trouv
er l’ins
talla
teur qualifié le plus pr
oche, ac
céde
z à:
http
s://
nfic
ertified.
org
; or
http
s://w
ww
.w
ettinc.
ca/
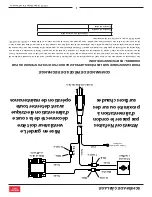
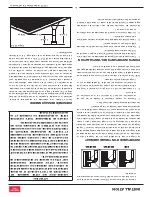
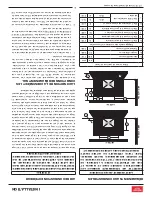
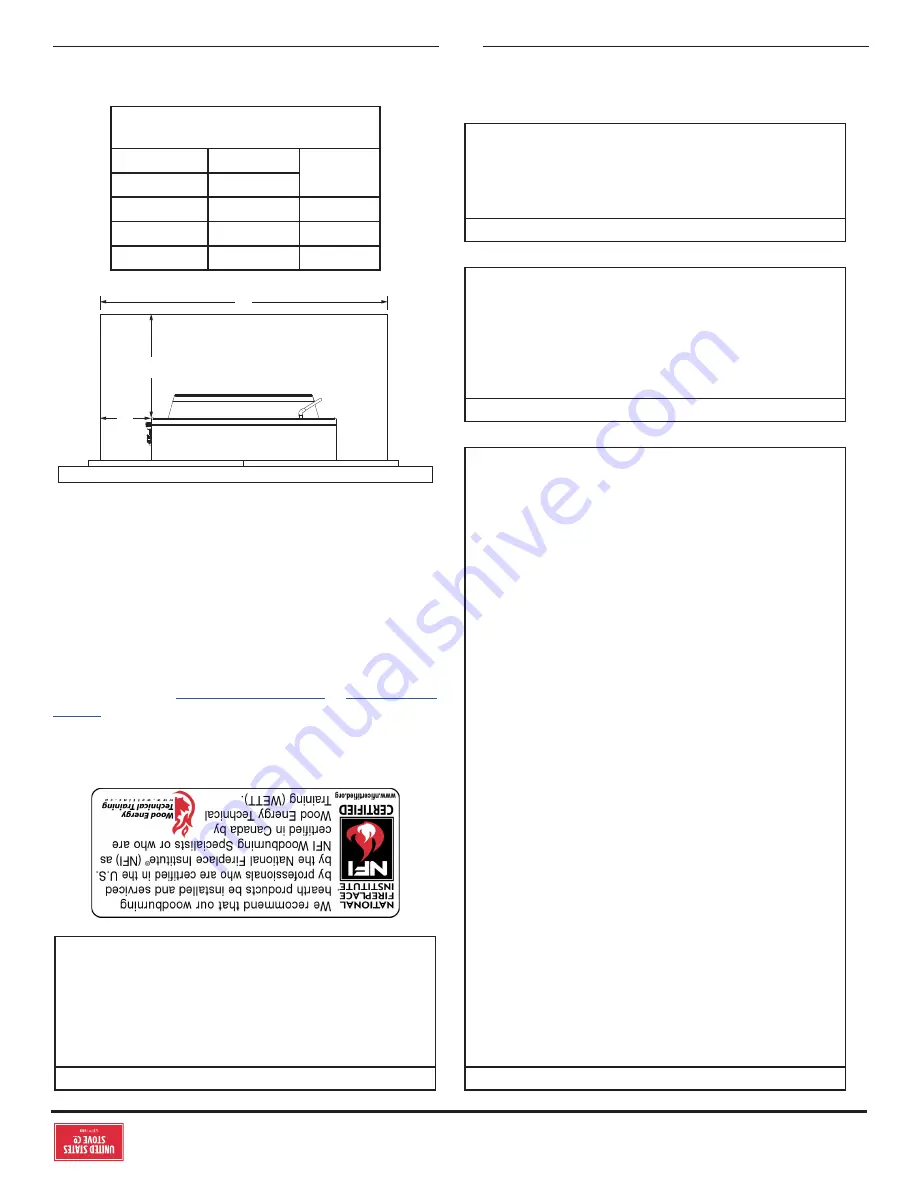
PLA
QUE DE PR
OTE
CTION D
U SOL
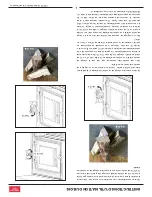
Un plancher s
olide incombus
tible, en bé
ton ou en maç
onnerie
pleine, doit s’
étendr
e de 6 ”(15
3 mm) de chaque c
ôté du c
orps
de l’appar
eil et de 17” (
432 mm
) devan
t la fac
e de l’appar
eil.
Lor
sque le r
evê
temen
t de sol c
ombustible s
e situe dans c
es
dimensions minimales, il doit êtr
e rec
ouver
t d’un pr
otec
teur
de sol homolo
gué
, avec une v
aleur R d’au moins 1,
4. V
érifiez les
codes du bâ
timent loc
aux si v
ous souhait
ez finir le r
evê
temen
t
de sol a
vec des c
arrea
ux de sol en c
éramique c
oulés.
C
B
Spécifications minimales de protection de plancher
A
PROTECTEUR DE SOL
Clé
po
mm
A
17
432
B
*6
*153
C
38 U
SA
966
42 C
AN
1067
* =
Les
installa
tions canadiennes
néces
siten
t 8 po (20
4 mm)


