
2
© 2021 U
nited S
tat
es Sto
ve C
ompany
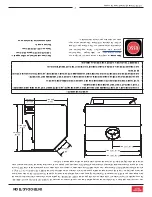
Les ins
truc
tions rela
tives à l’
installa
tion de votr
e poêle à bois son
t con
formes a
ux normes UL 1482
-2011 (R2
015) e
t ULC-
628
-93
.
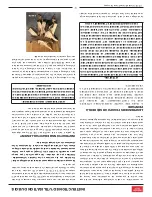
Ce manuel décrit
l’ins
talla
tion et l’
utilisation du
chauff
age a
u bois USS
C, U
S1800E. C
e poêle est c
onforme a
ux limites
d’émis
sions de
bois imposées par la U
S Envir
onmental P
rot
ection A
genc
y pour les poêles à bois vendus apr
ès le 15 mai 202
0. D
ans des conditions
de tes
t spécifiques, il a été démon
tré que c
e poêle produis
ait de la chaleur à des débits allan
t de 9 487 à 3
3 050 B
tu / h (* 1,
8 g / h
et une e
fficacit
é de 65,
5%). Remar
que: Les c
otes de B
TU mentionnées ci-
dessus s
ont ba
sées s
ur le prot
ocole de t
est de l’EP
A sur le
bois d’oeuvr
e dimensionné doublement dimensionnel No
s BTU annonc
és son
t basés s
ur la premièr
e heure de f
onctionnemen
t avec
du bois de chauff
age br
ûlant à un t
aux de c
ombustion éle
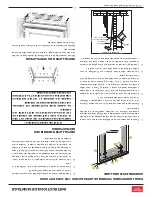
vé.pa
s êtr
e supérieur
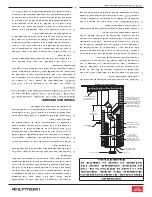
e à 5-8 cm.
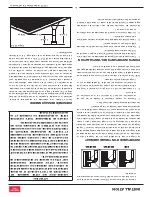
27-1/8” (691 mm)
26-1/2” (673 mm)
13-1/4
” (337 mm)
6.1”
(155 mm)
21-3/4”
(553 mm)
22-3/8”
(568 mm)
15-1/2”
(394 mm)
4-11/16”
(119 mm)
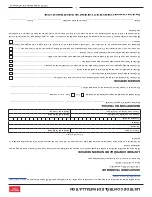
AVER
TISSEMENT
S:
•
CHAUD D
URANT LE F
ONCTIONNEMENT
. MAINTENEZ LES ENF
ANTS, LE
S VÊTEMENTS ET LE MOBILIER ÉL
OIGNÉS.
TO
UT CONT
ACT PEUT ENTR
AÎNER DES BR
ÛLURE
S.
•
N’UTILISEZ PAS DE PR
ODUIT
S CHIMIQUE
S NI DE FLUIDE
S PO
UR DÉMARRER LE FEU.
•
NE LAIS
SEZ PAS LE P
OÊLE SANS S
URVEILL
ANCE LOR
SQ
UE LA P
ORTE E
ST LÉ
GÈREMENT OU
VERTE.
•
NE BRÛLEZ P
AS DE DÉ
CHETS NI DE FL
UIDES INFL
AMMABLES TEL
S QUE L
’ESSENCE, LE NAP
THA OU L
’HUILE PO
UR
MOTEUR
.
•
NE CONNE
CTEZ P
AS LE P
OÊLE À UN COND
UIT OU CIR
CUIT DE DIS
TRIBUTION D
’AIR
.
•
FERMEZ TO
UJO
URS L
A POR
TE APRÈS L
’ALL
UMAGE.
INTROD
UCTION
Pour le s
ervic
e client, v
euillez appeler
:
1-800
-75
0-2
723 po
ste 5
050 ou;
Tex
te a
u 423
-301-
562
4 ou;
Écriv
ez-nous à:
cus
tomer
ser
vice@us
sto
ve.
com
Remar
que:
enregis
trez v
otr
e produit en ligne s
ur
ww
w.u
ssto
ve.c
om
ou téléchar
gez l’
application
grat
uite dès a
ujourd’
hui. Cet
te applic
ation es
t
disponible uniquement s
ur l’App S
tor
e pour iPhone
et iP
ad. Recher
cher US S
tov
e. C
onser
vez v
otr
e reç
u
avec v
os do
ssier
s pour tout
e réclama
tion.


